When to plant heirloom onions in Siberia. Family onions best varieties
Many people do not plant heirloom onions. The reason is that small bulbs grow. But if you know the agricultural technology of family onions, then you can grow bulbs of 150g or more.
Bulb onions a widespread vegetable crop of the onion family. Onions can be small-germ (1-2), medium-germ (2-3) and multi-germ (4-5 or more).
In common parlance, multiple bows are called family bows. Seven I - many.
Largest heirloom onion bulb
Shallots should also be included here. This is a variety of multi-bud bulb, but with a smaller bulb and tender leaves. I immediately notice that it’s not feathers, but leaves. Birds have feathers, but plants only have leaves.
Due to its exquisite taste, shallots are considered a gourmet onion. These bows are often confused and called “who knows what”. Therefore, for convenience, we will call all these bows family.
Dates for planting heirloom onions
Onions are a cold-resistant plant. Its root system grows intensively at a lower temperature than the leaves. This biological feature makes it possible to plant at an earlier date.
The root system of onions develops at temperatures from + 2° to + 25°C, and tolerates frosts down to minus 4-6°C. The onion leaf grows well at temperatures of +15-25°C, withstands frosts down to minus 7°C and tolerates heat of +35°C.
If you delay planting and the air and soil temperatures are high, leaves will immediately begin to grow. The root system will no longer be as powerful and this will affect the results.
If there is enough moisture in the soil during the growth of leaves, the plant is in no hurry to form a storage organ. It continues to increase the number of leaves and their size, thereby creating the basis for the formation of a larger and larger bulb. The more powerful leaves the plant has, the larger the bulb will be (taking into account varietal characteristics).
If there is a lack of moisture during the growing season, plant growth stops, and the bulbs begin to form at the stage in which they were caught in the drought.
For normal onion growth, a water regime with low air humidity (60-70%) and high soil moisture is required. This crop places especially high demands on water during the first period of growth, when the process of swelling and germination of planting material occurs, the leaf apparatus increases in volume, and the bulb begins to form. During the growth period, additional watering is required.
Heirloom onions often reproduce vegetatively. Since several bulbs grow in the nest, some are left for planting. The rest go to food. And so every year.
Is it possible to plant heirloom onions before winter?
Family onion is a fully grown and sexually mature plant, despite the size of the bulb. Onions planted before winter shoot, even small ones. Onions can partially shoot when planted very early in a cold, protracted spring. But this happens extremely rarely.
The Siberian Research Institute of Plant Growing and Selection (SibNIIRS) has developed varieties that can be planted before winter. Among the varieties recommended for winter planting are: Siberian Yellow, SIR-7, Ryzhik, Sophocles, Seryozhka, Krepysh, Albik, Garant and a number of new Siberian hybrids. But these are not multi-bud onions, but shallots.
Agricultural technology of family onions, features
To understand agricultural technology, you need to understand the structure of the bulb.
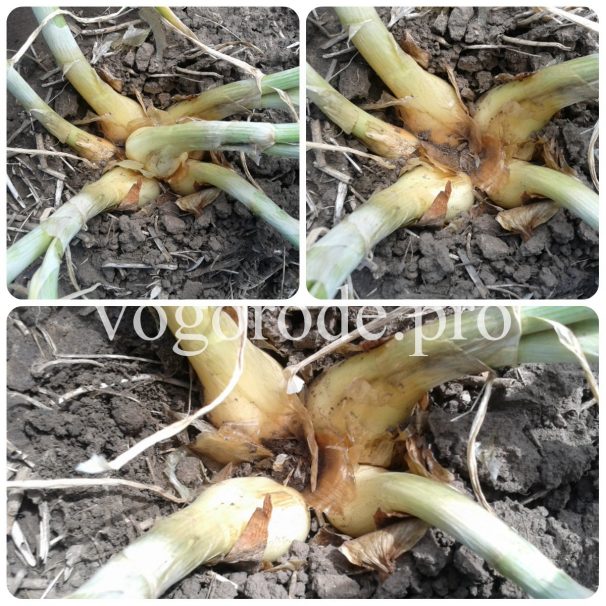
 At the bottom of family onions there is a heel - the place where the daughter bulbs are attached to the bottom of the mother bulb.
  If you cut the heel, you will see the location of the roots, in the form of a horseshoe. On the transverse section the rudiments are visible.
 Usually, for planting, I use a bulb weighing about 100g. If you plant a whole onion, all the buds will germinate and >8 small onions will grow. The quantity depends on the variety. The larger the planting bulb, the more new bulbs are formed, but small ones.
How to grow large family onions?
To grow large heirloom onion, it must be prepared for planting. First of all, it must be cleaned from dry scales to juicy ones. Various pathogens are often hidden under dry scales. Then the bulbs are pickled in a solution of copper sulfate -1 tbsp. spoon for 10 liters of water. Pickling time 20 min. The pickled onions are rinsed with clean water.
During storage, the onion dries out slightly and loses its nutritional value. substances. To restore the supply of moisture and nutrients, onions need to be soaked in nutrient solutions of any complex fertilizers.
To do this, you need to trim the heel to pure white scales. There is no need to be afraid that you will cut off too much. The rudiments themselves are deep. Even if you damage one or two, there are many of them in the bulb. If two of the six rudiments are damaged, the remaining four will produce a decent harvest. Damaged buds do not grow. But it’s better not to injure too much, just cut off the heel to the bottom. Removing dry scales and trimming the heel of the bottom facilitates the access of moisture, primarily to the roots, therefore, first of all, a powerful root system develops, ensuring strong plant growth.
I try to do without chemicals and use Gumistar or Biohumus for soaking onions - 1 tablespoon per 10 liters of water. Soaking time 8-10 hours.
Then I place the onion in a bucket, close it with a lid and place it in any unheated room until the roots grow (3 - 5mm).
How to cut heirloom onions before planting?
Now you need to cut it in half. Onions are cut not to increase the number of planting units, but to obtain larger bulbs in the harvest. Each half will contain fewer buds than were in the whole bulb. Each half will produce 3-4 marketable bulbs. The feeding area will remain the same and fewer bulbs will receive more nutrition.
 Cut the onion into halves, trying to leave approximately the same number of roots on them.
 In other words, after cutting off the heel, turn the onion 90° and cut in the center "horseshoe" roots. I do not process the cuts with anything. They dry out a little on their own..
Cut the whole onion
 We cut the family onion. The onions are ready to plant.
 Preparing the soil for planting heirloom onions
After harvesting the potatoes, I sow winter rye.
 Throughout the next season it grows to full ripeness, and then leaves before winter.
 I don't do anything in this area.
This is what the field looks like in the spring before planting.
Planting heirloom onions
The first time I come to the dacha is at the very end of April or at the beginning of May. I’m trying to plant onions as quickly as possible, at least before May 5th.
According to the popular calendar, this is Luke's day - Luke's day. So I plant onions up to Luka. Sometimes April is warm and (if possible) I plant earlier. How the soil ripens.
If you measure the soil temperature, then the most suitable is +5°C. You can do without a thermometer, I just check when the soil stops being smudged and you can plant.
I have permanent beds 0.9 m wide. Passages 0.5m.
In the spring, I rake the straw into the passages and lightly loosen the top layer of the bed with a Strizh cultivator.
 Then I make furrows 3-5cm deep with a furrow at a distance of 20cm from each other -15cm-20cm-20cm-20cm-15cm. I water the grooves with water from a watering can without a strainer.
 I sprinkle the moistened grooves with a mixture of ash and Zemlina (the same diazinon) against onion flies, 1 liter of ash + 1 packet of Zemlina is enough for 4 grooves 10 m long.
I place the onion halves in the grooves at a distance of 23 cm in a checkerboard pattern. It turns out to fit into equilateral triangles with a side of 23 cm.
I rakes the planted onions on both sides, like potatoes.
It is warm and humid under these dunes. Luke likes it.
The longer the day and the higher the temperature during growth, the more scales are closed, the better the onion will be stored in the future, the deeper and longer its dormant period.
Caring for family onions
Until the leaf grows to 10cm, I don’t do anything. I don't even water it. Let the roots go deep in search of moisture. I don't do any fertilizing. I don't spray anything. I didn’t notice any illnesses.
 Onions grow very quickly and it’s time to mulch the beds. To mulch an onion bed, you need to chop up a decent amount of organic matter.
 Mulched beds retain moisture better and onions grow well. I mulch to the height of the hilled rows (about 5cm - 10cm) with mowed weeds, immediately after chopping them, without drying them out. When dry, the mulch covers the bed with a dense, porous layer.
I water the onions once a week. The garden bed takes 200 liters of water. From the beginning of July I stop watering.
At the end of June, the bulbs begin to separate and the number of bulbs in the nest can be counted. The optimal quantity is 3-5 pcs.
 If the quantity exceeds 5 pieces, then you can normalize - remove excess bulbs.
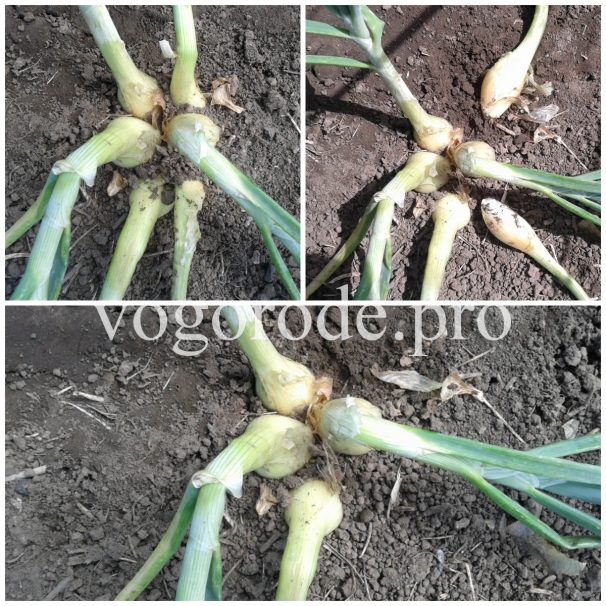 The remaining bulbs will grow larger.
When to rake the family onions?- at the beginning of July. You can simply push the soil away in a circular manner with your finger. The onion will be all in sight. In the sun the bulb will ripen faster.
Harvesting family onions
 End of July. The onion is ready for harvest.
 “It should be noted that you should not delay harvesting onions after lodging of the leaves, as this leads to increased losses during winter storage.
This is explained by the fact that the bulbs remaining in the ground absorb moisture from the soil, which activates growth processes and shortens the dormant period.”
I pull out the onion when the dew dries. He lies in the beds all day. In the evening I clean out the attic. There the harvested onions are ripened and dried. After drying, I wash the leaves by hand. I don't use scissors.
Even if it is damp and cold during harvesting, the family onions ripen well and dry under the roof. It is not in danger of secondary germination. He has a long period of rest, which was confirmed by the past, far from hot summer.
After the onions, I sow peas and oat mixture throughout the entire plot. Green manure from this mixture goes away before winter. In the spring I plant potatoes, right on the straw.
I take the dried onions home, along with the entire harvest.
 This is how onions are stored for food. Onions for planting, of different fractions, are stored in separate boxes.
 In the kitchen, the temperature is sometimes quite high, but onions are stored well. The onion storage temperature for planting is +19 +22 degrees, otherwise the onion will go to the shooter.
Or as Europeans call it Shallot, is a type of onion. The plant was named because of its ability to grow in families; not just one grows, but forms several bulbs at once. Although they are small in size, shallots are loved by many gardeners. Planting family onions before winter is not a difficult task; the main thing is to choose high-quality planting material, follow the terms and rules of planting.
Is it possible to plant family onions before winter?
In regions with short and rainy summers, most onion varieties do not have time to ripen in time. Therefore, to grow onions for feathers and turnips, family onions are suitable, which can be planted before winter.
Planting before winter allows you to get early feathers and increase productivity. This is due to the fact that when the snow melts, the onion accumulates moisture and distributes nutrients throughout the plant. Due to the increase in each head, the yield increases by 25%.
Family onions are early ripening varieties. The ripening period is 60 days. But before it begins to grow, the plant hibernates for a long time.
When to plant heirloom onions before winter
Family onions are planted in the fall, 1.5 months before the onset of stable frosts. In order for the seed to feel comfortable, the daytime temperature should be 0 - +5 degrees, the night temperature can drop to -3 degrees.
At these temperatures, the soil remains warm and the onions will have time to take root before the snow falls.
Important! Family onions are cold-resistant only if they have a strong, developed root system.
How to plant family onions before winter
Before planting shallots before winter, you need to select and prepare planting material and prepare the soil for planting.
Before winter you can plant seeds and sets. Seeds must not be expired. With proper planting, seedlings appear in mid-autumn, quickly take root and winter well even in regions with an unstable climate.
To get a large and healthy harvest, the choice of seedlings must be taken with full responsibility:
- large bulbs (5-7 cm in diameter) shoot arrows in the spring, form numerous families of small heads - the crop ripens with low commercial quality;
- bulbs 2 cm in diameter are ideal for planting before winter - with proper care, the plant will produce about 10 large juicy heads.
Planting material must be well dried, healthy, without damage or rot.
Not all varieties of heirloom onions are suitable for planting before winter. Most suitable:
- Sprint is a variety with early ripening and a sharp taste. The plant produces up to 9 bulbs weighing 35 g. Sprint is one of the best varieties for early harvest.
- Catkin – the plant forms 7 large heads with a very pungent taste.
- Garant is a mid-season variety. During the growth process, onions produce a lot of greenery, up to 200 g per bush. Productivity is high, up to 11 large flat heads of bright yellow color.
- Ural purple– mid-season variety. The rhombic bulb is large, the scales are colored red-violet. Ripening – 90%, shelf life – up to six months.
- Krepysh is a medium-late variety, ripening occurs 70 days after rooting. The oval bulb is large, weighing up to 50 g. The variety is frost-resistant and can grow in all regions of Russia.
Soil preparation
To grow a rich harvest, heirloom onions are planted in an open, sunny place. A month before sowing, the soil is dug up and fertilizers are applied. Per sq. m add 6 kg of humus and 80 g of double superphosphate. Wood ash is used as phosphorus-potassium fertilizer.
Important! Before planting, check the acidity of the soil. If it is high, then add lime.
For better rooting, it is necessary to carry out regular watering: from the moment of planting until the first snow falls. A large amount of water will allow the plant to accumulate moisture for the winter and quickly grow roots.
Preparation of planting material
Preparing the seedlings for planting begins with drying them. This process consists of 2 stages:
- The planting material is kept for 2-3 weeks at a temperature of +20 degrees;
- then the sets are heated for 9 hours at a temperature of +30 degrees.
To prevent diseases from occurring, the seeds are soaked in a weak solution of potassium permanganate (3 g per 10 liters of water). For better rooting, they are treated with a growth stimulator or kept in water at a temperature of +50 degrees. After 15 minutes, it is removed and immersed in cold water for 10 minutes.

Planting by seeds
Landing rules:
- Before sowing, the seeds are soaked in water with a growth stimulator solution.
- Seeds are sown in dug up beds in rows, with an interval of 20 cm from each other, to a depth of 1 cm.
- After sowing, the soil is compacted, watered and mulched.
When sowing seeds in the second half of August, the first shoots will appear in mid-September. At this time, the seeds form a set, which takes root, builds up the root system, which gives high winter hardiness and a good harvest in mid-July.
Advice! Deformed heads grow from buried seeds.
To obtain a large harvest, it is necessary to observe the interval between plantings and adhere to simple rules of care.

Planting seedlings
Technique:
- Before planting, the seedlings are disinfected and treated with a growth stimulator. Thanks to this, family onions will be less susceptible to diseases, and germination will occur 2 weeks earlier.
- Family onions need to be planted in rows, at a distance of 25 cm and deepened by 3-4 cm. It must be remembered that family onions form up to 11 heads, so thickened planting affects the yield.
- After planting, the ridges are watered and mulched. Mulch will provide additional nutrition, retain moisture and prevent weeds from growing. Straw, dry leaves or humus are used as mulch.
- With the arrival of spring, the mulch is removed. This must be done so that the seedlings do not wither and the earth begins to warm up under the rays of the spring sun. You should not be afraid of spring frosts, since the bulb will grow a root system over the winter and will be able to withstand a slight drop in temperature well.
In the Northern regions, with the arrival of the first snow, they protect against freezing (the beds are covered with snow). To form a snow cap, you can make a canopy of shields that will trap snow on the bed, as a result of which the crops will not be able to freeze.

Care after landing
Caring for family onions is simple. The main thing is to follow the necessary recommendations in time:
- In spring, winter mulch is removed.
- Watering is carried out as the soil dries, per square meter. m – 2 buckets of water.
- After germination, new mulch of straw or sawdust is laid.
- Loosening is neat, to a shallow depth.
- If the onion is grown for the head, the feather is not cut off.
- To obtain large bulbs, thinning is necessary. It is carried out several times per season, ultimately leaving 3-5 bulbs.
- Watering is stopped 14 days before harvest.
- When the feathers turn yellow and lodge, harvesting is carried out.
- The harvested crops are dried, the feather is cut 3 cm from the bulb.
- Store in a dry, ventilated area.

Conclusion
Planting heirloom onions before winter has a number of advantages: early, high yield, minimal labor costs, fresh greens at the beginning of summer. Despite the small size of the head, shallots are very popular throughout Russia.
To grow a decent harvest of shallots, you need to choose a suitable variety that can grow in the conditions of your region, as well as properly prepare planting material and follow the conditions of agricultural technology.
Shallots (or Ashkelon onions) are a type of onion, which is distinguished by smaller bulbs (20-50 g), as well as good early maturity and keeping quality.
This type of onion is also called family onion, or kushevka. The thing is that the bulbs form entire nests underground.
The bulbs and tender green feathers of shallots can be eaten all year round. And in some countries, a special rejuvenating tea is even prepared from its husk. How to grow such a popular onion yourself? Let's start by choosing the right varieties.
Shallots: varietal diversity
The range of planting material for family onions is quite diverse. Shallot varieties are especially popular Pomegranate, Fun, Lyra,Olvia, Surprise.
| Pomegranate | |
|
|
An early ripening variety of shallots. It is characterized by high resistance to yellowing of leaves and a long lifespan of green feathers. The growing season is 80-90 days, the mass of the bulbs is 20-40 g. |

| Fun | |
|
|
Early ripening universal variety. The bulbs are elongated and have a pungent taste. Growing season - 70-73 days, bulb weight - 23-26 g. |

| Lyra | |
|
|
An early ripening variety of shallots for universal use. The bulbs are elliptical in shape. The peculiarity of the variety is the simultaneous growth of green “arrows” and bulbs. Growing season - 72-74 days, bulb weight - 40-50 g. Taste - spicy. |

| Olvia | |
|
|
An early ripening variety of shallots. The bulbs are elliptical in shape and produce a lot of greenery. The growing season is 76-78 days, the mass of the bulbs is 20-26 g. It has good keeping quality. |

| Surprise | |
|
|
An early ripening variety, intended primarily for forcing onions. Gives an excellent harvest of greenery, bulbs with juicy white scales. The growing season is 68-70 days, the weight of the bulbs is 20-26 g. The taste is spicy. |

Shallots - cultivation and care
The technology for growing shallots is practically no different from the agricultural technology of its onion “brother”, but it also has its own characteristics. This culture is quite capricious, varieties of “northern” selection may not have enough daylight hours, bolting is often difficult, and flowering is difficult to achieve. Therefore, all growing recommendations must be followed very carefully.
Soil and planting site
Shallots need fertile soil with a neutral reaction. On acidic, heavy, damp soils the plant will not feel well. It also does not like waterlogged soil. Sparse soil in the fall (before digging) should be fertilized with rotted manure or compost at the rate of 3-4 kg per 1 sq.m. The bed reserved for planting shallots should be well lit.
Planting shallots
To obtain bulbs shallot planting material (small bulbs with a diameter of 2-4 cm), can be planted in early spring: in March-April. The holes should be made 5-6 cm deep and the bulbs should be placed according to a 20x10 cm pattern. When planting, they should not be pressed or screwed into the ground: their tops should be slightly visible from the holes.

To receive a feather Larger bulbs should be planted. This is done in the fall (October) so that the plants have time to take root before the onset of frost. Bulbs that have managed to sprout roots tolerate winter well even in northern regions and begin to grow green mass in early spring.

Shallot care
Caring for shallots involves periodic watering, loosening the soil and removing weeds. Typically, during the growing season during hot and dry periods, it is enough to water the onions 3-4 times. After this, the soil must be loosened so that a crust does not form on its surface.
Feeding shallots
In one season, family onions are fed 2 times. First feeding carried out in the spring, after the plants grow 3 leaves. For these purposes, you can use an infusion of weeds, diluted with water in a ratio of 1:3, urea or urea (1 tablespoon per 10 liters of water), to which ½ spoon of potassium fertilizer is added.
Second feeding necessary when the plants have 5 leaves. Since onions especially need phosphorus and potassium at this time, potassium monophosphate (1 tsp per 10 liters of water) is suitable as a fertilizer. If the weather is too wet, fertilizer can simply be scattered between the rows and incorporated into the soil.
Onion harvesting and storage
Shallots are harvested in dry sunny weather, when 50-70% of their green mass has fallen. The bulbs should be dug up along with the leaves, and then dried well in the sun for 2 weeks.

To send the bulbs for storage, you need to cut off the dry leaves, leaving only a thin neck 3-5 cm high. By this time, the onion should be ripe and dry. It should be stored in small wooden boxes or cardboard boxes in a dry place at a temperature of 0-3°C or at room temperature. At higher temperatures, the quality of shallots decreases and their taste deteriorates. There is no need to divide the nests into separate bulbs.
Shallots from seeds
Reproducing onions from seeds is quite difficult - this requires serious preparatory work. But if you have good selection skills, it’s still worth a try.
Preparing the bed
Shallots are sown in the spring, but the soil is prepared in advance - in the fall. To do this, the land is cleared of weeds, dug up and fertilized with organic and mineral fertilizers. Humus or compost is suitable, which is added at the rate of 5 kg per 1 sq.m., as well as superphosphate - 70 g per 1 sq.m. After fertilizing, you need to form beds and leave them until spring. Before sowing, the soil needs to be loosened a little.
Seed preparation
In order for heirloom onion seeds to germinate better, they should be germinated: wrapped in gauze or a cloth, placed in a container of water and kept for 2 days at a temperature of 22-25°C. Every 6-8 hours, the seed must be washed under running water, and then immersed again in a container with clean water. Before planting, the onion seeds need to be air-dried a little.

Sowing shallots
Shallot seeds are sown in late April - early May in beds prepared in the fall and covered with soil. The seeds are sown in furrows about 3 cm deep. It is advisable to cover them on top with a layer of peat or rotted compost. At first, the beds with shallots should be watered frequently.
Harvesting
In 20-25 days it will be possible to harvest the first harvest of greenery. In the first year, the seeds produce a medium-sized bulb, which, after drying, breaks up into 5-6 small ones. The next year, these bulbs are planted again in the garden to obtain larger nests of shallots. These bulbs will be suitable for such propagation for 5 years. After this, the planting material must be updated.
Selection in dacha conditions
One of the main problems that gardeners face when growing shallots is that many of their varieties degenerate due to various diseases. For example, for several years in a row, onions gave an excellent harvest, after which they began to “refuse” to grow. What to do? You can try to improve (or at least simply maintain) the varietal qualities of a certain variety.

Onion selection is based on its biological characteristics. You can try to breed your own variety from seeds, but this is very difficult. But there is another option. From each shallot bulb planted, several new ones are obtained, combined into a nest. If you take a good look at the bulbs from the same nest, you will notice how different they are in shape, size and color intensity. Most often, changes in offspring occur under the influence of external environmental factors and are not inherited. But there can also be mutations. Therefore, when selecting material for propagation, you need to carry out 2 inspections of the planting material:
Stage 1 - arrange the bulbs of different nests in a row, inspect them, and then remove the nests with diseased, damaged or ugly specimens.
Stage 2 - select the best nests from the remaining ones and select one medium uterine bulb from them for future offspring (sometimes all the bulbs from the nest may be suitable for propagation).
Please note that good onion growth and development largely depend on the weight of the selected bulb. Try to select planting material of the same size.
Until spring, the selected bulbs should be stored in boxes in a dry place with good ventilation. In this case, the planting material must be periodically checked and rotten bulbs removed.
In early spring, the selected bulbs must be sorted out again and planted in the ground as soon as possible. The “family” is not afraid of returning spring frosts. This is how a simple summer resident can become a breeder and develop his own shallot variety.
Shallot diseases
The most dangerous onion disease is neck rot (gray rot). If you store the bulbs in a damp room, there is a high probability that the crop will become infected with neck rot. The disease can appear even when onions are ripening in open ground. But if you store onions in a dry room, the affected bulbs will dry out, preventing the disease from spreading to the rest of the crop. In humid air, infected specimens will become soft and watery.
Prevention of gray rot involves following agricultural practices that allow for timely ripening of the bulbs.
- It is advisable to plant shallots in their original place no earlier than after 3-4 years.
- Early planting should be done in moderately moist soils.
- The area allocated for planting onions should be well ventilated.
- It is worth observing the measure when fertilizing with nitrogen fertilizers.
- Watering should be stopped 3-4 weeks before harvesting.
Shallots are a very valuable vegetable, because they are not only healthy, but also produce a generous harvest of bulbs and herbs. Therefore, be sure to plant it on your site - you won’t go wrong!
Onion (from the Latin Állium) belongs to a genus of biennial and perennial herbaceous plants from the subfamily Allium, or Alliaceae, and the family Amaryllidaceae, or Amaryllidaceae. Planting heirloom onions in the spring allows gardeners to get a rich harvest of a very tasty and valuable green crop.
The best varieties
Family onion (Alliumascalonicum) is the popular name for shallots, or Ashkelon onions. Young leaves are eaten and should be cut several times during the growing season. The small onions, which have a distinctive taste, are also edible. Currently, several varieties of this perennial herbaceous plant are known.

The best varieties of heirloom onions are not only unpretentious, but also capable of producing a high yield.
| Variety name | Ripening time | Productivity | Description of the bulb | Number of bulbs in the nest |
| "Ayrat" | Mid-season | 1.6 kg/sq. m | Round shape, semi-sharp taste | 5−6 pieces |
| "Albik" | Mid-season | 13−25 t/ha | Transverse-eleptic, semi-sharp taste | 3−8 pieces |
| "Afonya" | Mid-season | 2.0 kg/sq. m | Broadly ovate, red | 4−5 pieces |
| "Guarantee" | Mid-season | 4.1−24.6 t/ha | Round-flat, light brown in color | 4−10 pieces |
| "Miner" | Mid-season | 1.6 kg/sq. m | Round, yellowish in color, semi-sharp taste | 5−7 pieces |
| "Emerald" | Early ripening | 1.2−1.4 kg/m | Round shape, brown with a pinkish tint | 3−4 pieces |
| "Cascade" | Early ripening | 17.4 t/ha | Widely ovoid in shape with a pinkish color | 5−6 pieces |
| "Family" | Early ripening | 1.2−1.4 kg/m | Round in shape, yellow-brown in color with a purple tint | 3−4 pieces |
| "Snowball" | Early ripening | 1.9 kg/sq. m | Egg-shaped, pungent taste, juicy | 3−4 pieces |
| "Sprint" | Early ripening | 350−500 c/ha | Round, attractive bulb, yellowish in color, semi-sharp taste | 4−10 pieces |
| "Strong" | Mid-late | 2.7−21.4 t/ha | Oval, leveled shape, with a pinkish surface color | 4−7 pieces |
| "Siberian Amber" | Mid-late | 20.3 t/ha | Round-flat shape, with an attractive bronze surface finish | 6−7 pieces |
| "Ural purple" | Mid-late | up to 164 c/ha | Flattened in shape, with a reddish-purple surface and a semi-sharp taste | 4−7 pieces |
Pre-planting treatment
To obtain a full-fledged and high-quality harvest that is subject to long-term storage, it is necessary to carefully inspect the bulbs suitable for planting before planting. It is necessary to reject seed material that has traces of disease or pest damage. Bulbs that have severe mechanical damage are also unsuitable for planting.
Seed bulbs selected for planting should be disinfected with special fungicidal preparations or soaked for several minutes in a weak pink solution of potassium permanganate. After disinfection, it is recommended to separate the planting material into large and medium, as well as small fractions. This treatment helps protect plantings from diseases and pests.
How to plant shallots (video)
Where and how to plant
Shallots can be planted and grown by sowing seeds, but most often in home gardening, planting with bulbs is used. Planting dates vary depending on soil and climatic conditions in the cultivation region. Planting is allowed both in spring and in autumn, each of them has its own characteristics:
- spring planting more preferable, due to the high level of photophilia. In conditions of long daylight hours, as a rule, the most complete bulbs are formed with the possibility of long-term storage. In addition, in spring the soil retains a sufficient amount of moisture necessary for the successful growth and development of garden crops. To obtain marketable bulbs, it is recommended to plant in late April–early May. In order to obtain a large amount of greenery, it is recommended to plant from mid-May;
- autumn planting before winter involves the implementation of activities from the second decade of the first autumn month. For this purpose, it is necessary to select an area characterized by the presence of sufficient snow cover in winter. This type of planting is especially relevant if it is impossible to preserve planting material until spring. In addition, the advantages of autumn planting include earlier harvesting of both bulbs and greens.

When choosing the timing of planting, you should evaluate all the pros and cons; in addition, you need to take into account the fertility of the soil and choose the right area, which should have good lighting and no stagnant moisture. It is necessary to plant the bulbs at a distance of at least 10−12 cm, with sufficient depth, leaving a distance of 20−25 cm between the rows. The standard depth for planting shallots in the spring is approximately 5−8 cm. When planting in winter, the bulb needs to be deepened by 8−10 cm, counting from the bottom. It is advisable to mulch ridges with onions with peat.

Benefits of growing
The main advantages of family onions are represented by the following characteristics:
- relatively short growing season;
- the ability to form marketable bulbs during the dry period;
- simultaneous lodging of tops and the possibility of immediate harvesting;
- low risk of bulb damage by diseases such as neck rot and downy mildew;
- possibility of long-term storage of crops;
- high quality indicators of driven greens.
The total mass of each nest is quite large, which has a beneficial effect on the overall yield of the bulbs.

Further care
Growing shallots for both greens and turnips is in many ways similar to the technology for cultivating onions, but there are some nuances that are very important to consider if you need to get a high and high-quality harvest:
- during active growing season, the crop requires regular watering, approximately once every five days, at the rate of 10 liters per square meter of planting;
- shallots will need one feeding in mid-June with a solution of manure infusion diluted in a ratio of 1:10 or bird droppings in a ratio of 1:15;
- We should not forget about the systematic removal of weeds and periodic loosening of the soil between the rows;
- Among the diseases for onions, the greatest danger is cervical, gray and white rot, as well as fusarium, downy mildew, rust, mosaic and tracheomycosis;
- To prevent damage from diseases and pests, it is necessary to control the density of plantings, follow agricultural practices and promptly remove specimens with symptoms of diseases.
How to prepare onions for planting (video)
When growing shallots, you should remember the pattern according to which the more bulbs are formed in a nest, the smaller their size will be, therefore experienced vegetable growers recommend rationing the number of bulbs in each nest.