The simplest veranda at the dacha with your own hands. How to build a wooden veranda - step-by-step construction
Having a beautiful veranda at your dacha makes it even more attractive and cozy. This room will be an excellent place to meet guests or have tea at home. We’ll talk further about how to build a summer veranda and options for its design.
Summer veranda - location features
Almost any veranda is an extension and is never built as a separate building. Most often, verandas are attached to the main building, in our case, to the dacha. In most cases, the veranda is located near the facade or end area with the entrance door. In the latter option, the entrance to the house involves walking along the veranda.
There are two main types of verandas:
- summer or open buildings;
- winter - closed.
Summer verandas photo:
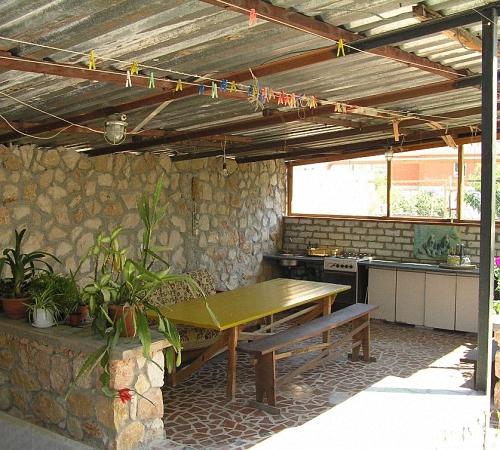
The summer veranda has incomplete walls that occupy a certain part of it; in addition, it has no windows, and the structure consists of a frame.
While the closed version is distinguished by the presence of a large number of glazed windows, making the room very light and spacious.
In the process of designing a veranda, one should take into account its harmony with the appearance of the building itself. If the cottage is made of wood, then the veranda should also be wooden. The size of the veranda is of great importance; for a small and compact dacha it is necessary to equip the same veranda; a large one - in this case it will look out of place.
It is possible to combine a porch and a place for spending free time on the open veranda. With the presence of wooden railings and a large number of plants, the room will become more comfortable and attractive.
Enclosed verandas are used as hallways if they are installed in front of the front door or dining room, if installed in another place.
Verandas, in most cases, are used only in the warm season, and in winter they are not heated, since due to the large number of windows, they require a lot of energy for heating.

Initial stage: drafting a summer veranda
Any extension that is being built on the territory of a private house or cottage must be documented. Since during their sale or execution of certain documents, you will have to get by with a fine if there are uncertified extensions.
The first stage of constructing a veranda involves contacting design organizations to calculate the veranda and design it. After all the calculations have been carried out, taking into account the individual requirements of the consumer and the peculiarities of the structure, the organization issues a certified project.
Taking with you your passport, project and application for the desire to build an extension, you should contact certain authorities that will coordinate and approve the construction.
At the end of the construction process, the building registration will need to be updated.
In addition to collecting the necessary documentation, the initial stage involves the purchase and preparation of materials for construction. The most important principle in this matter is the correspondence of the material from which the house is made to the materials for constructing the veranda.

Do-it-yourself summer veranda: manufacturing features
A fairly simple option for constructing a summer veranda is a frame-type structure. When arranging its foundation, roof, walls, you will not need to spend a lot of money, and the result will please everyone.
When the drawings are ready and the materials have been purchased, you should proceed to the main stage of the work - construction. The first stage is the construction of the foundation for the veranda.
To do this, you will need to make markings, prepare the surface, having previously cleared it of debris and dirt. Next, the top layer of soil is removed and a foundation is built. For such a structure, it is possible to construct a shallow strip foundation. It will require a lot of time and material resources. An alternative to such a foundation is a columnar one. One or two days are enough for its construction.
Instructions for constructing a columnar foundation for a veranda:
- digging holes located in the corners of the building when constructing a large veranda, it is possible to dig additional holes;
- the depth of the wells must be more than one meter;
- installation of a gravel-sand cushion is the next stage, protecting the columns from soil shrinkage;
- waterproofing work using bitumen will improve the quality characteristics of the foundation;
- arrangement of a concrete base fifteen centimeters thick;
- erection of pillars from any of the above materials.

The height of the pillars and the depth of the foundation depend on the height of the floor itself in the house. The roof of the constructed veranda must fit under the roof of the main house, therefore, when arranging the foundation, you should take into account the fact that the floor in the veranda must be lower than the usual floor in the house, at least 25 cm.
The next stage requires creating a frame that is strong and stable. It is on this that all wall components will be attached. The technology for manufacturing the frame depends on the material for constructing the veranda and the previously prepared drawing.
Let's consider the arrangement of a veranda made of timber. To build such a frame, you will need to perform piping for the lower and upper purposes. It is made from logs with a diameter of 13 cm or beams with a cross-section of 80x80 or 100x100 mm. It is preferable to choose a connection called a straight lock.
The frame of the veranda should be built starting from the corners, and then moving to the central boards. When arranging the lower double trim, the logs are inserted at the distance of the second log. Next, the racks are installed, secured with metal brackets.
The upper part involves the equipment of the second trim and installation of the rafters. The upper sections of which are connected to beams installed on the roof. To connect horizontal parts, it is better to use bolts.

The next stage involves arranging the walls and roof of the veranda. As materials for upholstery of walls, it is better to give preference to materials with low weight, but strength and weather resistance. For these purposes, lining or wooden boards are perfect. Each of these materials has individual installation features. For example, when carrying out horizontal fastening of the material, the lining is installed tightly adjacent to each other, and the board is overlapped.
When arranging the veranda together with the house at the same time, it is recommended to use the same roofing covering, in this way it will be possible to achieve a smooth transition from one roof to another.
The internal arrangement of the veranda roof involves laying thermal insulation materials, tile or roll type. To finish the inside of the veranda, it is recommended to use lining, plasterboard or chipboard. The decoration of the walls depends on the overall interior of the veranda being constructed.
There are several options for arranging a roof for a veranda. But since it is an extension to the main building, the most preferable option is to install a pitched roof. Its construction does not require a lot of time and materials. In addition, thanks to the use of this type of roofing, it is possible to achieve a smooth transition from the main roof to the veranda.

The upper ends of the rafters are fixed on the sloping section, and the lower ends - in the under-wall area.
To cover the roof, it is recommended to use exactly the same materials as the roof of the dacha. Take care to match the texture and shade. Soft tiles, roofing felt or metal tiles are distinguished by ease of installation and long service life.
Instructions for installing roofing felt on the veranda roof:
- construction of dense flooring from boards - the first stage;
- installation of roofing felt and its fixation using galvanized nails;
- fixing the coating using slats, between which the same interval is maintained;
- tucking the bottom edge of the roofing material.
The arrangement of the floor of a summer veranda at the dacha has its own characteristics. The best option is a wooden board, about 2.5-3 cm thick. When choosing a tone for painting wood, it is better to give preference to a translucent varnish, through which the surface texture is visible. The optimal board width is 8-13 cm. The installation of boards is preceded by the installation of thermal and waterproofing, as well as the installation of logs. Please note that the floor must be level and smooth. To treat each wooden element, you need to use a protective agent, and after installation - varnish or paint.

Design of a summer veranda: ideas for design and decoration
When building the house itself, it is advisable to immediately build a veranda or at least leave space for its connection to the house. The design of the veranda should be in harmony with the overall interior and exterior.
There is an option for arranging a veranda using sliding walls. They are easy to use and easy to operate. With their help, the veranda is transformed from an open type to a closed one and vice versa.
The classic version of arranging a veranda involves the presence of a large number of windows. Therefore, using a glazed entrance door will make the veranda even lighter and weightless. It is preferable to place large furniture, such as a cabinet, shelf or bookcase, near a wall that does not have windows. Near the walls with windows there are chairs, armchairs, sun loungers, and a dining table.
To save space, folding tables are built in a small veranda, which are hidden if necessary. Since the veranda is a very bright room, curtains, blinds or straw curtains are hung on the windows.

We invite you to familiarize yourself with tips that will help you design a summer veranda:
1. Focus on proper lighting.
Most often, the veranda is used as a place to relax. Therefore, you should not select lighting based on its power, but rather pay attention to the appearance of the lamps.
It is possible to install lamps that imitate lanterns; they have a variety of shapes and colors. Therefore, they are suitable for almost any type of premises. To enhance their aesthetic perception, place them at different heights from the ceiling, this way you can achieve an interesting color effect.
2. The entrance area creates the first impression.
To make the veranda even more attractive, due attention should be paid to the entrance area and its design. Already before entering, the guest must understand that he will be in a room close to nature. Therefore, to decorate this area, it is suitable to use flowers, and in their various variations: wall vases, floor vases, vases with flowers, etc. It is possible to install miniature trees or entire flower arrangements. If there is an asymmetrical entrance to the veranda, it is preferable to install identical compositions on both sides.

3. The use of removable covers is a successful style effect.
By using textile decorative elements, the veranda is transformed. Since the summer veranda is constantly exposed to precipitation, the textile elements must be removable. In addition, it is preferable to choose a fabric with moisture-repellent properties and resistance to ultraviolet radiation. Bright pillows, bedspreads, mattresses - all this will add comfort and attractiveness to the veranda.
4. Dividing space into zones.
Take advantage of such a design technique as zoning. If you have a spacious and large veranda, it will come in handy. With the help of zoning you will be able to organize the space and make it functional. For example, in a rectangular veranda, it is possible to arrange a dining, working and living area. To do this, you should choose furniture that is different in functionality, but the same in texture or color. The boundary space between the zones in this case will be conditional, smoothly transitioning from one to another.
5. A place to relax is a must.
Since the veranda is primarily a place to relax in an open space, it is imperative to provide an element that provides relaxation. Such an item could well be a hammock or a chaise lounge chair. Install it in the shade or sun, depending on your preference. Place a table and the things you need nearby. Please note that the seating area should be located in the corner of the veranda so that people passing by do not disturb the vacationer.

6. Landscaping.
The main advantage of arranging a summer veranda is its direct contact with nature. This dignity must not only be emphasized, but also increased. Set up a variety of flowers in pots, large planters, stands or planters. Greenery will improve the overall impression of the veranda and make the air in it cleaner.
It is possible to build a hedge that will occupy one of the walls. Greenery will provide the room with additional shade, which is so necessary in the summer.
Remember that the main feature of the veranda is a large amount of light and air. Therefore, if you have a small room, you should not clutter it with a large number of objects.
Veranda at the dacha: construction with your own hands - summer open, interior and design in the photo. Criteria for choosing a roof, tiles, foundation.
An open summer area is an indispensable attribute of country life and one of the ways to bring a little beauty, silence and relaxation into life.
A veranda at the dacha is an opportunity to spend pleasant leisure time, an option for relaxing in the fresh air, communicating with friends and relatives in nature in the atmosphere of a country house. Created with your own hands, it is also a source of well-deserved pride.
Any construction requires a technical and design project. Before you start developing technological aspects, think about what type of extension to choose:
- open or closed. The first option is the simplest: you can limit yourself to installing a fence, laying a floor and erecting a canopy. The second - with permanent glazing (French) and heating - will be all-season, but will require high costs;
- glazing is removable, permanent or combined;
- type of building material.
Here, restrictions are imposed only by financial possibilities: wood, stone, panels, metal-plastic structures, etc.
When building a summer extension, pay attention to the stylistic unity of the house and veranda. Numerous photos of solutions implemented in practice will allow you to make a smart choice.
How to make an open veranda at the dacha
The decision has been made, the style of the veranda has been determined, and the appropriate material has been selected. Next, the DIY construction scenario develops according to the project, where the construction sequence and each element used are interconnected.
They start from the foundation.
Foundation for the veranda
To determine the appropriate type of foundation, study the geological features of the area, soil composition, soil characteristics, and also calculate the approximate load, taking into account the weight of each of the structural elements.
To select a reliable support for a specific type of structure, consult reference books. What foundations are usually chosen?
- Tape - suitable for unstable soil and significant load on the base, which means it is suitable for closed buildings.
- Pile - used for buildings erected in conditions with high groundwater levels or in areas where there is a risk of flooding.
- Columnar is an excellent solution for wooden terraces and verandas. The piles are buried into the soil to a depth of 2 m and then tied with wooden beams. When constructing such a foundation, a drainage layer is provided.
Fencing and veranda floor
After laying the bottom frame, the joists are laid, which serve as support for the construction of the floor.
The flooring material is wood or so-called decking boards made from wood using resins that bind natural fibers.
This board has low water absorption, high strength and an anti-slip surface, and therefore is the perfect solution for open spaces. To lay floorboards, be sure to provide additional support points, such as logs, concrete or brick pillars.
The floor can be integral with the foundation, that is, it can be concrete. Decorated with terrace boards and ceramic tiles. If you lay OSB boards on a concrete base, then you can lay linoleum on top.
The fencing of the summer veranda is made in the form of separate elements (balusters), or in the form of shields (lattices), or low brick or stone walls (0.8-1.2 m high).

Roof
After installing the frame of the building, which can be metal (corners, profiled metal) or wood (laminated beams, rounded wood), they begin building walls and laying the roof.
The roof for the extension veranda is integral with the covering of the main building or is constructed separately. There are different types of roof:
- cantilever, laid on cantilever beams;
- supporting with the construction of an independent support on which logs, beams, and sheathing are mounted.
The ideal option is a lean-to roof, laid under the house, the roof of which has a small canopy over the site area. The selected roofing material is laid on the logs in increments of 350 mm. The length of the canopy boards is determined with a margin of about 120 cm between the corner rafters for protection from rain.
The sheathing is arranged on racks and beams, rigidly connected to each other.
A variety of roofing options are available, differing in price and functionality:
- slate;
- roofing felt;
- steel;
- polycarbonate
Metal tiles and soft rolled materials are often used for roofing.
The choice of roofing material is made taking into account the wind, rain or snow load in the region, as well as depending on the type of covering used on the roof of the dacha.
Yulia Petrichenko, expert
Are windows needed on the summer veranda?
What type of glazing to choose for the room depends on the weather conditions in the region. If winds and rains are regular, then you need to protect the site on the side where bad weather comes from most often. Consider the possibility of completely dismantling or opening windows in case of calm and warm weather.
In practice, any glazing option is applicable:
- deaf;
- removable;
- sliding doors;
- combined.
The French veranda will allow you to use it in any season by moving the metal-plastic sliding stained-glass windows as needed.

Decorating a summer veranda
The design of the space directly depends on the type of structure and the building material used.
Work on decorating the internal and external surfaces of the open extension is minimal. The veranda in this case requires only minor finishing (painting, varnishing, tinting). In the closed version, siding is used to decorate the external surface, and plasterboard is used for the internal surface, followed by painting or laying tiles (PVC panels).
Artificial lighting
The comfort of any room depends on the lighting chosen.
Summer terrace. Veranda design options
Nowadays it is fashionable to use light sources of various types and styles (lamps, sconces and chandeliers) installed in areas where people are present. The choice is made in the style of the room decor, but taking into account the natural flow of light. Local lighting will be optimal.
Protection from sun, insects
The problem with open spaces is that they are easily accessible to birds, insects and sunlight. To protect the room from ultraviolet radiation, it is enough to provide overhanging cornices, awnings or hang light curtains.
To protect the area from insects, take care of protective nets or use substances that repel unwanted guests.
Interior of an open veranda
The style used in interior design sets the mood, so take into account as much as possible the functional purpose of the room and the needs of family members.

Decorative elements
An interesting decorative element will be a natural green shelter: a pergola or a vertical wall of plants and flowers. Grilles, balusters, fireplace material, stove or barbecue, awnings and curtains - each of the components will add a touch of style to the interior design and the mood of the owners.
The role of decorative elements in open extensions is played by well-known objects used to decorate interior spaces.
For verandas, special wooden or wrought-iron furniture with an abundance of bright pillows and warm blankets, a special shape of lamps, and vases with living plants are selected.
Furniture for the veranda
In the summer veranda, equip seating areas: sofas, beds, arrange comfortable armchairs and chairs, build a fireplace or barbecue.
A comfortable hammock will add a special touch and save space.
If the site serves as a place for eating, then take care of a water source and a buffet.
As a rule, the feature in such a room is a large table.
An open veranda, built with your own hands, is an amazing place to relax and a gathering point for family and friends, creating and setting the mood for a long time.
Do you have a summer veranda at your dacha?
 Yulia Petrichenko
Amateur gardener, 18 years of experience
About Me: I will share the secrets of a rich harvest and teach you how to create garden compositions.
Veranda at the dacha: construction with your own hands - summer open, interior and design in the photo - print version
Home/ Articles/ Veranda at the dacha with your own hands
Do-it-yourself veranda at the dacha

How to build a veranda at your dacha yourself. Every owner of a country house eventually begins to think about this issue - building a veranda, and on his own. And if you correctly and competently bring your idea to life, you can get a magnificent addition to your home, with the help of which you can really increase the living space of the building.
It's better to turn to professionals. From us you can order the construction of a veranda at your dacha, country house or cottage. But, you can start building such a veranda yourself by studying the provisions and instructions in our article.

What is a country veranda
Before you start building a veranda with your own hands, you need to clearly understand what a veranda is and what a terrace is.
After all, many summer residents with little experience confuse these concepts. But still there are differences.
If you decide to add an open area to your house, this is a terrace. On the terrace you can make a small fence on all sides and a canopy on top.
A veranda is a building that is like a continuation of a residential building. We can say that this is another room, and whether it’s heated or not is up to you to decide.
One of the walls of the veranda is connected to the house, the remaining three walls are glazed.
What is a veranda made of?
When constructing a veranda, it is advisable to use the same building material from which the country house is built, either brick or foam block.
The simplest veranda is made of wooden beams, which is built according to a frame scheme using ready-made components.
In our article we will dwell in detail on the construction of such a veranda. The roof can be covered with roofing felt, bitumen tiles, slate, polycarbonate, etc. Ideally, cover the veranda with the same material as the house itself.
Foundation for the veranda

Any building construction begins with pouring the foundation.
It is much easier if you planned to build a veranda when the house itself was built. After all, the base of the veranda can be made parallel to the main foundation. But even if the house itself has already been built, you can add a veranda to it without much effort.
The ideal base option would be a columnar type of structure with brick supports. The pillars should be placed in place of the corner and supporting frame posts at a distance of no more than 50-70 cm.

DIY summer veranda
Decide on the layout of the foundation according to the shape of your veranda.
2. In those places where you plan to install supports, dig holes at least 1 m deep.
3. Pour a layer of sand about 20 cm into each hole and compact it. In this case, you need to take into account the composition of the mail on your site; if it is sandy, it is better to add crushed stone.
4. Pour molten bitumen over the sand backfill; this is necessary for waterproofing.
5. Now lay a layer of concrete mortar. Its surface must be leveled as smooth as possible.
On the hardened concrete, lay out the brick support to the desired height. The height should be such that the extension flooring is 25-30 cm below the floor in the house itself. In this case, the roof of your veranda can be installed under the overhang of the main roof of the house, and the height of our structure will correspond to the height of the rooms in the house.
Coat the support posts with bitumen.
8. If there is empty space left, it must be filled with crushed stone, broken brick, or other similar material.
The foundation is ready.
Construction of the veranda frame.

Let us remind you that we are considering the construction of a wooden veranda. To do this, we will make our frame from a wooden beam with a section of 10*10cm.
1. Place the bottom trim on the base of the foundation supports.
To fasten the timber, use a tongue-and-groove fastening, or another similar method.
2. Secure the vertical posts. They need to be fastened to the bottom trim beam with staples; you will also need zinc screws and nails of the required length. You can also use wooden dowels. But then the holes for them will need to be made in advance.


Install vertical support posts in the corners of the building and in those places where you plan to install windows and doors.
If a large veranda is planned, additional supports are installed in the gaps.

3. Attach the upper frame beam to the finished racks.
To do this, use anchor bolts.
Roof

The most common option for veranda roofing is a single-pitched sloping roof.
Horizontal roofs are not practical because... They will retain moisture.
1. Install the rafters on the top frame beam. To fasten them, use staples and screws or other suitable fasteners. We connect the rafters at the top with a special girder.
It is located under the roof slope. To secure such a beam we use anchor bolts.
2. It is necessary to attach boards or sheathing beams to the rafters (this depends on the final roof covering).


If it is roofing felt, you need a continuous sheathing of good wide boards.
When using sheet roofing materials, for example, polycarbonates, it is better to make the sheathing from beams. After all, the lathing is a frame for securing sheets during finishing.
3. Installation of the final coating. We have already looked at it; the optimal material will be the same as that used at the house itself. But you can navigate other options, taking into account your funds.
Veranda floor installation

It is better to use edged boards as a floor covering. As a standard, wooden logs are first attached to the bottom frame, and then the floor boards are attached to them.
At the same time, do not forget to treat all wooden elements of the structure with an antiseptic.
You can leave just a wooden floor in the veranda, you can paint it, varnish it, or lay any other covering on top of it at your discretion.
Doors and windows
Now we install double-glazed windows.
The first thing to do is secure the window sill boards. Usually they are located at a height of 50 cm from the floor line. But you should also take into account the features of the design you choose and the size of the windows you install. Floor-to-ceiling double glazed windows are very common windows.
The window sill boards that we mentioned earlier should be secured to the supports of the building frame. Seal the gap between the floor and the glass unit with any suitable material.

The front door is installed individually, anywhere on your veranda; there are no rules and regulations here.
Finishing the veranda
Before building a veranda, you should decide what time of year it will be used.
If this is a summer room, you can sheathe the veranda only from the outside, without giving much importance to the interior arrangement. If the extension is planned to be used year-round, an interior finish is needed, with insulation used between the layers.

The final stage is the internal lining, even if you do not plan to insulate your veranda. After all, finishing will give your veranda a finished look.
Very often, lining is used as finishing, but you can use any other material according to your preference.


In our article we tried to talk about the construction of one of the simplest and most popular frame structures of the veranda.
There are other ways to build structures, it’s up to you to choose. But it is still worth knowing that, despite the variety of types of verandas, their construction is carried out approximately according to the same principle. Having familiarized yourself with the various construction methods and following the instructions for the chosen method, it will not be difficult for you to build a veranda with your own hands.
Good luck in realizing your dream.
How did you hear about our company?
NewsNews archive
Who helps in building houses?
Examples of successful businesses
The veranda has become an integral part of the country house. If the site doesn't have enough space, there is also a garden table that combines comfort and outdoor recreation.
It’s nice to escape the heat in the summer, and in the early spring and rainy autumn, enjoy the tranquility and chat with loved ones in a warm atmosphere. The nursery shares a common wall with the house and can be opened and closed.
What? veranda projects the most practical and inexpensive? It offers you a selection of photographic projects of the most successful buildings.

Project veranda for a suburban area, photo
Suburban Porch Projects Are Simple, Quick, and Aesthetic
If the house at home has not yet been built, it is necessary to ensure the construction of a porch at the design stage, which will be of a general nature with it.
Before starting the assembly, you need to specify the following points:
- The location of the veranda in accordance with the house, for example. It is necessary to determine where the entrance will be from the front or the side.
- The dimensions of the structure should be organically included in the entire style, not too bulky or small. Depending on the size of the house, the average length of the porch is 4 - 7 m, width 2 - 4 m.
- The material of the extension must match or be combined with the material from which the house is being built.
The main rule is that the porches should not differ from the general style of the entire structure.
- The room is closed or open, whether it is heating. If the cottage is frequently visited even in the cold season, heating has an additional advantage.
If you need a dacha only for the summer season, then you can do it without an open, unheated veranda.

An open porch usually does not have the top half of the walls and has a roof on wood or metal beams.
Closed enclosure - it has full walls, the thickness of which depends on the warm space. Often the veranda is already attached to the existing holiday home.
How to build a terrace at your dacha yourself - stages and shades of a wooden building
Most often the base is laid or a pillar (halfway) that will resist the wood or frame support.

Verandas can be made of any material:
- Brick. If the house is made of brick, the extension can be made of the same material or wood.
If the house is covered with siding, then a plastic and glass porch is a good choice. A sliding glass door design is available for entry.
- Tree. The veranda of all possible variations can be made of wood, which is also an organic material.
One option for protecting the hull is metal fencing or plantations of green shrubs.
- Polycarbonate. Recently, the “French” veranda has gained popularity - a stylish attachment that does not require a solid foundation.
Most often, such models are made with sliding doors and windows, and polycarbonate is used for glazing. When choosing this type of extension, it is usually purchased in a modular version and produces an independent installation structure.

With real glazing you can create an original look, even the simplest shape.
Frames can be wooden, metal-plastic, polycarbonate glazing or without the use of frames, sliding plates. The most popular are sliding walls, especially those that are important in a small room. At the opening, each small veranda is located on an open summer terrace.

It is important that before the renewal begins porch to the house, it is necessary to coordinate the project with the relevant organizations and take all necessary measures to register the registration documents.
Otherwise, the construction is considered unauthorized construction, for which fines are provided.


A veranda is an extension to a house on a summer cottage, which is most often erected during the construction of the main building. However, it can be added later. You should not think that the veranda is a separate structure. It represents an important part of the house. To avoid problems with selling or donating property in the future, you should first obtain permission to build a veranda and then register the new house. This is due to the fact that living space is increasing. A veranda at the dacha can be erected with your own hands quite quickly - a few days. It is important to choose tools and materials.
Basic Rules
The main rule when constructing any veranda is the need to create an extension on the door side. This solution will further protect the entrance group. Attach a veranda from the end or facade of the house. You can only enter the building through this extension.
The second basic rule is that the style of the extension should be chosen in accordance with the design of the house. To prevent the veranda from becoming an awkward spot against the background of the building, it is worth considering some design recommendations. The width of the veranda is usually 2.5 m. If these conditions are not met, the extension will look rather bulky or too miniature.

There are many forms of verandas. They are performed open - when there is no need to insulate the extension, or closed - in the case of a permanent structure. Open extensions usually do not have a top structure. They only carry out the roof and fencing elements.
Enclosed verandas are most often made with continuous glazing. Depending on the chosen style, the space that is glazed may have a different area. Verandas with an open upper part of the walls can be used both as an entrance extension and as a terrace. In the case of closed extensions, a dining area or hallway is arranged here.

Pouring the foundation
The foundation for a veranda or terrace should be made at some distance from the foundation of the house. This is explained by the difference in weight between the main structure and the extension. The loads on the foundations of the house and its extensions will be different, so they should be installed at a distance of 15 mm from each other. The resulting gap is filled with polystyrene foam. It will compensate for ground movements. To build a veranda at your dacha with your own hands, you will need to know the foundation technology.

A columnar foundation is suitable for a frame-type veranda. It is not difficult to build such a foundation:


Important! Experienced builders recommend adding a veranda to a house made of timber only after it has completely settled. This process can take about 3 years. If you decide to build the veranda before the end of the shrinkage, you will need to attach it to the house using a tongue-and-groove system.
Construction of the extension frame
Now you can begin constructing the extension frame. It is erected from beams with a section of 120x120 mm. Before installation, they should be protected from fire and moisture with special means. The lower harness is made double to make the structure more reliable. In the corners, the timber should be fastened halfway across the tree. The logs are installed at the stage of creating the upper element of the lower frame of the extension.

Depending on the material of the foundation supports of the extension, the method of fastening the lower frame is chosen. Studs can be pre-cast into concrete pillars. Subsequently, a beam is put on them and then secured with a nut.
In the case of brick supports, the strapping is secured using anchors. Metal pins are treated with a special agent that will protect them from corrosion. However, such treatment does not protect the timber from rotting.
The next step is to attach the purlin. The slope of the veranda roof goes under the roofing pie of the house, so its thickness should be taken into account first of all. Usually the purlin is mounted on anchor bolts to the wall of the house. There are many ways that vertical posts can be installed. They can be cut in the half-tree way, using the tongue-and-groove system, or by cutting out ½ of the bottom trim.

How high the racks will be should be determined based on their location. Those supports that are mounted against the wall of the extension will be higher. This ensures the slope of the roof. When calculating the height of the extension racks, it should be taken into account that they are mounted in a cut-out or in a groove. The roof of the extension should have a slope of 12%. This requirement is mandatory for proper installation of flexible tiles.
You can create the top frame of an extension quite quickly. The rafter beams should be mounted with one side on the purlin, which is located along the wall of the house, and the other on the top frame. The rigidity of the structure can be ensured by installing jibs. Crossbars mounted between racks must be installed using angles.

Construction of a veranda roof
Traditionally, the roof covering the veranda has one slope. It should be flatter than the slope of the roof of the house. The sheathing for flexible tiles is continuous. It is created from edged boards. Before creating the roofing pie for the extension, you should make sure that the boards are well dried. The humidity of wooden elements should not exceed 20%.
Grooves should be made on the eaves board for installing drainage holders. The boards for lathing should protrude 15 cm beyond the frame supports.

A layer of waterproofing is installed on the finished sheathing. In this case, it is necessary to overlap in the transverse and longitudinal directions. The canvas should be nailed to the boards with galvanized nails. They have one distinctive feature - wide caps. Using bitumen mastic, those places where the waterproofing film overlaps are treated.
Reinforcement of overhangs is carried out using end and cornice strips. They must be nailed down with roofing nails. Laying of flexible tiles is carried out from the center of the roof in both directions. In this case, shingles should be taken from different packs, since they may differ slightly in color.
The protective film should be removed from the shingles immediately before installation on the extension. The shingles are secured with roofing nails. The cap should not damage the roofing material. At points where there is no self-adhesive layer, the material should be coated with bitumen mastic.

Floor and walls
If you plan to make the veranda residential, the floor should be well insulated. To do this, you must first lay a rough covering. A 50x50 mm beam should be laid on top of it. The step between the elements should be 50 cm. The result will be cells for insulation. Penoplex should be placed in them. Then all the cracks are foamed. To figure out how to make a floor in an extension, you will need to study the detailed instructions.
Penoplex should be installed so that there is a distance of about 10 mm between the insulation and the finished floor of the veranda. This will ensure natural ventilation. Before laying, cover the timber and insulation material with a film that does not allow moisture to pass through. Its joints are connected with metallized tape. The finishing floor of the veranda is laid on top. It must be coated with polyurethane varnish. The floor on an open veranda should be painted with paint that can withstand various exposures to bad weather and sun.

The walls of the veranda must be lined from the outside with clapboard. After fixing the decorative material from the inside, it is necessary to lay waterproofing. Then the foam boards are installed. The inner surface of the veranda walls is also covered with clapboard.
Window blocks should be installed in the prepared openings of the extension. They are secured with nails. All gaps are foamed. When the foam has completely hardened, the excess areas are cut off. Then the windows and trim of the extension are decorated. They can be painted according to the overall tone of the room. At the final stage of creating a veranda, the ceiling is hemmed and the door is hung.

Interior decoration of the veranda
When the main work is completed, you can begin finishing the veranda premises. The inside of the lining is coated with polyurethane varnish. The material should be slightly lighter than the floor. It is better to make the ceiling white. The owner chooses lighting and furniture in accordance with his preferences and capabilities. The photo shows an interesting option for finishing the veranda from the inside.

Building a veranda at the dacha is a rather lengthy process that includes several important stages. The basis of any capital building is the foundation, so you should devote a lot of time and effort to it. Usually for a summer veranda it is enough to build a columnar base. It is able to cope with serious loads, providing good ventilation of the space under the extension.
conclusions
To create an extension you will need to prepare the necessary tools. An important stage of work is the interior decoration of the veranda. Its style should match the design of the main building. Open verandas can be used as a place to relax, but in bad weather or cold times you will have to go into the house. If the veranda is closed, it is better to insulate it. For this, penoplex or polystyrene foam is used. Such materials perfectly protect the veranda from the cold.

When preparing materials for walls and roofs, you should learn about their properties. For example, you should not use wooden products with a moisture content of more than 20%. In addition, they should be treated with impregnations against rot and fire. Such measures will extend the service life of individual elements of the veranda.
The roof of the veranda should have a slope of about 12 degrees so that precipitation can flow freely into the drainage system. It is better to choose soft tiles for the roofing of the extension. In this case, there will be practically no noise during rain.
Many owners of private houses, wanting to increase the usable area of the building, seek to attach various structures to it. One of the most common is the open veranda. Let's look at how a terrace is made from wood - the most affordable building material in our country.
We are drawing up an extension project
Before you begin building a veranda made of wood or any other materials, you should carefully study the design documentation. This will allow you to pre-calculate all the necessary materials, decide on the shape of the future structure, and avoid possible mistakes during construction. Even if you do not have the necessary level of drawing or similar tools, we recommend making simple sketches of the future building indicating its dimensions.
Users often search:
When drawing up a project, you should think through the entire sequence of work and the most optimal methods for its implementation. Similarly, you should decide on the equipment and tools necessary for building a terrace.
Stage one - laying the foundation
After determining the construction sequence, a do-it-yourself wooden veranda is built step by step. You need to start with the base of the terrace, which is a shallow strip or columnar foundation.

As a rule, both types are quite widespread when making home extensions independently. Let's consider the features of the data for the future terrace.
Column by column
Simple and less expensive in terms of materials and physical effort is the columnar foundation of the veranda. It consists of several separate supports of rectangular cross-section in a horizontal plane. The following materials are used for manufacturing:
- red ceramic brick;
- concrete foundation blocks;
- concrete building blocks;
- masonry sand-cement mortar.
Before installation, holes of 0.6-1 m are dug under future posts. The depth of burial under the terrace supports depends on the quality of the soil and the mass of the future structure. The bottom of the pits is filled with sand and crushed stone with intermediate compaction. A concrete pad is poured on top of the fill under the base of the terrace for leveling.
The wooden veranda should rest evenly on all elements of the foundation. To do this, the pillars are brought to a common height level. For this purpose, you can use partially cut blocks or bricks, as well as different thicknesses of joints. Once all deck supports are installed, they must be protected from moisture. In this case, ready-made bitumen mastic and roll waterproofing are used. The heads of the posts under the veranda are waterproofed in the same way.

Tape under the terrace - pros and cons
The terrace requires a lot of effort during construction. Main stages:
- marking tape along the perimeter of the terrace walls;
- digging a trench to a depth of at least 0.6 meters and a width of about 30 cm;
- installation of formwork to lift the tape above the soil level to the timber frame of the veranda;
- filling the bottom of the trench with sand and crushed stone;
- production and installation of a reinforcing frame made of steel rods;
- preparing a sufficient volume of concrete solution, pouring the tape to the upper edge of the formwork;
- waterproofing cured tape using ready-made compounds;
- backfilling the trench with soil.

As can be seen from the description of the process, the technology for installing a strip foundation under a wooden terrace is a rather labor-intensive and time-consuming process, requiring higher qualifications than when installing a columnar foundation. In case of improper construction or high soil mobility, the tape can tear and bend, which will certainly affect the entire structure.
Stage two - construction of the building frame
The structure frame is installed on the finished foundation. A wooden deck can be made quickly, even if done alone. For work you will need construction timber with a cross section of 150x150 and 100x100 mm. The first beam will fit on the lower frame - the base of the veranda floor, the second - on the racks and supports for the railings.
Laying the bottom trim
We lay the timber with a section of 150x150 on a foundation for the terrace pre-lined with roofing felt. If the dimensions exceed 6 meters - the standard length of lumber in our country - you will have to splice the strapping elements. The technology for corner and longitudinal connection of timber is as follows:
- Select the most even, undisturbed lumber.
- At the ends, mark cuts for half the thickness of the timber. The length of the future groove is in our case 150 mm.
- Saw the timber along the markings using a hand or mechanical tool - a hacksaw, circular saw or chain saw.
- Connect the parts groove to groove at an angle or lengthwise.
- Additionally strengthen the connection by driving in 2-3 nails No. 150.
To avoid possible displacement of the terrace frame relative to the base (this should be thought about at the stage of foundation construction), several scraps of steel reinforcement with a diameter of 8 or 10 mm and a free end length of 200-250 mm are left at the top of the pillars or tape. Before laying the strapping, holes of larger diameter are drilled at the exit points of the steel rods, and the timber is laid on the pins, which are then bent flush.
After completing the timber lining of the terrace floor around the perimeter, lay several transverse beams of the same section in the same way, installing them in pre-marked and cut grooves in increments of about 1 meter, fastening them with long nails.
Installing racks
To support the roof of a wooden veranda, it is necessary to install several vertical bars at the outer corners and along the long side parallel to the wall of the house. The length of which is chosen in such a way that the height of the terrace roof from the floor is at least 2 meters, and the slope of the roof from the main building is maintained.

Connection diagram of harness and racks
If the terrace framing timber is allowed not to be planed, then the racks must be pre-planed with an electric planer. This will give them a more aesthetic appearance and will simplify further finishing and processing of the veranda. The racks should be secured to the frame with self-tapping screws using reinforced steel corners. In the upper part, the ends of the beams are attached to the terrace frame, which is a frame element that serves to increase the strength of the veranda structure.
It is better to make the top trim from planed timber 100x100. Assembly is carried out on the ground in detail, after which it is installed on the ends of the racks and attached to them. In this case, it is necessary to ensure that the vertical parts are perpendicular in two planes. To do this, use a plumb line or a building level.

Stage three - installation of the terrace floor
The step-by-step process of installing a wooden terrace continues with the manufacture of the extension floor. Particular attention should be paid to the correct selection of material; these are operating conditions associated with constant exposure to moisture and sudden temperature changes.
A standard pine or spruce floorboard is the worst thing you can choose for a veranda. If you decide to use it, you must treat the lumber twice with antiseptic compounds that protect the wood from rotting and damage by various microorganisms. Pay special attention to processing the boards from the end.
The best choice for the veranda floor is larch flooring. Its advantages:
- resistant to moisture and damage by fungi, mold, insects;
- has a beautiful woody structure;
- lends itself well to additional treatment with protective and decorative compounds.
Instead of larch, artificial flooring material – decking – is often used for outdoor terraces.

To enhance the decorative properties of the entire product, the flooring can be laid not only traditionally along one side of the terrace, but also at an angle to them. With this method, the consumption of floorboards on the veranda will increase by 20 percent, but it is worth it. They are also carried out from the center along diagonals, which requires making precise corner cuts, which can be made on a miter circular saw.
Stage 4 - roof installation
A high-quality roof will help protect visitors to the veranda and the floor covering from rain and the heat of the sun. Its frame is made of wood, using a vertical terrace frame and a horizontal base beam fixed to the wall of the house. When constructing the veranda roof, it is necessary to provide a slope relative to the horizon of at least 15-20 o in order to avoid the accumulation of large masses of snow.

As roofing materials for terraces, both traditional metal sheets or soft roofing and less common glass or colored cellular polycarbonate are used. Thanks to the use of the latter, the roof of the veranda can have a radius or dome shape. Of course, this will require the manufacture of a more complex rafter system, but it will give the terrace a unique appearance.
Stage 5 - installation of railings, finishing
Wooden railings will help limit the internal space of the veranda and protect visitors from falling. They are made from profiled metal or planed timber. Balusters will add zest to the exterior interior.
Having completed the installation of the fence, the wood should be treated with stains, stains or oil-based paints, in other words, protected and prepared for use.
In this article we examined the issue of building a veranda, as it turned out it is not at all difficult. The main thing is to follow the recommendations and step-by-step algorithm.
Sooner or later, almost every dacha owner thinks about setting up a veranda on their own. Subject to proper construction and finishing, the extension will be an excellent addition to the main house, contributing to a significant increase in the usable area of the building.
You can handle the arrangement of the veranda on your own. Read the basic instructions and get started.

Before you start studying the guide to building a veranda at your dacha, understand the main features of such a design.
Inexperienced summer residents often confuse the veranda with another popular extension known as the terrace. However, there are differences between these two extensions.
The terrace, although attached to the main house, is an open area. Sometimes it is supplemented with a small perimeter fence and a protective canopy.
The veranda is arranged in such a way that it looks like an organic continuation of the main structure. That is, at its core, the veranda is an additional room, perhaps not heated (if desired, you can install heaters).
One wall of the veranda is connected to the house, the other three walls of the extension are glazed.

What to build a veranda from?
To build a veranda, it is best to use the same materials from which the country house was built, for example, brick or foam block - focus on the characteristics of your situation.
The easiest way to build extensions is from wooden beams and using a frame scheme from ready-made elements. The presented guide will discuss the procedure for constructing a wooden veranda frame.
To finish the roof of the extension, you can use any convenient and affordable materials: bitumen shingles, roofing felt, polycarbonate sheets, slate, etc. It is better if the roof of the veranda is covered with the same material as the main house.
Video - Construction of a veranda
Foundation arrangement
The construction of an extension, as well as any other buildings, begins with the construction of the foundation. It is more convenient and easier if the construction of the veranda was planned at the stage of drawing up the design of the main house. In such a situation, you can arrange the base of the extension parallel to the main foundation.

However, you can also cope with arranging an extension to an already finished house without any problems.
The best base option for a veranda is a columnar structure with brick supports.
The pillars should be arranged in the places where the corner and support frame posts are located in increments of no more than 50-70 cm.
Video - How to make a columnar foundation
First step. Mark the foundation in accordance with the planned configuration of the veranda.
Second step. In the places where the supports will be placed, dig holes with a depth of 100 cm.
Third step. Place a 20 cm thick layer of sand at the bottom of each hole. Firmly compact the pillow. If your site has sandy or other problematic soil, backfill with crushed stone.
Fourth step. Pour melted bitumen over the compacted backfill. Once hardened, this material will become a reliable waterproofing material.
Fifth step. Place a layer of concrete mortar in the hole. The concrete surface must be perfectly leveled.
Sixth step. Lay a brick support on the frozen base to the required height.
Select the height so that the finished flooring of the extension is 250-300 mm below the floor of the main house. In such a situation, the roof of the veranda will be able to be “brought” under the overhang of the main roof structure, and the height of the extension will correspond to the height of full-fledged living rooms.
Seventh step. Coat the support posts with bitumen.
Eighth step. Fill the remaining empty space of the holes with crushed stone, broken bricks or other material of similar properties and size.

Construction of the frame
The veranda, as already noted, is built using wood.
Start building the frame. To build it, use a simple wooden beam with a section of 10x10 cm.
First step
Lay the bottom trim on the base of the foundation supports. To fasten the strapping beams, use a tongue-and-groove connection or other similar joining methods.

Second step
Install vertical posts. Fasten them to the bottom frame beam using staples, as well as galvanized screws and nails of suitable length. You can also use wooden dowels for connections. In such a situation, holes for their placement will need to be made in advance.


Place supporting vertical posts in the corners of the future veranda and in the places where doors and double-glazed windows are installed. If the extension will have a large area, place additional intermediate supports.
Third step
Mount the top frame beam on top of the installed racks. Use anchor bolts for fastening.

Roof structure
The optimal roofing option for a veranda is a lean-to sloping structure. Horizontal types of roofs are not very convenient - they are not able to provide effective removal of precipitation.
First step
Install the rafters onto the previously secured top frame beam. To fasten the elements, use suitable fasteners, for example, staples and screws.
At the top, the rafters are fastened using a special girder. This element is placed under the roof slope. Anchor bolts are traditionally used to secure the purlin.
Second step
Attach boards or timber (depending on the chosen finishing coating) to the rafters.
If you choose rolled material, for example, roofing felt, make a continuous sheathing from high-quality wide boards. If you plan to use sheet roofing materials, for example, polycarbonate, then the sheathing should be assembled from beams. The sheathing itself will look like a kind of frame for fixing the finishing sheets.
Third step


Proceed with installation of the finishing coating. Recommendations on the choice of material were given earlier - it is better if it is the same as the roofing material of the main structure. For the rest, focus on your preferences and available budget.

Floor installation

For flooring, it is best to use edged boards.
The procedure for installing the structure is standard: first, wooden logs are attached to the bottom trim of the frame, and floor boards are fixed to them.
Before installation, all wooden structural elements must be impregnated with an antiseptic.
If desired, the boards can be painted, varnished, or another preferred coating can be placed on them. Do as you please.
Video - Floor on the veranda
Doors and double glazed windows

Proceed with the installation of double-glazed windows. First you need to secure the window sill boards. Usually they are fixed at a height of half a meter from the floor line. In general, it all depends on the design features and height of the windows you choose.

Quite often, the glazing is continuous, that is, from the floor line of the extension to the ceiling itself.
The mentioned window sill boards should be attached to the supports of the structure frame. Sew up the space between the double-glazed window and the floor with any suitable material for the event, for example, boards or clapboard.

Install the front door taking into account your individual preferences. It can be placed from any convenient part of the extension - there are no specific rules in this regard.
Finishing

If you plan to use the veranda exclusively as a summer room, the cladding can be done only on the outside, abandoning the interior decoration. If the extension will be insulated and used in cold weather, be sure to complete the interior finishing. In such a situation, insulation is laid between the layers of finishing.

Even if insulation is not part of your plans, all other things being equal, it is still better to do the internal lining. It will give the interior of the extension a more noble and finished look.
Lining is perfect for finishing surfaces. For the rest, be guided by your preferences.

Now you know how to build a veranda at your dacha yourself. This guide presented one of the simplest and most popular variations of this design. In reality, there are a huge number of different modifications of the veranda.
However, despite such diversity, the construction of all extensions is carried out approximately according to the same scheme. Having understood the main points and principles of construction work, you will be able to cope with the independent construction of a veranda without any problems.

Happy work!
Video - Do-it-yourself veranda at the dacha