How much does it cost to put spokes in a bicycle wheel. Re-spoke of a bicycle wheel. Walkthrough
One of the most practical and healthy means of transport is the bicycle. However, its maintenance can cost you a pretty penny if you do not know how to repair at least minor breakdowns.
In such cases, it is simply necessary to have skills such as attention to detail and accuracy, since they will help you repair or disassemble any part, for example, the rear hub of a bicycle wheel.
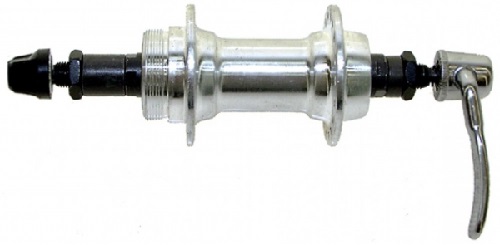
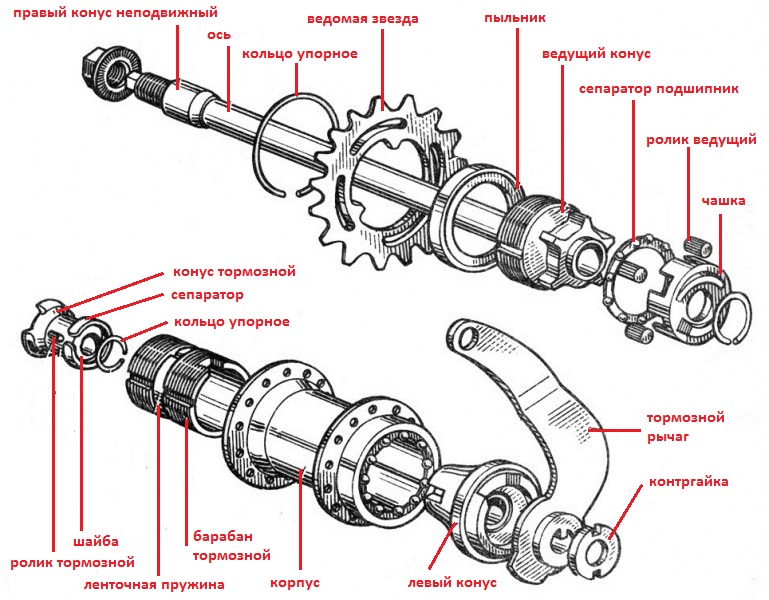
Bicycle rear hub and its device
 One of the most important parts of a bicycle is its wheel. In particular, the rear wheel is much more loaded than the front wheel, since it is on it that the ratchet (freewheel mechanism) and the cassette (sprocket block) are installed. The main focus is on the wheel when driving, so it is important to understand the design of its hub in order to be able to properly service it.
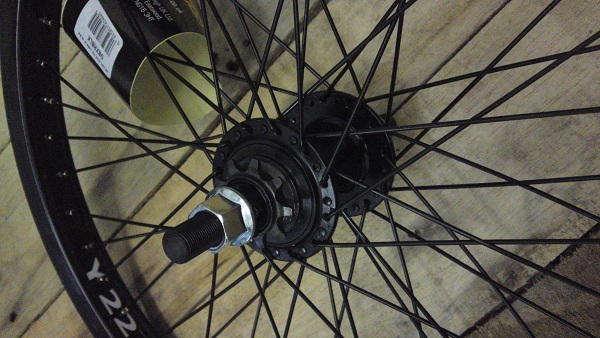
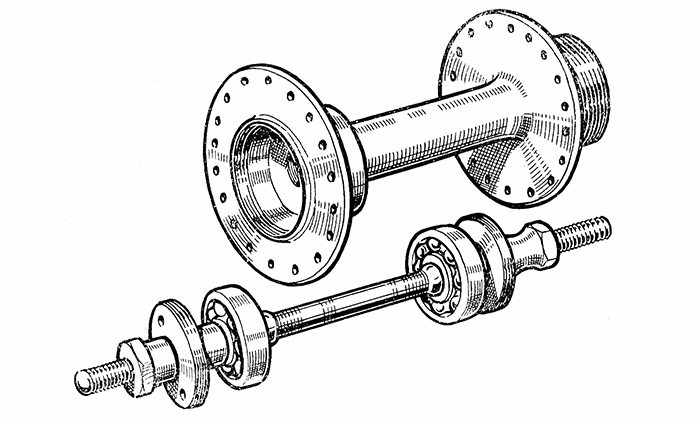 Bushing - wheel element, mounted on a bicycle frame, namely on dropaunts. This is the central part of the wheel, ensuring its free rotation.
The sleeve consists of such elements as:
- Lock-nut.
- Washer.
- Cone.
Varieties of rear bicycle bushings, their differences from each other
One of the reasons for dividing the rear bushings into varieties is their design. Depending on it, the rear bushings are divided into:
- Without brake.
- With built-in brakes.
 It should be said that bushings that are not equipped with a brake mechanism are also divided into those that are without free play and with free play. With an integrated foot brake, the hubs are designed with free play. If we are talking about the version of the hub with a brake mechanism, then their main feature is that you need to push the pedals in the opposite direction to stop the bike.
 According to the fixing method, the bushings can be fixed on two nuts, which is much cheaper, or they can be fixed using an eccentric. The second method is more expensive, but much more convenient, since the nuts must be removed with a wrench, and to remove the wheel on the eccentric, it is enough to wring out its handle. It will only take a couple of seconds.
The material of manufacture also matters. Bushings are:
- Aluminum(lightweight and non-corrosive).
- Steel(strong, but heavy and very prone to corrosion).
The bushings also differ in the size of the axis, the standards are different - from 9mm to 15mm. It should be borne in mind that the larger the sleeve, the heavier it is.
When to Service a Rear Hub
 For the correct operation of the wheel and its main parts, incl. bushings, it must be constantly maintained in good condition. It needs lubrication, and also its body must be periodically tightened. In addition, replacing the bearing balls and adjusting the pads on the brake hub will not interfere.
Service rear hub simply necessary, because in cases where this does not happen, it may be necessary to repair the entire wheel. Therefore, it is better to take care of your bike in the long run. It should be noted that servicing the rear hub is not much more difficult than the front one.
Service is required in the following cases:
- If you hear chassis noise when the bike is in motion or wobbles.
- Backlash.
- If the bearings are rattling.
- Bad rolling dynamics.
If you do not pay attention to the signs of "disease" of your bike described above and use it for a long time if they are present, it can quickly fail.
Repair, in turn, will be much more expensive than simple maintenance of the wheel, which you can do yourself. Therefore, at the beginning of each season, check the wheel for play, and also that the bearings are not too tight.
Case disassembly, cleaning and lubrication
Before proceeding with the disassembly of the case, it is necessary to clean workplace, since it is very important to carry out all the steps very carefully and with the utmost care.
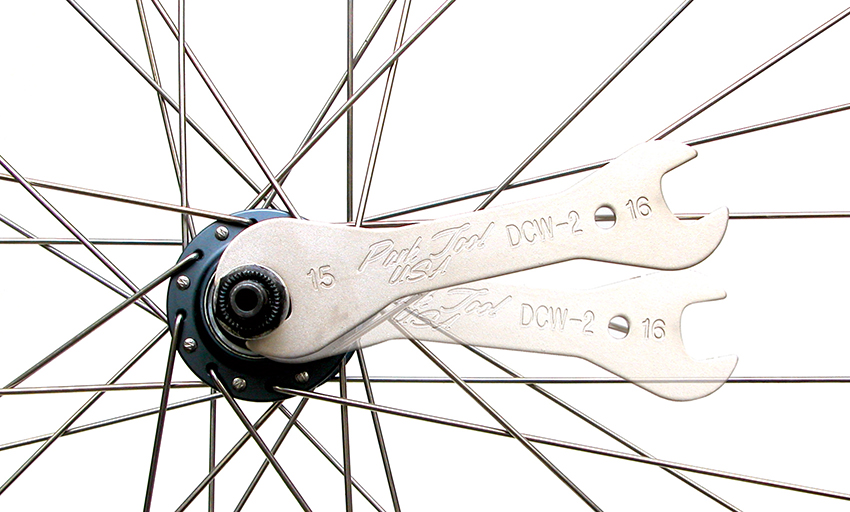
Initially, you should remove the cassette from the axle using a puller and a whip. Then we open the retaining ring and remove the washers and bearings. In order not to get confused in the details, it is important to remember the original location of the washers and bearings.
If any part is damaged, even the slightest scratch, they should be replaced. Next, you need to pull out the axle, clean the body of dirt with a soft dry cloth, and then proceed to lubricate the parts. We do this as we install the parts in their places.
How to assemble a bicycle rear hub?
 After lubrication, it is necessary to assemble the sleeve. To properly assemble the rear hub, you must adhere to the following rules:
- We insert the axis in such a way as not to confuse on which side the right side of the axis is located, which is fixed tightly. The axle is adjusted using the left cone.
- Next, put the left cone on the axle until it stops.
- We put on pucks.
- We turn the locknut.
- Adjusting bearings.
Rear wheel hub repair. Step-by-step instruction
- Remove retaining ring.
Most often bushing repair rear wheel necessary either for backlash or cone constriction. So, step by step instructions:
- Checking the workplace. We clean the workplace from unnecessary tools, things that will not be useful to you.
- Loosen the locknut with a wrench.
- Loosen or tighten the flare nut.
- Tighten the locknut into place.
If the cause of the breakdown was a malfunction or breakdown of any part, then you should simply replace it using the following recommendations:
- After checking the workplace, remove the retaining ring.
- Remove the axle shaft. First, remove all the parts that are on the opposite side of the stars.
- Checking parts for defects.
- We replace the broken part.
- We install all the parts in place, tighten the flare nuts and locknut.
Causes of breakdowns
 Bicycle wheel failure occurs for a variety of reasons. There may be a large number of them.
The main ones are:
- Insufficient or no bushing maintenance.
- Loose bushing (backlash).
- Poor quality bushing parts.
- Wear.
- Cone stretch.
Thus, in order to ensure the long service life of your bike, you should give it a certain amount of time. The basis for the long life of a bicycle is maintenance. This can be done independently, with your own hands. The main thing in this is to observe safety precautions and carefully approach the matter, since every detail is important in the sleeve mechanism.
To service the bushing, it is necessary to remove all parts, lubricate, after removing all the old grease. And then carefully reverse order set all parts in place. When doing so, care must be taken to tighten the locknuts and the flare nut so as not to overtighten them. In addition, there are different kinds rear bushings.
With frequent care of bicycle parts, it will serve you for a long time and will not require repair after its first use.
Rating: 1.6 12 votes
The comfort of cycling depends on many factors. And intelligently assembled wheels play an important role in this. After all, a well-made assembly of the rim with a central sleeve ensures the perfect shape of the wheels. A real cyclist should always be ready to perform this simple, but requiring patience and attention operation.
Types of placement of spokes in the wheel
In practice, two types of spoke arrangement are used - one radial, the other cross. Radial gives a small gain in terms of aesthetics, but lags far behind in terms of mechanics. This method can only be used for front wheels with a brake on the rim. It is not at all suitable for transmitting torque between the hub and the wheel periphery.
The cross method of wheel assembly is recognized as the most functional in the entire history of the operation of equipment. It optimally transfers the mechanical loads that occur during movement.
The choice of the type of placement of the spokes greatly affects the process of completing the wheel, especially initial stage. After all, the selection of spokes for a bicycle, installation and adjustment depend on this.
Where does assembly begin?
On the side of bicycle wheels, you need to start with the selection of all components and tools. In this case, you need to take into account the difference between the front and rear wheels. If our front is symmetrical, then everything is much more complicated with the back.

The drive to the sprocket makes you take into account the possible nuances of the central sleeve. The main difficulty at this stage is to decide on the long spokes, taking into account the indicated features of the front and rear wheels. As a result of the first stage, we should have selected: a rim, an axial sleeve, spokes with nipples of a suitable length, and from the tool - a spoke wrench and a screwdriver.
Bicycle spokes: installation
With the cross method, it is useful to distinguish two types of spokes in the direction of their installation: leading and tail. The leading ones are placed in the direction of rotation, and the tail ones are against. Starting the assembly, you need to insert the knitting needles with outer side into the holes of the right flange of the bushing through one, and they should come out from the side of the countersink. They will become tails.
Then on the rim we find the exit slot for the nipple of the camera. We select the hole that goes along the right side of the rim, and fix the first spoke there. When screwing the nipple, do not forget to use lubricant, this will subsequently facilitate broaching and adjustment. Initially, everything is baited for a couple of turns.
The next needle is attached to the fourth hole clockwise. Similarly, we repeat the procedure on all tails on the right side. A quarter of the holes will be occupied on the rim and three free ones between them.
Then we proceed to the installation of the tail left side. We turn the wheel over and start again from the camera output. Only now we put the needle in the hole on the left side of the rim and on the other side of the lead. You will get a location next to the first one with a slight shift. We do the same with the rest of the tails on the left side. Do not forget that they are also inserted into the flange from the outside.
Now we come to the installation of the leading spokes:
- They will be inserted from the inside of the flange.
- Each leader will cross with three tails of its side.
- It crosses the first two from the outside, and starts under the last one from the inside.
- The order of installation of the leading ones is not important, the rules of intersections are observed.
The second stage will end when we receive full assembled wheel, and the nipples on the spokes are only baited.
Tension and shape adjustment
This stage requires a responsible approach, and does not like haste. It begins with tightening the nipples an equal number of turns. It is better to go around the rim several times, increasing the tightening by one turn. For ease of adjustment, the leading knitting needles at the last intersection can be slightly bent.
When the backlash is selected on all the spokes, it's time to control the shape. The wheel should not have deviations from the plane of symmetry of the "umbrella" type; end and side beating ("ellipse" and "eight").
All these deviations are removed by loosening one and tightening the other spokes in accordance with the necessary geometry adjustment.
At the end of all adjustments, we check that the tips of the spokes do not protrude from the nipples. If necessary, we work with a file.
The wheel is the part of the bike that is in direct contact with the ground. And since the wheel is also sometimes found with curbs, stones and other irregularities, sooner or later the rim will have to be changed. You have to go to the workshop and, having paid a rather big amount, get a well-assembled and balanced wheel. Meanwhile, you can assemble the wheel yourself, especially since it is unlikely that anyone will want to pay a third of the price of a bicycle for assembling a Kama or Salut wheel.
So, to assemble the wheel, we need: spokes with nipples, a rim, a bushing and a spoke wrench. It is also desirable to have a screwdriver, but you can do without it.
This article describes how to assemble a wheel into three crosses (each spoke intersects with three others) - the most common way. Although it is possible to collect two crosses and no crosses at all (with the sun). The more crosses in the wheel, the more torsional and heavier it is. The sun wheel is lighter and stiffer during impacts, but it is impossible to assemble the rear wheel in this way or use a disc brake in this case - the load on the rim and hub flange will increase sharply.
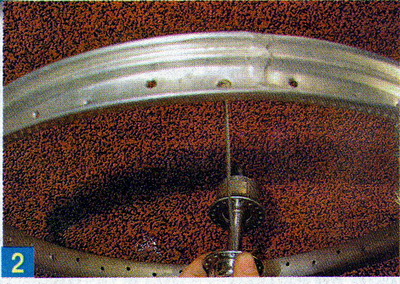
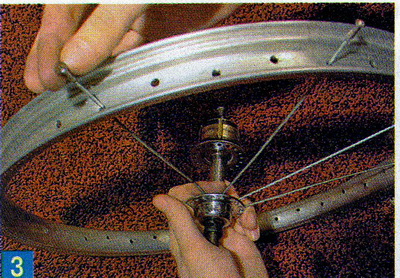
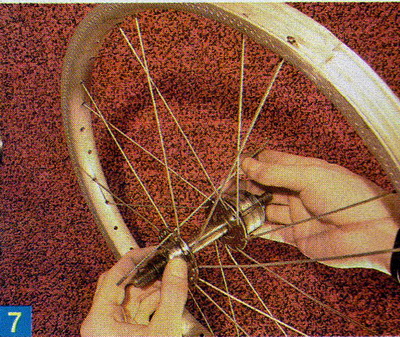
First you need to pick up the rim, sleeve and spokes (photo 1).
It is clear that the number of holes for the spokes in the rim, bushing and the number of spokes must match. For your first wheel, it is better to use a new hub, spokes and rim, as in this case the cleanliness of the threads on the spokes is guaranteed, that is, there are no problems with screwing in the nipples, as well as with balancing the wheel.
However, nowadays it is necessary to choose not only the length of the spokes, but also their brand and model. If for riding around the house you can put inexpensive spokes from little-known manufacturers, then for extreme riding good spokes are even more important than good rims and bushings, although it is also better not to save on them. The highest quality knitting needles are produced by DT Swiss and Ritchey. The black spokes look nice, but the DT champion Jask needles cost 75 cents for one, versus 25 cents for the silver DT champion. Whether to pay three times more for beauty is up to you. But drawn knitting needles and knitting needles with variable thickness are really better than others. The first ones are tougher than usual, the second ones are lighter, and not at the expense of strength.
Now a little about how to assemble a strong and beautiful wheel and how to keep a good tone (imagine, real cyclists are very scrupulous about it). Correct from an aesthetic point of view is a wheel, the inscriptions on the rims of which are read from the right side of the bike, and on the bushings - from the saddle. Also, some mechanics assemble the wheels so that the inscriptions on the bushings are read through the nipple hole. There is no practical sense in all this, but if you want to follow all the rules, then why not. Against, correct location crosses is very important, especially when using inexpensive rims. The fact is that all rims have weakness- this is a joint. From the outside of the rim, it is often invisible, but with inside it is usually easy to find (photo 2).
The joint should be under two crosses that will hold it together. This article discusses just such an assembly option, in which the last rule will be observed.
You should pay attention to the cleanliness of the holes for the spokes in the bushings and, if necessary, clean them so that dirt does not get on the thread of the spokes, and there are no difficulties when screwing the nipples.
Lubricate the threads of the spokes to facilitate the assembly process.
We insert one spoke into the hole in the left flange of the hub and into the hole on the rim located to the left of the nipple one (the rim is located on the left side to the collecting one). We fix the knitting needle with a nipple (see photo 2).
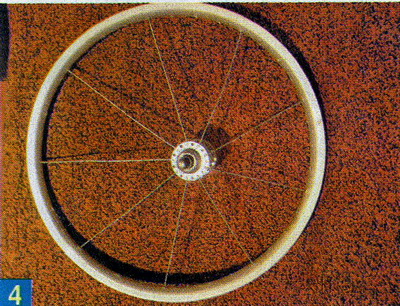
We insert the next spoke through one hole in the flange and, counting three holes in the rim, insert it into the fourth (photo 3).
We continue the process until we get what is shown in photo 4.
We turn the wheel with the right side towards us and insert the spoke into the hole in the rim located in this moment to the right of the very first knitting needle (photo 5).
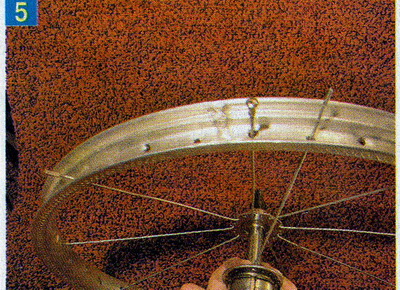
We continue to spoke the right side of the wheel in the same way as the left.
Of course, the holes in which the spokes of the left side are located should be considered as empty. The result of the work done is in photo 6.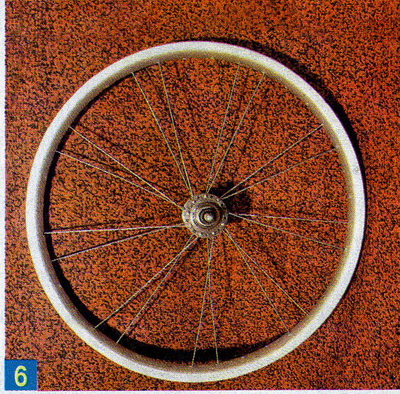
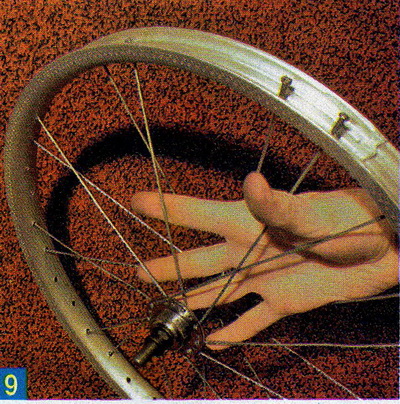
We turn the sleeve clockwise relative to the rim and insert the next spoke from the inside (photo 7),
We pass it so that it passes over two knitting needles and under the third one (the same “three crosses”, photo 8.9).

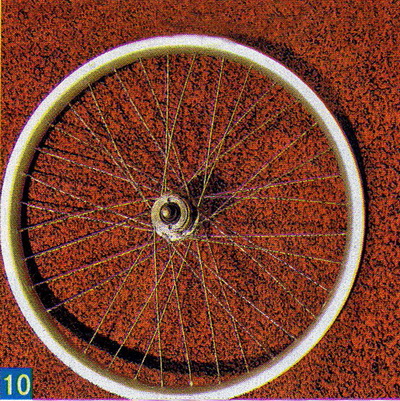
By inserting the remaining knitting needles in this way, we complete the assembly. What should happen can be seen on any bike or in photo 10.
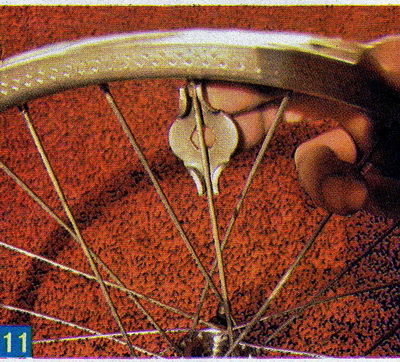
After all the spokes are in place, you can start balancing. Balancing is carried out by tightening the spokes with a special key (photo 11)
Or with a screwdriver from the side of the rim (photo 12).

There are three types of defects.
EIGHT - the wheel moves during rotation so that the rim is not constantly in the same plane.EGG - the beating of the wheel up and down during rotation.
UMBRELLA - constant displacement of the wheel to the right or left relative to the hub.
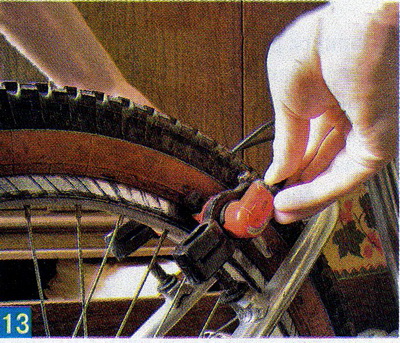
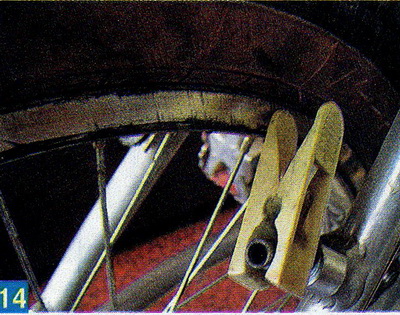
All of the above defects are corrected by loosening the spokes from the side of the bend and pulling them up from the opposite side. It is important to remember that when the tension of one spoke changes, the tension of the others changes, and all the spokes are involved in correcting one or another defect. To gradually reduce the defect "to nothing", you need a wheel straightening machine. Instead of a machine, you can use a bicycle. If your bike has V-break rim brake mounts, then it couldn't be easier. Having removed the brake (photo 13),
We put a clothespin on one of the pins (photo 14.15)
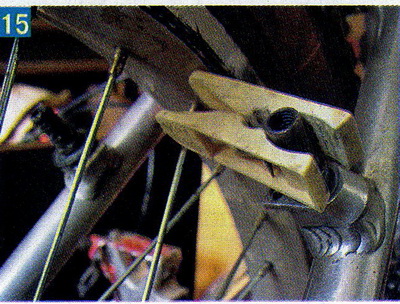
And, moving it to the edge of the rim, we rotate the wheel. Having thus found the place of the defect and having adjusted the tension of the spokes as necessary, we repeat the operation. Thus, you can straighten a figure eight or an egg. The umbrella can be easily straightened by eye.
So, you can put the wheel on the bike and go. Just do not forget to inspect the wheel again after and correct new defects if they appear. In the future, be more careful and monitor the pressure in the chambers - it is better to pump a little bit than to correct the wheel or assemble it again.
Photos.
12... or with a screwdriver from the outside.
Anton ATAMAS, Krasnogorsk, Moscow Region
CAM 8 2014
[email protected]
[email protected]
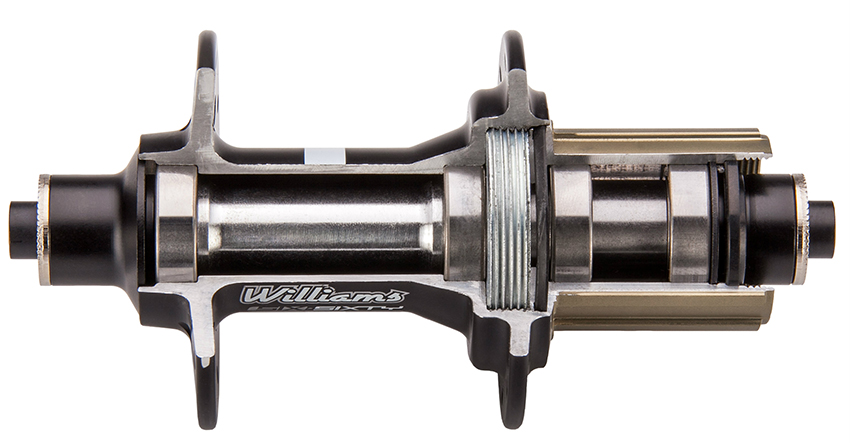
A bicycle rear wheel hub is one of the most complex and expensive bicycle mechanisms. It is the rear hub that causes the most questions among beginner cyclists. And its repair or maintenance is generally like a bad dream.
The quality of the bushings determines how much effort you spend to overcome a certain distance, in other words, the “rolling” of the bike. The rear hub is subjected to much greater loads than the front, which dictates the need to make it more massive. In addition, if the front hub has only one function (free rotation of the wheel), then the rear hub is additionally assigned functions - torque transmission, pedal-free travel, braking functions, and even sometimes internal gear shift systems (planetary hubs).
There are a lot of companies that produce hubs for bicycles and it makes no sense to list them all. It is worth noting Shimano rear hubs, in Russia these are the most common hubs, due to their high quality and wide price range.
Like the front hubs, the rear ones can differ in materials of manufacture, purpose, production technology, weight and strength. But the rear bushings have their own differences inherent only to them. Which ones will be discussed below.
Materials and technologies for the manufacture of rear bushings
In terms of manufacturing methods and materials, the rear bushings do not differ from the front ones. Bushings are produced by casting, turning or stamping. Cast bushings are the cheapest to manufacture, but also the least strong and the heaviest. The most optimal metal for bushings is aluminum alloy. Steel is used to produce hubs for the simplest and cheapest bicycles. The lightest and strongest hubs are made of titanium alloy, but they are so expensive that they are used only in sports professional bikes.
Rear hub types
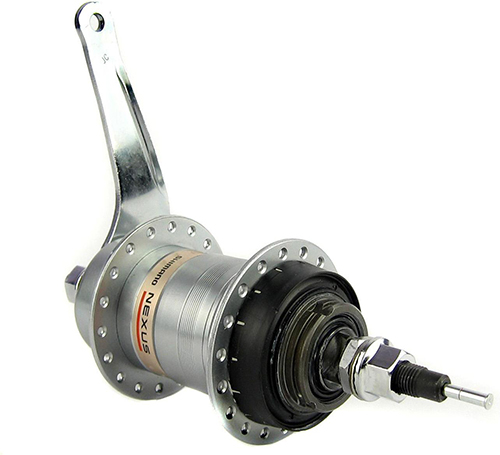
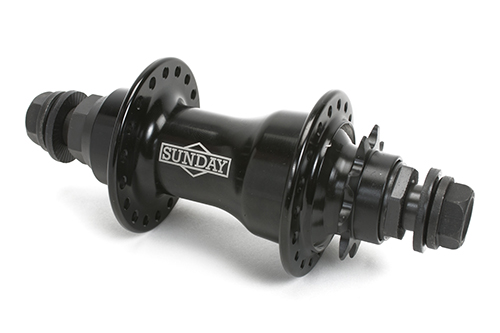
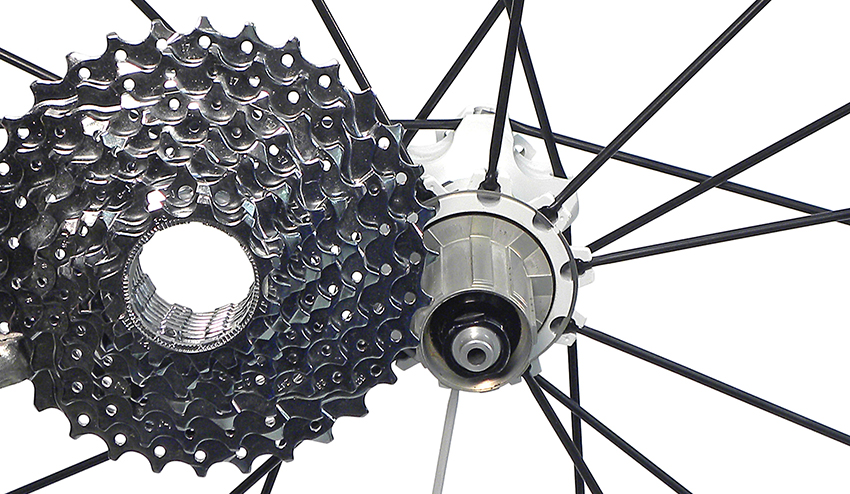
According to the application, the rear bushings can be for road bikes, high-speed (mountain, tourist and road bikes). Road bikes usually have hubs with one driven star and a freewheel mechanism. Also, bushings for road builders are equipped with a drum brake mechanism, i.e. bushing with foot brake. The rear hubs for sports bikes do not have a brake mechanism, but have a freewheel system. In addition, sports rear hubs are divided into cassette and ratchet.
Speed bike rear hub device
The device of the hub of the rear wheel of a high-speed bicycle provides for a set of driven stars through which torque is transmitted to the wheel. There are two types of sprocket set - cassette and ratchet. If the sleeve is designed for a ratchet, then the drum (nut) is located outside the sleeve and is integrated into the set of stars. The ratchet itself is attached to the fork with a special thread. If the sleeve is for the cassette, then the drum is located on the sleeve itself and is attached to it using a special hollow bolt (see diagram). The cassette, in turn, is attached to the drum through a spline connection and secured with a special nut.

It is worth adding about the mounting of the disc brake rotor. Here, like the front hubs, there are two standards - CenterLock and 6 Bolt. The CL standard provides spline fastening and tightening with a special nut. This standard is patented by Shimano. The six-bolt mount is more popular and is used by all manufacturers of rear hubs and brake systems. Six-bolt CL-mount rotor
Rear hub arrangement with brake
Most single speed bikes, whether road bikes or kids bikes, have a rear hub with built-in brakes and freewheeling. These bushings perform the following functions:
- Torque transmission from the connecting rod drive star to the driven star of the rear hub and, accordingly, the wheel itself.
- Wheel free play relative to the driven star. As soon as the driven star stops, the wheel continues to rotate, regardless of the pedals of the bike.
- The built-in brake mechanism allows you to brake by turning the pedals in the opposite direction. The essence is the same as in car drum brakes with internal pads.
The most common brake bushings of the "Torpedo" type. Such bushings were installed on most Soviet bicycles and are still used in the production of road bicycles to this day. On the oldest Soviet and some imported bicycles of the beginning of the last century, “Go” type bushings were installed. Also in Soviet times, domestic bushings with the speaking name "Motherland" were developed. The last two types are now almost never found. Therefore, we will consider in more detail the device of only the Torpedo bushings.
Based on the above diagram, let's consider how the processes inside the rear hub take place.
- Working stroke - while turning the pedals, the driving cone, rotating with its protrusions, shifts the driving rollers up, thereby wedging the bushing body, thereby rotating the wheel.
- Freeplay - as soon as the drive cone stops rotating, the body squeezes the drive rollers into the recesses between the lugs, due to this process, the connection between the drive cone and the body is lost. Loss of connection allows the wheel to rotate freely relative to the pedals.
- Braking - when the cyclist starts to push the pedal back, the driving cone begins to rotate in the opposite direction and, due to friction, rotates the brake cone with oblique protrusions. The brake rollers enter the grooves of the brake drum and the brake cone slides into the drum. The drum is moved apart by cones on both sides, pressed against the hub body and brakes the wheel.
Torpedo type provides the best braking option. The stronger the force on the pedal, the stronger the braking - this ensures smooth braking.
Most modern bicycles are two-wheeled. The rear wheel of a bicycle, the device of which will be discussed later, is most often the leading one and begins to rotate under the action of the movement of the chain.
Before you disassemble the rear wheel of a bicycle, installing it on, or any other vehicle, you need to study its device.
It consists of the following components:
- sleeve;
- rim;
- knitting needles;
- tire with a tube or tire, which should have .
The device of the rear wheel hub of a bicycle is quite simple: it is attached to the rim with knitting needles (from 12 to 48 pieces).
Wheel size is determined by outside diameter, which varies from 14 to 29 inches. Mountain bikes often come with 26-inch wheels, while hybrid or touring bikes come with 28-inch wheels.
The device of the rear wheel of a high-speed bicycle does not provide for the presence of spokes. Instead, a solid disk is used, providing increased rigidity. This design is less resistant to the oncoming air flow, but has an increased windage, which complicates the ride in a side wind.

The life of a wheel depends on the design of the rim, and its strength affects the speed and safety of the ride. Modern bicycles are most often equipped with rims resembling a box in section. Thanks to this shape, the wheel is protected from damage when hitting a hard obstacle.
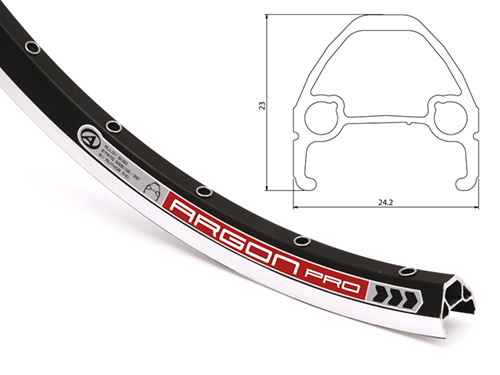
The most commonly used material for the manufacture of rims is steel or aluminum alloys. A steel rim is cheaper, but has more mass and is less resistant to corrosion. Carbon is considered the most modern material, but the price of such models is very high.
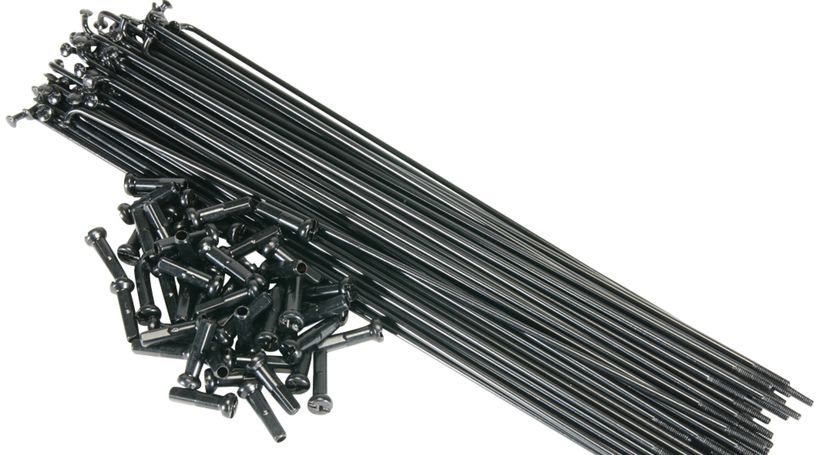
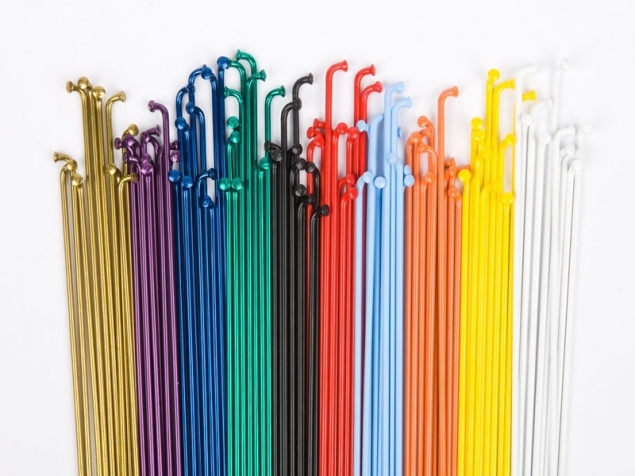
A rather vulnerable part of the structure. In addition to the mass of the cyclist that affects them, the spokes are regularly subjected to stress arising from the unevenness of the road surface. The spoke is fixed in the rim with a nipple. The most common materials for manufacturing are steel and aluminum.
Important! The materials of the nipple and spokes must necessarily match, otherwise the reaction between different metals will not allow you to freely tighten or change the spokes in the future.
Depending on the production process, spokes can be:
- rolled(the cheapest option);
- drawn(light, but more expensive);
- flat(the most expensive option, surpassing others in terms of mass and resistance to oncoming air flows).
Spoke is the order of fixing the sleeve, rim and spokes. It can be radial or cross. Radial provides for the installation of the sleeve without crossing the spokes with each other. With a cross, the spokes are crossed.
Sleeve
The bushing is located in the center of the wheels and is attached to the bicycle frame. Provides rotation of the wheel, eliminating slippage and turning. The rear hub contributes to the rolling of the bike - the efficiency of movement without the expenditure of energy.
The bicycle rear hub device provides the following configurations:
- the presence of free play, the absence of a braking mechanism;
- lack of free play, the presence of a brake mechanism;
- the presence of a free wheeling and braking mechanism.
Interesting to know! In the presence of a hub brake, consisting of a drum with a shoe, it becomes possible to stop the bicycle using the pedals.
The dimensions of the hub, its mass and quality affect the rolling and energy consumption of the cyclist while riding. There are three types of this node.

3-speed hub has simple design, while 5 or 7 speed gears are best not disassembled. Gears of planetary systems during assembly are installed in a certain position. This work requires special equipment.
Disassembly, cleaning/lubricating
How to remove the hub of the rear wheel of a bicycle for subsequent cleaning and lubrication? The following procedure is required:
- the stopper opens;
- washers with bearings are removed;
- troubleshooting is carried out by examining the surface of the bearings: worn out elements must be replaced, the rest are cleaned with a solvent;
- the axle is removed;
- inside the case is cleaned with a soft cloth, all elements are lubricated (special attention must be paid to bearings).
How to assemble a bicycle rear wheel hub? Assembling the rear wheel of a mountain bike or any other bicycle is carried out in the reverse order. When installing parts inside the housing, you must first put grease on its walls.
Important! When tightening, it is necessary to avoid overtightening, otherwise jamming and excessive wear of the structure during operation are possible.
After that, the rear wheel is installed in place. How to do this is shown in the video.
Before you start disassembling the rear wheel of a bicycle to repair the hub, you must clearly understand the procedure for these steps. IN otherwise the situation will only get worse. If you are not 100% confident in your own abilities, watch the video, which will tell you everything in detail.
Service
To maintain the good condition of the mechanisms of the bicycle, it is required to service it periodically. For the rear wheel, similar work is performed as follows:
- the body is pulled up;
- defective bearings are replaced;
- mechanisms are lubricated;
- brake pads are adjustable.
Despite its unpretentiousness, the rear wheel, with prolonged use without proper maintenance, will become unusable, which will require its repair. In addition, constant adjustment of the rear wheel must be carried out to make the ride comfortable.