Tools needed for bike repair. How to remove a cassette from a bicycle wheel
Old bicycles were supplied with an outdated transmission unit called a ratchet. It is screwed along a large diameter thread onto the sleeve. rear wheel. Its ratchet mechanism is not a separate unit and cannot work independently. When the ratchet is removed, everything is twisted at once: sprockets and ratchet.
There is another way to connect the rear sprockets to the wheel. New bikes are equipped with a more advanced transmission unit - a cassette. If you need to remove it, you can easily separate the set of sprockets and an independent ratchet mechanism. All modern bicycles have such an easy-to-maintain knot.
Internal device
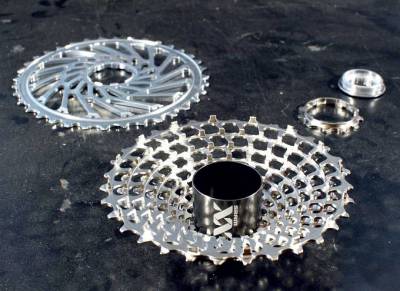
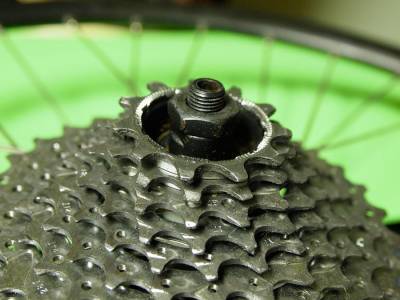
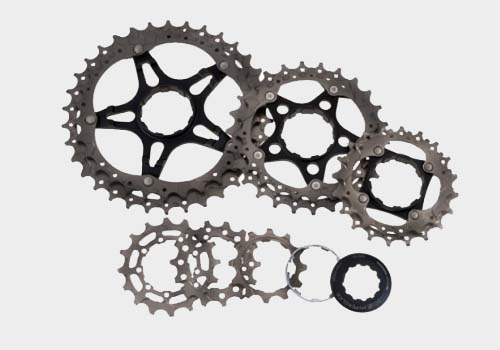
A bicycle cassette is a pyramid composed of stars of different sizes, which is a high-speed chain drive assembly. Between themselves, the stars are separated at an equal distance by rings or, in some expensive models, by an internal spider frame. Together, all these parts form the body of the device.
The cassette on the bike is mounted to the ratchet drum through slots. The ratchet itself in a cylindrical body is attached to the wheel hub with similar hooks. It is a separate cylindrical mechanism on the rear wheel that cracks during free rolling and catches tightly during pedaling. There are no pawls or a gear in the cassette.
The body of the cassette is finally fixed on the rear wheel with an external clamping nut screwed into the internal ratchet mechanism. She and the smallest chainring have teeth on their mating surfaces to prevent spinning while riding.
Select by multiple criteria
Bicycle cassettes can be divided according to the following criteria:
- material of manufacture;
- the number of stars and their range;
- compatibility with various types of bicycles;
- designs.
The material for manufacturing can be:
- Steel is the main material for the manufacture of most strong bicycle assemblies. Details from it are distinguished by an optimal ratio of strength and cost. To protect against corrosion damage, finished products are chrome-plated - made shiny, nickel-plated - covered with yellow metal, or blued - blackened in oil.
- Aluminum has the lowest density of all metals. Parts made from its alloys are the lightest, but they are inferior to steel in strength and service life. In addition, aluminum cassettes are more expensive than steel ones. Anodized aluminum parts are especially popular with fans of reducing the weight of the bike to the maximum - weightwinners.
- Titanium, although heavier than aluminum, is lighter than steel. It has sufficient strength for long-term operation of any heavily loaded bicycle components. This material and its alloys do not rust. Minus one - high price products from it. If your goal is not to keep the weight of the bike as low as possible, then it is better to get the most advanced steel cassette for the money, which will hold more and last longer.
A bicycle cassette can be recruited from a different number of stars:
- 7 - can be seen on older bikes, the same model years as the ratchet ones.
- 8-10 are the most common, used on many bikes today, from mountain bikes to road bikes.
- 11 - manufactured by Campagnolo. You can put them only on the bushings of this company.
The number of stars and their range are indicated in the cassette marking. For example, the inscription "11-36T, 10 speed" means that the smallest star has 11 teeth, the largest has 36, and there are 10 of them in total.
The number and range of cassette sprockets determines compatibility with a particular type of bike:
- Mountain. Rear transmission units with 8-10 sprockets. The smallest should have 11–12 teeth, the largest should have 28–36 teeth.
- Highway. Cassettes having the smallest sprockets with 11 teeth, the largest ones with 22–27 teeth. Campagnolo attachments with 11 chainrings are only compatible with bikes of this type.
- City, cross, folding. Devices with the smallest sprocket for 12 and the largest for 27 teeth are suitable.
OpenGlide construction
There are five types of cassettes according to the type of assembly:
- Collapsible - Most bicycle cassettes have all but the smallest two sprockets assembled together with rivets or screws. So it is necessary for the availability of maintenance and assembly. But this design is too heavy and clogged with dirt.
- On the spider - some structures assembled on an aluminum frame, which is called the spider. Two smallest stars are also riveted to it. They are famous for their light weight and are excellent for cleaning dirt.
- On several spiders- rare and expensive items assembled from two parts with 2-3 stars each. Convenient when you need to replace one of the two worn parts, rather than change the entire cassette. As with one spider, they are lighter than the common collapsible ones, and they are even easier to clean.
- - a one-piece construction from SRAM, designed exclusively for road bikes. It is held on the splines of the ratchet drum only by a cap at the base of the largest sprocket and an aluminum nut in the smallest sprocket.
- X-Dome - the same monolithic device from SRAM, different only in the way it is mounted on a ratchet. If in the upper part of the small sprocket it is fixed in the same way as the previous design, then at the base the largest star serves as the mount, and not a separate cover. To save weight, often the largest locking star is made of aluminum.
Disassembled X-Dome cassette
Removing the bike cassette
To replace the latest generation Shimano's Hyperglide cassette with a ratchet or rear wheel hub, you will need two special tools and one common tool.
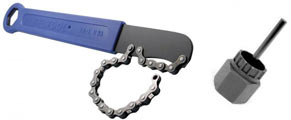
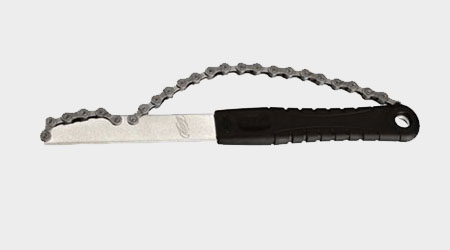
- Chain wrench, which is important for holding the cassette itself. You need to choose the right one: SR-1 for 10 sprockets, SR-2 for 11 sprockets and less, SR-11, HCW-16.
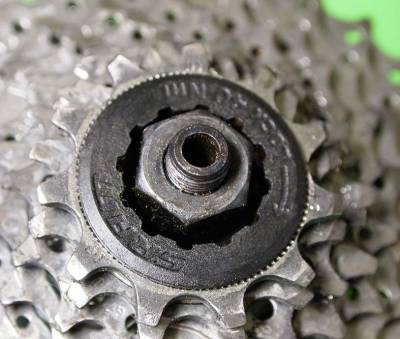
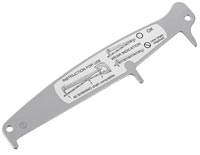
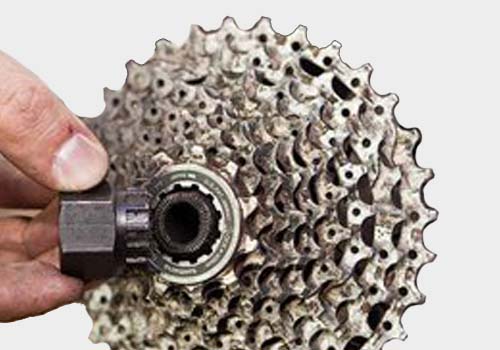
- The FR series puller with 12 hooks, because that is how many slots the end clamp nut has, which can be seen in the third picture.
- 21 mm wrench, a large adjustable wrench or vise is suitable as a replacement. But a tubular wrench with a 21 mm head is preferred.
One of the FR-1 or FR-5G pullers should loosen the clamp nut. Tool number FR-5G has a guide that makes the job of turning the nut much easier. Without a guide pin, it is difficult to keep the tool engaged with one hand when you need to grab the chain wrench with the other. Using a large ratchet wrench with a set of sockets makes it much more comfortable to hold any puller in place.
The fourth picture shows the most popular pullers:
- left FR-1 with 12 long slots for modern Shimano cassettes;
- right FR-5G with rail for all SRAM/Sachs and most HG products.
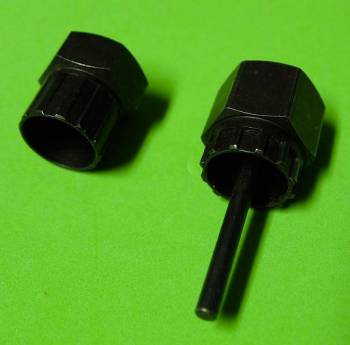
In this picture, you can see that the FR-5G tool is already installed to release the jammed nut.
The next tool you need is any device to keep the cassette from rotating backwards (counterclockwise) when you release the locked nut. This cannot be done with a large sliding gas wrench, as it tends to bend or scratch the teeth of the sprockets.
If you do not have a chain wrench or are trying to change a particularly stubborn cassette, then you can put a short piece of chain on one of the stars and clamp it in a vise, as shown in the sixth figure.
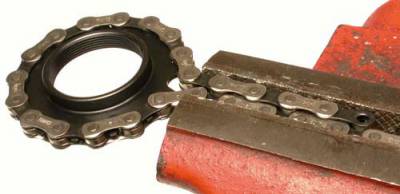
The length of the chain piece and vise jaws is long enough to capture the largest star. It is not necessary to have a large carpenter's vise, no one has ever had to twist such a tightened nut. It is enough to have small hinged vices that you can hold in your hand.
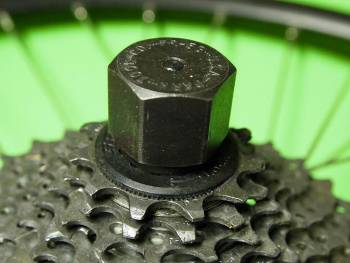
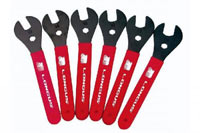
However the best way to hold the rear cassette is to use a model SR-1 chain wrench or similar, which can be seen in the seventh figure on the left.
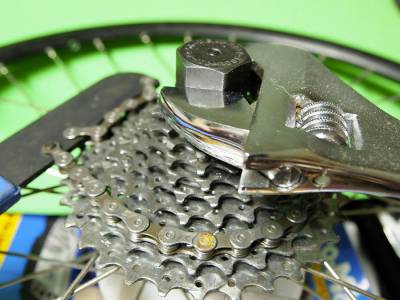
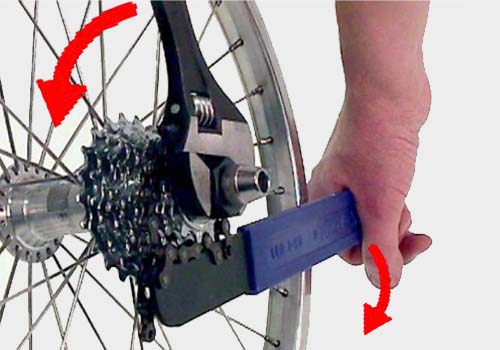
By applying a 12" adjustable wrench, a set wrench, or even a large 21mm socket ratchet to the FR-5G, you can loosen the socket nut.
While holding the chain whip, turn the adjustable wrench counterclockwise to loosen the tightened nut. She and a small sprocket have notches on their contact surfaces. So you will hear a few clicks when you loosen the nut. After loosening slightly, remove the chain catch and wrench, and also unscrew the clamping ring. As a result, everything should look like in the eighth image.
Now it is enough to lift the cassette from the ratchet sleeve. But be careful and stick with the outer two smallest sprockets, because they are not as tightly bonded together as the rest.
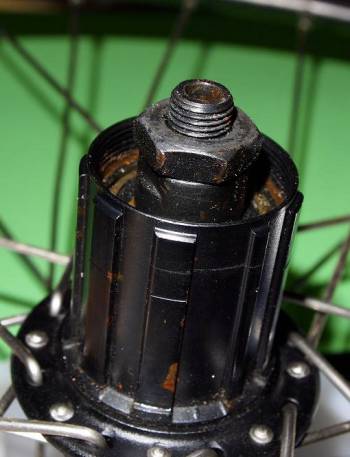
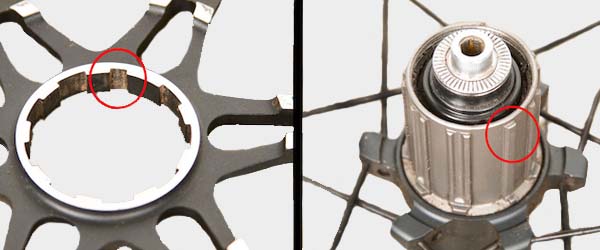
Remember for later replacement how each star is put on the ratchet. Note that one of the splines on the ratchet drum is the smallest and matches the narrow slot on each sprocket sprocket. They should all line up in one line. The ratchet after removing the cassette looks like in the ninth image.
If you are not absolutely sure how all the sprockets and spacers were put together because they fell apart when removed, then stop and contact your local bike shop for help.
Preferably, the ratchet sleeve is made of hard steel. On some road bikes it may have an aluminum outer drum to reduce weight. Having once removed the cassette from such a ratchet, you can notice where the dents remained on the soft slots and which sprockets are often loaded. The dented slots, by the way, make the job of removing the cassette very difficult.
Installing a cassette
Replacing the cassette consists in simply lifting it up from the wide slots of the ratchet sleeve and putting a new set of stars back along the grooves in them.
Putting the cassette back on is as easy as taking it off. This is essentially the reverse operation. The sprockets should fit snugly into the ratchet splines. It must be remembered that one of the slots is different in width from the rest. Be careful. Be careful not to damage the spline flange when putting on the last two small sprockets. Knowing this, it is enough just to put the body of the cassette (rings and stars) on the ratchet and finally screw the clamping nut along the thread.
Be careful. Follow the installation order of the sprockets and spacer rings, which are simply typed onto the splines of the ratchet bushing one after the other. Each spacer ring has two small pins that must fit exactly into the corresponding holes in the sprockets. If this is not done, then the sprockets near the ring will be set too far apart, which will ruin the accurate operation of the speed selector.
Tighten the end nut firmly with the same puller and a large wrench. We don't want the cassette to spin on the road, so it's a good idea to put the wheel upright and push down hard on the key lever. But no need to push your foot! It is recommended to apply a force equal to 21.7–36.2 N∙m (about 3 kgf∙m). The nut is tightened clockwise, the ratchet is blocked in this direction, so you do not need a chain wrench to install the cassette.
Lube should be applied like a tube of bicycle grease or any other non-lithium, dust repellent oil.
After assembling the cassette, make sure that the sprockets do not wobble relative to each other. It is also good to make sure that the distance between them is the same. If everything is correct, then put the wheel and go ride!
I believe that any self-respecting cyclist should be able to troubleshoot minor problems, adjust switches, bleed hydraulic brakes, adjust eights and much more.
I will definitely write articles on all these topics, but first I would like to tell you what tools it makes sense to get for those of my readers who decide to service the bike on their own.
Looking at this question from the height of experience, I understand that it would be better to immediately buy a complete set of tools for a bicycle, and not buy one at a time as the need arises. I wrote a note about, read it.
However, the approach of collecting a tool one by one also has the right to life, therefore, see what you need.
Basic bike tools
1. A set of hexagons. Most importantly, do not buy any plasticine Chinese slag in hardware stores at a penny price. Only a specialized bike kit - compact and made of strong steel, for example, Crank Brothers .
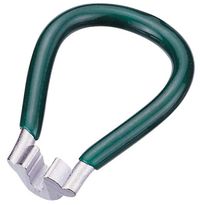
2. Key for knitting needles. Everything is clear here - eights appear on the wheels, they need to be corrected. If the rim is soft, and your weight is walking within a centner, then you are tormented by running to the mechanic. And there business something for three minutes.
3. Cassette puller, whip and wrench. You will need this kit when it comes time to change the cassette - for the sake of such a small operation, going to the workshop is not serious. In principle, at one time I did without a whip, winding an old towel around the cassette, but this is inconvenient and not aesthetically pleasing. 🙂 If you have an old system, 7 speeds or less, then your cassette is on a ratchet, and another puller is needed there.
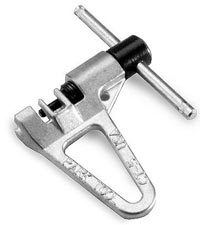
4. Squeeze. The thing is practical, it is needed even if you use chains with a lock, for example, when the chain breaks or needs to be shortened.
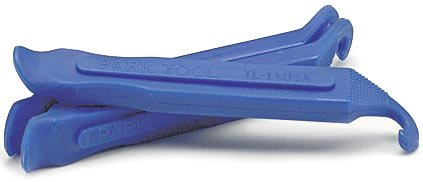
5. Mounting blades. Of course, you can do without them, but rubber is far from always dismantled with your bare hands, and if you use improvised items, you risk tearing the camera.
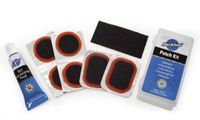
6. Repair kit for cameras. Even if you have a spare tube, don't think it can't be pierced either. Patches will save the situation in this case.
With this kit, the cyclist can do basic maintenance, adjust gears and edit eights.
Basic bike tool kit
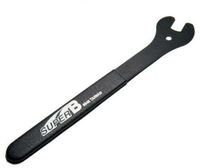
1. Key for pedals. It is best to buy a special wrench, it has a very thin section and fits into the narrowest gaps between the crank and the pedal. But in most cases, you can get by with the usual key for 15.
2. Kit for removing the system and carriage. There is a huge range of different standards here. Until recently, the main type of bottom bracket on inexpensive bicycles was the “square”, requiring a squeeze for the connecting rods and a slotted wrench to remove.
Now the Hollowtech system is more popular, to remove it you need only a wrench for the carriage cups. However, the good old “square” is still installed on budget bikes, so before buying a tool, find out what your standard is.

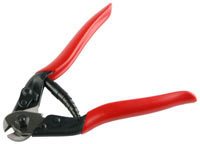
3. Cable cutters. Whatever beginner cyclists do not cut the cables, but correctly - with special wire cutters, then the tip of the cable does not fluff, which in turn must be pressed into an aluminum tip.
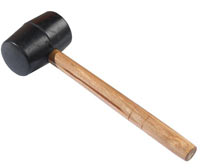
4. Hammer with rubber impact part. A very useful thing in the household, sometimes you need to apply, but so as not to damage anything. It is also convenient to knock out the position of the front derailleur with weak blows of such a hammer in order to set its ideal position.
5. Cone keys. These wrenches are needed when it comes time to clean and adjust bushings with loose bearings. However, modern mid-range bikes already often use hubs with industrial cartridge bearings, often requiring no tools for disassembly. Therefore, before buying such keys, check with the seller what kind of bushings you have on your bike.
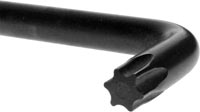
6. Set of Torx keys. This standard is sometimes used in bicycle construction, along with hex bolts. It doesn't hurt to have a Torx kit with all the main sizes.
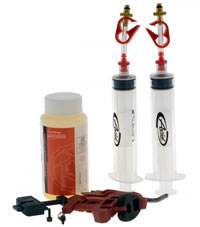
7. Set for pumping hydraulic brakes. I will cover this topic in more detail in a separate article. For now, I will only say that there are special kits, for example, Avid produces such kits. However, they can be farmed on their own from a disposable syringe, but the finished tool is more convenient.
With such a set of tools, you can solve almost all the problems associated with self-repair of a bicycle. Mechanics will only need to be contacted for special work, such as trimming the frame or servicing shock absorbers.
Special kit for advanced cyclists
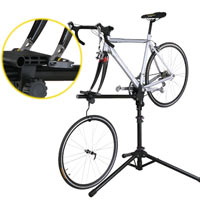
1. Bicycle repair stand. An extremely comfortable design that allows you not to bend over the bike, but to engage in it in a natural position.
2. Stand for leveling eights. You can straighten the wheels right in the frame, but with a special stand it is much more convenient, more accurate and faster to do this.
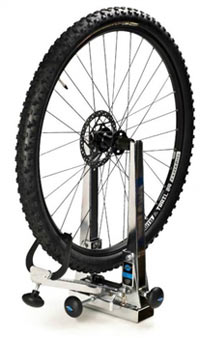
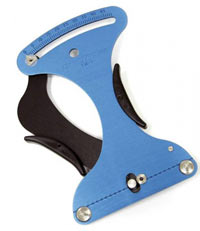
3. Tensiometer. Device for measuring the uniformity of the tension of the spokes. An indispensable item for those who assemble their own wheels. However, for those who simply monitor the condition of the spokes, I recommend it, especially if your weight is close to a hundred kg.
4. . A great thing for those who ride in three chains. You can monitor the stretching of the chains, changing them in a timely manner in a circle. This allows you to increase the life of the stars of the system, cassette and chains.
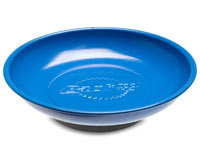
5. Magnetic cup. A handy thing so that all the bolts, chain locks and other small things do not spread around the apartment.
What did I miss, dear readers? If there is a significant point, write in the comments, I will add.
Listing these tools does not mean that you should run to the store and buy everything on the list. No, buy what you need this moment and look a little into the future - what else may be needed.
I just wanted to show that you don't need a lot of tools to do a complete bike repair at home. An addicted person will quickly accumulate the kit he needs and forget the way to the bike mechanics. I will try to give more information on how to maintain and repair the bike myself.
Friends, let's not get lost on the Internet! I suggest that you receive email notifications when my new articles are published, so you will always know that I have written something new. Please.
With ratchet mechanism and fastened with a retaining ring. Special slots on the sleeve body allow you to install the cassette in the correct position.
Tools needed to remove the cassette
- Key "whip" - is a key with an attached bicycle chain;

1. Remove the bicycle wheel, then install the puller so that its splines are fully engaged in the grooves of the retaining ring.
2. Install the whip on the sprocket so that the links of its chain fit snugly on its teeth. The whip handle should be to the right of the cassette and the chain on top.
3. Put the adjustable wrench on the cassette remover and turn it counterclockwise, while holding the whip handle without letting the sprockets spin.
If the chain is slipping, it is possible that the cassette sprockets are badly worn, or the whip is defective. In this case, try throwing it on a big asterisk.
4. Unscrew the retaining ring to the end, then remove and spread out the stars and intermediate washers. Lay everything out in order so that you don’t confuse anything during assembly.
Cassette removed, now it can be cleaned or changed.
When installing the cassette, the main thing is not to confuse the order of installing parts. In order to properly install the sprockets, they have grooves with different widths, and the sleeve has the same splines, thanks to which the teeth will fit in the right order.
1. Some cyclists advise lubricating the hub surface before installing the cassette, but I think this would be redundant. First, the chance of corrosion is too low. Secondly, the friction between the bushing and the sprocket is also not large enough to cause damage. Thirdly, dust and sand can stick to the lubricant, which can lead to accelerated wear of parts.
Apply lubricant only to the threads of the retaining ring, then the next time it will be easier to unscrew it.
2. Put on the sprockets in turn, but do not forget about the spacer rings. In some cassettes, all or several sprockets can be connected into one non-separable knot - a "spider". But most often all the stars go separately.
3. In some cassettes, to install the last sprocket, you need to press it. Check again if everything is installed correctly, with one hand press on the last sprocket, and with the other hand screw on the retaining ring.
4. Screw the ring all the way in, but do not tighten it yet. Check again that all the stars are parallel to each other, stand exactly. If something bothers you, disassemble the cassette and fix the problem.

5. If you are sure that everything is assembled correctly, then take the cassette puller and tighten the retaining ring clockwise to the end.
Everything, the cassette is assembled. Once again inspect the correct assembly and you can install the wheel in place.