Crochet neck jewelry diagrams and description. How to crochet a choker - diagrams and description
Crocheted white and pink orchid. Description + diagrams
A delicate orchid with a yellow-pink center, crocheted, folded into a boutonniere and decorated with silver and black fabric, iridescent ribbons and plastic stems with beads.
You will need: 20g of thread No. 18 in white, yellow, light pink and melange pink shades;
Hook No. 1.50;
Metal wire;
Colored adhesive tape;
Black tulle fabric with silver threads;
Silver ribbon;
Iridescent ribbon, shimmering green;
Iridescent beads and mother-of-pearl beads on plastic stems
Description of knitting
Core: crochet thread yellow color tie a chain of 4 in. p. and knit 3 p. according to scheme 4.
Petal A: crochet thread white tie a chain of 30 v. p. and knit as follows according to pattern 1:
1st r.: 1 c. lifting point, 1 SBN, 1 PS1N, 1 S1N, 1 S2N, 1 S3N, 1 S4N, 1 S5N, 1 S6N, 1 S7N, 1 S8N, 10 S9N, 1 S8N, 1 S7N, 1 S6N, 1 S5N, 1 S4N, 1 S3N, 1 S2N, 1 S1N, 1 PS1N, 1 SBN
2nd row: 30 RLS
On the other side, tie 30 sc behind the back wall 30 in. n. grounds.
Tie 3 petals.
Petal B: crochet a chain of 20 sts using a white thread. p. and knit 4 p. according to scheme 2 as follows:
1st r.: 1 c. lifting point, 6 SBN, 5 PS1N, 9 S1N
2nd row: 20 sc, 1 sc in 1 st. p. lifting the 1st r., 20 RLS on the other side of the chain from v. P.
3rd row: 1st century. lifting sts, 1 SBN, 1 PS1N, 1 S1N, 1 S2N, 1 S3N, 1 S4N, 1 S5N, 1 S6N, 1 S7N, 2 S8N in one st, 2 S8N, 2 S8N in one st, 2 S8N , 2 C8H in one st., 2 C8H, 2 C8H in one st., (1 C9H, 1 C10H, 1 C9H) in one st., 2 C8H in one st., 2 C8H, 2 C8H in one st., 2 С8Н, 2 С8Н in one p., 2 С8Н, 2 С8Н in one p., 1 С7Н, 1 С6Н, 1 С5Н, 1 С4Н, 1 С3Н, 1 С2Н, 1 С1Н, 1 PS1Н, 1 СБН
4th row: (1 sc, 3 ch, 1 sc) in each st of the 3rd row.
Tie 2 petals.
Bottom part: crochet with a light pink thread according to pattern 3 from the 1st to the 5th row. At 5 p.m. after knitting the central C1H, make a picot from 4 sts. p. and finish 5 p. Break the thread.
Rows 6-8: knit for 4 sts. p. according to scheme 3 with a yellow thread. Break the thread.
9th-10th row: knit according to pattern 3 with melange thread in pink shades
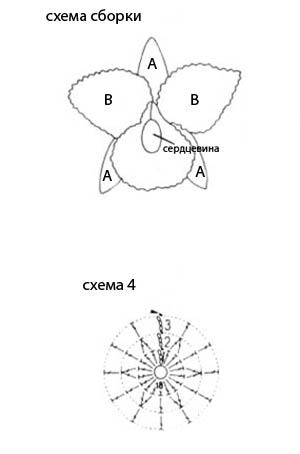
Assembly: bend a wire 18 cm long from the edge by about 0.5 cm, coat the resulting loop with glue and insert it into the knitted yellow core. Starch the petals, give them the desired shape and glue them to a 12 cm long wire, as shown in the diagram. With petal B do the same as with petal A, but glue the wire 2 cm below the top of the petal, as shown in the diagram. Starch the bottom part of the orchid and stretch the edges, glue a 12 cm long wire 1.5 cm below the top of the part, as shown in the diagram.
Apply glue to the base of the lower part of the orchid, place the core from the inside and glue it, aligning the side parts of the part according to the guidelines indicated in the diagram. Place and glue petals A and B to the back of the bottom of the orchid as shown in the assembly diagram. Attach iridescent and mother-of-pearl beads on plastic stems to the flower. Connect all the wires together and secure with colored tape. Decorate the orchid with a small piece of black tulle fabric with silver threads, a silver ribbon and an iridescent green ribbon, securing them with adhesive tape. 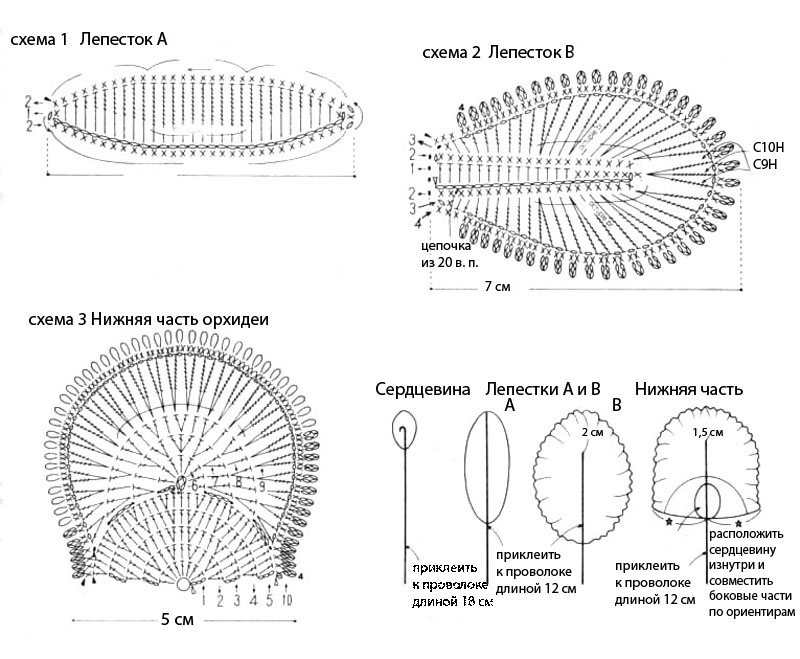

What girl or lady doesn’t want to be tender and feminine? Stylish accessories will always help us with this. IN this moment these are chokers. The fashion for chokers is not going away, and is not going to leave the catwalks and wardrobes anytime soon. We invite everyone who is interested in this topic to try their hand at the “Crocheted neck choker” master class. In addition, we’ll talk about what types of chokers exist, how they differ, and how to wear them correctly.
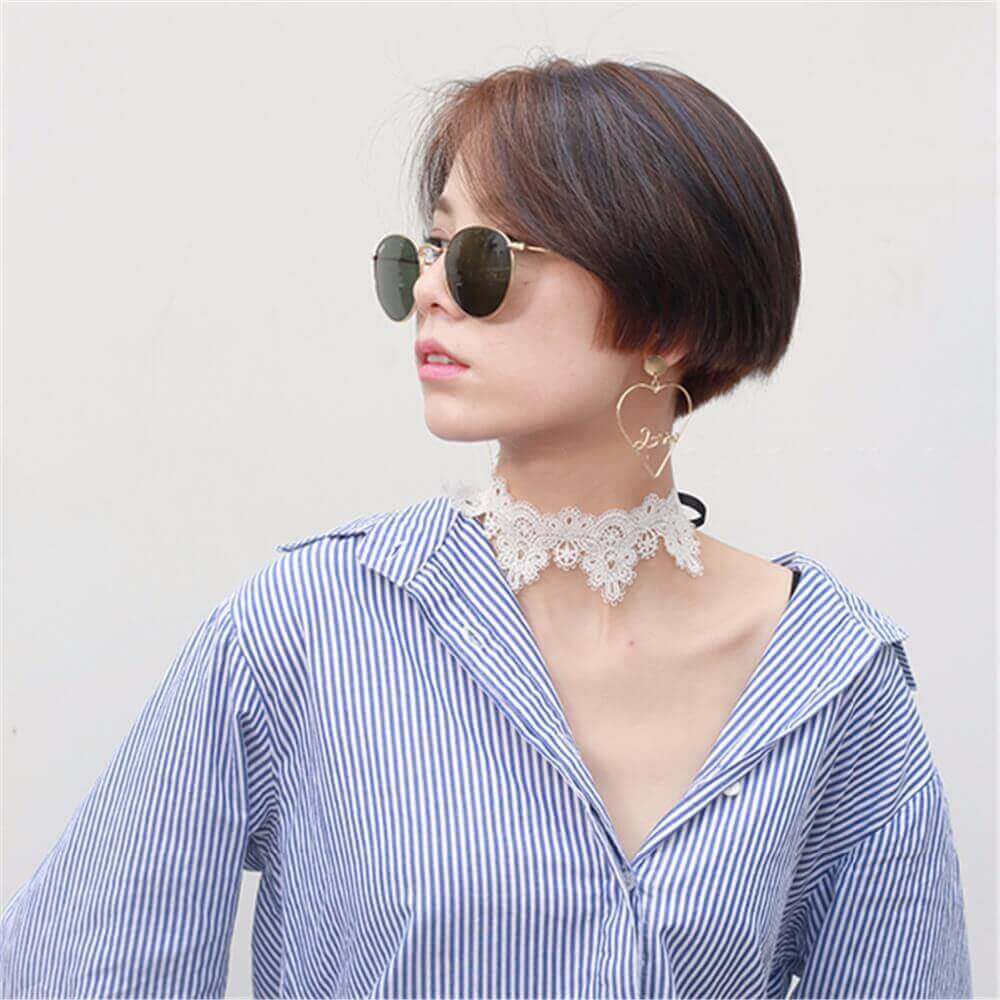
And, of course, our story about how to crochet a choker is in detail. The good thing about this accessory is that you can make it yourself, to your taste, with your own hands, from available materials - with a little effort and patience. An excellent choice for an everyday or festive look.
How are chokers different?
A choker is an ornament that visually lengthens the neck, making it more feminine and graceful, but at the same time it puts emphasis on it. Therefore, there is one rule that should be followed: if you have scars or spots on your skin, it is better to refuse the choker. But at the same time, if you think about the shape of the choker, then a scar or stain can be skillfully hidden: the Princess of Wales hid a scar on her skin under chokers.
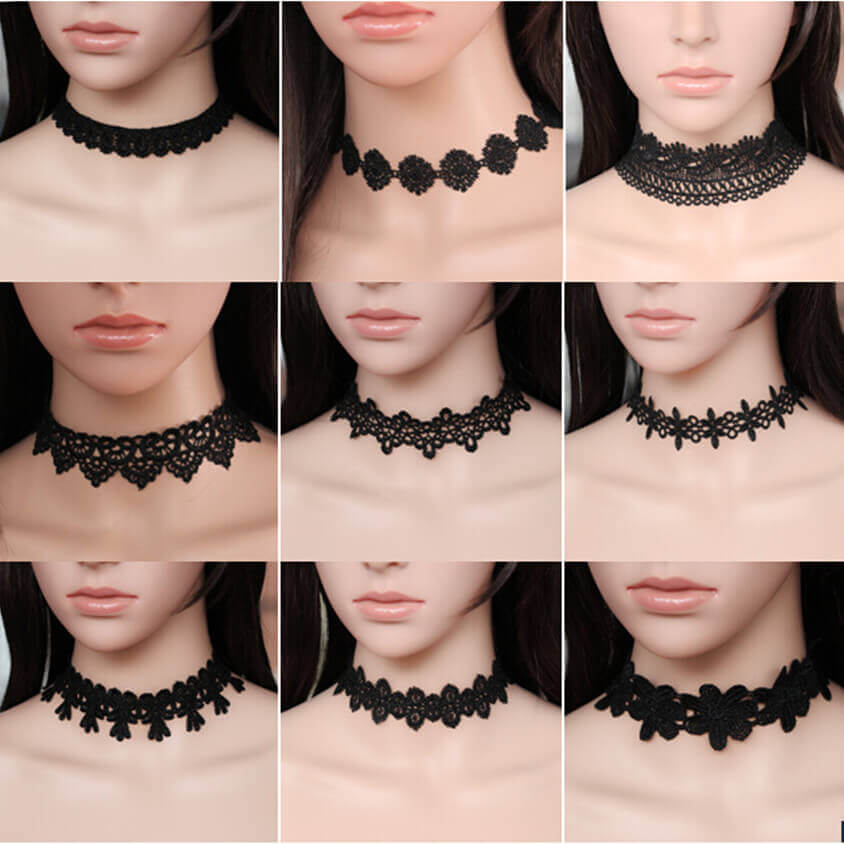
There are different types of chokers:
- Tattoo choker.
- Metal.
- From beads and beads.
- Leather.
- Velvet.
- Lace.
- Choker necklace, also known as a collar.
- Made from denim.
- Made from suede.
- Crocheted or knitted.
A knitted checker with long pendants and beads will visually “stretch” your neck if it is short. Also in this case, it is better to wear light-colored accessories that harmonize with the skin. Colors: beige, pale pink, golden, gray. A black collar will “cut” the neck in two with a strip, thereby slightly shortening this part of the body.

We are currently crocheting a gray choker. Knitting and description are not too complicated, and the product turns out very interesting and stylish.
To work you will need:
- Cotton threads 100%, (50 g / 120 m) - 1 package.
- Hook 3 mm thick.
- Buttons - 3 pcs.
- Knitting, density: 24 p. / 10 r. = 10 cm of canvas.
Designations:
- “...” - repetition of a fragment of knitting.
- VP - air. a loop.
- RLS - column. without a crochet.
- SSN - column. double crochet
- PBN - half-column. single crochet (SS).
Using a 3 mm thick hook we make a chain of 82 VPs and then knit:
1st R., 6th R., and 11th R.: 3 VP for 1 CCH, then all CCHs.
2nd and 7th r.: 3 ch for 1 dc, 1 dc in the next p., * 5 ch, skip 3 sts, 2 dc in the next 2. p.*, repeat from * to *.
3rd r., 5th, 8th and 10th r.: 3 VP for 1 dc, 1 dc in the next one. p.,* 4 VP, 2 Dc in 2 Dc previous. r.*, repeat from * to *.
4th and 9th r.: 3 VP for 1 dc, 1 dc in the next one. p., * 2 VP, 1 RLS in the previous one. 2 rows, 2 VP, 2 dc in 2 dc previous. r.*, repeat from * to *.
12th r.: 1 VP for a turn, * 6 VP, skip 4 p., 1 RLS in the next one. n., * repeat from * to *, and finish with 1 RLS.
13th r.: 1 VP in order to turn, * 3 DC we knit with our own hands into an arch of 6 VP previous. r., 1 picot (3 VP, 1 PBN in the 1st VP), 3 SSN, then 1 RLS in the previous RLS. row*, repeat from * to *.
14th r.: 1 VP to turn, (*Z VP, 1 picot* - repeat 6 times from * to *, 3 VP, skip two shells, 1 RLS in the next RLS), repeat 3 times what is in parentheses. (* 3 VP, 1 picot* - repeat 8 times from * to *, 3 VP, skip two shells, 1 RLS in the next RLS) - repeat 2 times what is in brackets, (* 3 VP, 1 picot*, repeat 6 times from * to *, 3 VP, skip two shells, 1 sc in the next sc) - repeat 3 times what is in brackets. That's all. The knitted choker necklace is ready.
All that remains is to make loops from 5 VP on one side and sew buttons for fastening.
Another scheme for a choker necklace:


Crochet patterns for chokers
Let's knit not one, but several chokers of different widths and different colors. A crocheted choker is a self-sufficient decoration, even if its shape is the simplest. There is no need to add massive jewelry to it: earrings, beads, bracelets. A choker pattern with one or two thin chains combines well. Knitted chokers can be decorated with one or more beads, beads, or pendants.
It is better to make the clasp from two thin suede or leather laces, buttons, or a special fastener for jewelry. Use a fastener from old beads. Any pattern you choose for your choker can be used. At the end of the article there is symbols for reading crochet patterns. Click on the arrow if you need to enlarge the diagram.
Hello.
The New Year holidays are getting closer, so today we are making a knitted necklace. I knitted it for a girl I know, a friend of my eldest daughter. I think it would also be suitable for an older girl.
Crocheting flowers is my favorite thing to do. I don’t like to repeat myself, so the flowers, although similar, are still different. Even the number of petals is not the same. And the lace braid to which it is attached looks completely different. You will find the diagram below.
For those who liked this crocheted flower, I offer a detailed master class.
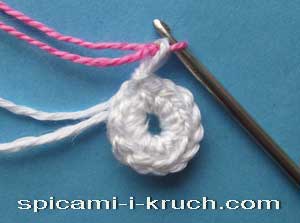
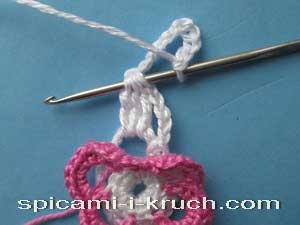
We take white yarn. First, as usual, we make a ring of 5 air loops. We knit 12 single crochets into it. Then we take the pink yarn, make a loop and pull it into the white loop, as shown in the photo.
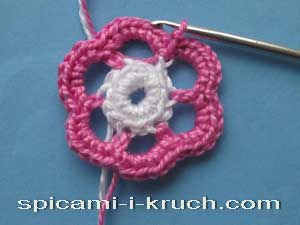
We knit arches from 5 VP, as shown in the Diagram of the middle of the flower.

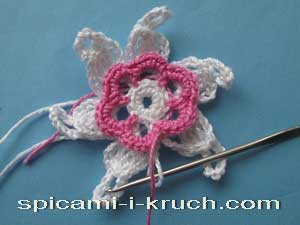
We tie each arch with 7 single crochets. We leave the pink thread for now - it will be useful for tying the flower.
And we continue knitting according to pattern 1 with white yarn.
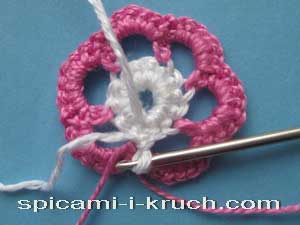
WITH back side flower we again knit arches from 5 VP.
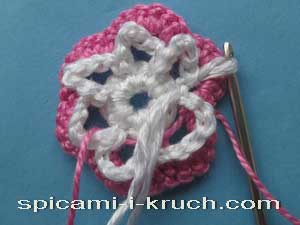
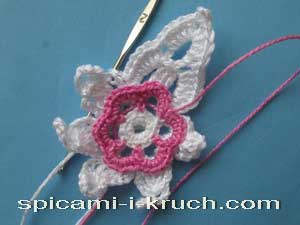
We turn the flower to face ourselves and knit the petals: treble, 5 VP, 3 treble, s2n with a common top,

pico from 10 VP and dc to the common top, then again 5 VP and dc.
These are the bases of the petals.

We tie all 6 pieces.
And now we’re making real petals for our knitted neck decoration. In an arch of 5 VP we knit 1 treble s/n, 1 half treble s/n, 5 treble s/n, then in a picot of 10 VP we knit 5 treble s/n, a picot of 3 VP, 5 treble s. /n. And in the second arch of 5 VP - 5 dc/. 1 half-st. s/n. 1 tbsp. b/n.
Now let's move on to the lace ribbon. I found the diagram on the Internet. She is from the magazine “Duplet”, I don’t know the magazine number, because... it is not visible in the picture. And the diagram was unclear, so I redrew it.
Everything is simple here: we start from the triangle and knit 7 VP,
then 1 row - 5 VP, 2 treble s/n, 2 VP, 2 treble s/n, 7 VP, 2 treble s/n, 2 VP, 2 treble s/n
Row 2 - 5 VP, 2 treble s/n, 2 VP, 2 treble s/n, 3 VP, 3 treble s/n, 3 VP, 2 treble s/n, 2 VP, 2 treble s /n, and so on according to the scheme.
If you found the article useful or have something to add, please write a comment at the bottom of the page. I will be very grateful.