Brickwork pillars. Laying piers of window and door openings. Reinforcement of brickwork. Laying columns under the logs of the wooden floor. Brickwork of pillars and piers
Pillars and narrow piers (no more than 1 m wide, or 4 bricks) are laid out in a single-row, two-row or three-row dressing system (the maximum number of adjacent spoon rows is three). If the width of the pier exceeds 1 m, the use of multi-row dressing is allowed. The minimum is the square section of the pillar in one brick. Pillars of this section are used mainly for unloaded structures (for example, fence posts of a site). For bearing pillars, the minimum section is 380 x 380 mm (1.5 x 1.5 bricks), for piers - 250 x 510 mm (1/2 brick). Pillars can be not only square, but also rectangular in plan.
At high loads, horizontal seams in the walls and pillars are reinforced with a metal mesh (wire diameter 3-6 mm) with an interval of 3-5 rows in height. The mesh must cover all the bricks, while not extending beyond the masonry: the reinforcement requires mortar protection, so it is not brought to the front surface of the pillar or pier by at least 10 mm.
In the case of erecting a decorative brick pillar (for example, in a fence or for installing a lamp on a pillar), vertical reinforcement is used: the masonry is led around an axis - a vertical rod in the form of a pipe or a metal profile of a different section. The masonry itself is arranged with a thickness of half a brick of facing stones. In this case, hollow bricks can also be used.
If, according to the project, a thin wall adjoins a pillar or a narrow wall, the masonry is connected by means of a vertical bar or extensions of reinforcement bars embedded in the pillar or wall.
Brick is chosen according to the same principles as for walls. For example, only full-bodied ceramic bricks of high strength and frost resistance are suitable for the installation of foundation pillars. For the construction of pillars and piers in external structures, as well as in buildings with intermittent heating, it is advisable to take a brick with a frost resistance of at least 50. As a rule, the pillars are laid out from solid brick of the M-75 grade or higher, using a high-strength mortar (not lower than M-25 ). The pillars and piers of the above-ground part of the structural framework are isolated from the foundation with a waterproofing material. The upper edge of pillars and narrow piers, over which no roof is provided, is covered with metal caps to protect against precipitation.
In the laying of pillars and piers, all seams must be filled with mortar. Masonry in a wasteland is allowed only for vertical front seams, and the depth of the solution should not exceed 10 mm from the front surface of the masonry (moreover, this option is possible only in the case of erecting a pillar for further finishing). Horizontal seams must be filled completely, with trimming of the mortar and (if necessary) with jointing.
If the laying is carried out for the subsequent plastering of the wall, it does not matter how the dressing of the seams in the corner part looks from the outside. At the same time, attention is paid only to the quality of the dressing) of the seams. In the corners of the foundation tape, one should choose such a method of laying the corner, in which the least number of incomplete bricks, especially quarters, will be used.
Transverse vertical seams should coincide in no more than three adjacent rows. That is, no less than in every fourth row, spoon bricks are covered with pokes. Begin and finish the laying of pillars and piers with a row of full-length bricks. If possible, incomplete bricks are not used at all, especially if the section (width) of the column or wall is less than 2.5 bricks.
With a cross section of a pillar of one and a half bricks, it is difficult to call any side of the spoon or bonder, since the bricks of the outer row are laid "in a circle."
For the device of backfilling during the construction of a column of solid masonry of square section with a side of 1.5 bricks, halves of a brick are used. The system of ligation of verst bricks in this case is single-row, and the backfill remains not tied with versts. In pillars of a different section, such a scheme (it is called a “basket”) is unacceptable: verst rows of pillars must be tied with the inside of the masonry. But even when constructing a pillar with a cross section of 1.5 bricks, another variant of masonry is possible, with dressing of a verst and filling: this is an option with a three-row dressing of seams. Here, too, in each row it is necessary to use one half of the brick, but this half is not laid in the center, as in single-row dressing, but each time in different corners of the column.
For the construction of pillars with a section of 1 x 1 bricks or 1 x 1.5 bricks, only single-row dressing is used. For pillars with a cross section of more than 1.5 bricks, a three-row dressing is mainly used, since a single-row one requires the use of a large number of incomplete bricks: to dress all vertical seams in all adjacent rows of masonry, it will be necessary to lay three-quarters in almost every row to shift the seams by a quarter brick. If at least one of the sides of the column is two bricks, the first row of masonry is laid out in two rows of bonders.
Pillars with a section of 1.5 x 2 or 2 x 2.5 bricks require the use of two halves in every four rows of masonry.
Partitions with quarters are laid out so that the quarters are securely tied with the main array of masonry. Quarters are needed to install window and door blocks, but it is possible to install windows and doors in openings without quarters.
The first row in the outer verst is laid with pokes, and for quarters, incomplete stones (quarters) are used. In the next row, the seams between the quarters and full-length bricks of the outer verst are covered with whole bricks or halves. Partition walls of a different width are arranged according to the same principle as those shown in Figures 48 and 49, with the addition or subtraction of the width to that required by the project.
Walls without quarters are laid out according to the same principle as rectangular pillars or ordinary ends (restrictions) of walls.
Each laid row of masonry in pillars and piers is checked for verticality and horizontality using a level and a plumb line, since it is extremely difficult to correct a mistake made in the correct laying of such a small area.
Redevelopment of a house or apartment involves the construction of a new interior partition. At the same time, one of the most popular materials for the construction internal walls is a brick - a very strong, durable, hardly combustible and soundproof building stone.
The main thing that is needed in the first place is to obtain all the necessary permits (mainly for an apartment) and make sure according to the construction project that a new brick wall is possible in your home and it will fit perfectly into. Then you can safely proceed with the repair.
Let's deal with you now how to build a simple brick wall.
Tools and materials
- trowel;
- metal container;
- bucket;
- building level;
- roulette;
- marker or chalk;
- thin twine or fishing line;
- oven pick for splitting building materials;
- jointing for seams (under plaster is not necessary);
- shovel;
- brick;
- reinforcing wire for the length of the masonry, two rods for every 5 rows;
- cement and sand;
- water.
Method of brickwork for the wall
The usual parameters of a red solid brick made of clay: 65 mm * 120 mm * 250 mm. In one and a half and double bricks, only the height of the rib differs, respectively - 88 mm and 140 mm.
Based on this, for interior walls, traditionally simple laying "in half a brick" is used when each brick is laid one after the other along in one line. The thickness of the wall in this case will be 12 cm. Less commonly used for partitions is a thicker masonry “in one brick” along the width of the face with a wall thickness of 25 cm.
Some piers are 65 and 88 mm thick when the brick is placed “on edge”, but they are not very reliable. There are also more complex types of masonry - in two, one and a half bricks, etc., which are usually used for the construction of external walls.
Material Quantity Calculation
Quantity required material depends on the dimensions of the brick, the planned thickness of the masonry and the footage of the partition. For example, taking into account seams of 10-12 mm, per 1 sq. m partition when laying in "0.5" can take a standard single brick about 51 units, when laying in "1" - 102 units. One and a half bricks, respectively, 39 and 78 pcs. Then the result is multiplied by the area of the wall, taking into account the safety margin of 5% over the plan.
Preparatory stage
A brick pier should be erected on a flat and, most importantly, durable surface, since it has a decent weight. Therefore, if the foundation is not ideal, make a strong rough reinforced cement-sand screed strictly under the horizontal level.
A cut-off waterproofing and a vibration damper are laid between the foundation and the future pier. Most often, rolled materials like roofing material are used for these purposes, laid in 2 layers, while leaving up to 20 cm from the edges.
In order for the partition to firmly enter the adjoining walls with extreme bricks, they make grooves-recesses up to 3-5 cm, which in width correspond to the thickness of the masonry. If this is not possible, in the future it will be necessary to fasten the wall to adjacent walls using corner brackets.
markup. Using a tape measure, crayon, cord and spirit level, carefully mark the boundaries of the future masonry in the form of two parallel lines on the floor and on both adjacent walls. The marking must be strictly verified, correct and correspond to the contour of the masonry.
Rough laying
First of all, you need to know one of the rules of masons - the longitudinal laying of bricks with a long edge along the wall being erected is called "spoon", and, conversely, laying building materials across the row - "poke".
Lay out the first row of bricks along the marking lines on the floor dry, observing uniform gaps between them and taking into account the width of the doorway. Try to use whole bricks for the first row, if possible, without chips and cracks.
From above, carefully dry the edge corners of the future wall up to 3-5 rows on top of several bricks. Check the verticality of the corners - they should go strictly in 90 degrees.
masonry mortar
The mortar for a brick partition should be of a creamy consistency - not too liquid so that it does not spread and plastic enough to provide a certain shrinkage of the building material.
For mortar, PC400 or M500 cement is suitable. The composition of the mixture varies. For example, this option is common:
- building sand - 4 hours,
- cement - 1 hour,
- water - 1 tsp.
If the sand is ordinary, then you need to take three parts of it (3:1:1).
Mix sand and cement dry, then add water to the container, and mix the composition again. To make the solution more elastic and not delaminate, clay, lime, gypsum, plasticizers, or even ordinary household detergent can be added to it.

Laying process
Before starting work, hold the bricks in a basin of water - a wet stone will absorb the mortar less.
Lay the first row according to the markup on top of the waterproofing. Start laying from left to right from any of the corners or from the location of the doors.
Collect the solution from the container and apply to the surface, carefully leveling it horizontally with a trowel. The thickness of the mortar in vertical joints is taken 8-10 mm, as well as 10-12 mm horizontally.
Lay the brick on the prepared mortar path at some distance from the outermost laid stone or adjacent wall. (Or a little differently - the brick is taken in hand and lowered into the solution at a slight angle). Now move the brick to the already laid element, at the same time raking up the required amount of binding mixture with the corresponding edge to form a vertical seam.
Another way: to the vertical end of the laid stone, rake up the mortar with a trowel, lay a new brick, pressing it against the trowel, then abruptly remove the tool.
After joining the edges in any of the above methods, settle the stone and trim it with respect to the already laid blocks. For better adhesion, the brick can be tapped with a trowel or hammer. Finally, remove the remaining mortar with a trowel and distribute it from above or from the ends.
While the mixture has not frozen, go through the seam with a joint to give the masonry beautiful view. If the wall is to be plastered, no grouting is needed. For subsequent plastering, the seams are usually made empty seam - the solution is applied so that it does not reach the front edge of the brick a little.
Regularly check with a tape measure and level the horizontal laying of the first and subsequent rows, the dimensions of the doorway, as well as the vertical inclination of the partition.
If you need to split a brick, then mark the part that needs to be beaten off. Then apply oblique blows with a special pick, combing the corners, and gradually chip off the desired fragment.
Why do you need a cord
Above the upper edge of the future row of bricks, be sure to stretch a thin cord or fishing line to its full length, which will help control the straightness of the laying. The cord is fastened as follows: on top of the first two bricks of the lower row, one brick of the upper row is laid out, and then a nail with fishing line is stuck into the mortar that has not yet cooled down along the edges of the future lower row near the adjacent walls. Or you can simply press down a nail with a cord with something heavy from above to the first bricks of any row.
Each time the cord is rearranged higher and higher under the level of the laid out row. Constantly control the coincidence of the upper edges of the rib of the building material with the fishing line in the process of upsetting and leveling the brick. Adjust the horizontal position of the partition by the thickness of the seam.
Dressing masonry
During the construction process, it is necessary to observe a special dressing - overlapping of vertical seams with bricks of the upper row. Bandaging of the masonry is necessary for the strength of the masonry and the uniform distribution of the load in the wall, as well as for the economical use of building materials.
For example, the second and other rows are stacked with a shift so that the vertical seam of the lower row falls on the center of the brick of the upper row. This is the so-called simple spoon dressing - it is optimally suited for a conventional half-brick partition.
For a wall in one brick, for example, cross dressing is suitable, which is performed by successive rotation of rows in a poke and in a spoon.
In conclusion
To give the wall strength, it is recommended to lay two reinforcement bars (4-6 mm) over the entire length of the masonry after the next 4 or 5 rows. During the day, do not make the partition higher than 150 cm - the solution must seize, otherwise the bulkhead may “float”.
Laying pillars and piers
The laying of pillars and narrow piers, as well as the laying of corners, is usually done by a bricklayer with extensive experience.
Pillars and narrow piers (no more than 1 m wide, or 4 bricks) are laid out in a single-row, two-row or three-row dressing system (the maximum number of adjacent spoon rows is three). If the width of the pier exceeds 1 m, the use of multi-row dressing is allowed. The minimum is the square section of the pillar in one brick. Pillars of this section are used mainly for unloaded structures (for example, fence posts of a site). For bearing pillars, the minimum section is 380 × 380 mm (1.5 × 1.5 bricks), for piers - 250 × 510 mm (1 × 2 bricks). Pillars can be not only square, but also rectangular in plan.
At high loads, horizontal seams in the walls and pillars are reinforced with a metal mesh (wire diameter 3–6 mm) with an interval of 3–5 rows in height. The mesh should cover all the bricks, but not go beyond the masonry: the reinforcement needs to be protected with mortar, so it is not brought to the front surface of the pillar or pier by at least 10 mm.
In the case of erecting a decorative brick pillar (for example, in a fence or for installing a lamp on a pillar), vertical reinforcement is used: the masonry is led around an axis - a vertical rod in the form of a pipe or a metal profile of a different section. The masonry itself is arranged with a thickness of half a brick of facing stones. In this case, hollow bricks can also be used.
If a thin wall adjoins a pillar or a narrow wall according to the project, the masonry is connected by means of a vertical bar or extensions of reinforcement bars embedded in the pillar or wall.
Brick is chosen according to the same principles as for walls. For example, only full-bodied ceramic bricks of high strength and frost resistance are suitable for the installation of foundation pillars. For the construction of pillars and piers in external structures, as well as in buildings with intermittent heating, it is advisable to take a brick with a frost resistance of at least 50. As a rule, the pillars are laid out from solid brick of the M-75 grade or higher, using a high-strength mortar (not lower than M-25 ). The pillars and piers of the above-ground part of the structural framework are isolated from the foundation with a waterproofing material. The upper edge of pillars and narrow piers, over which no roof is provided, is covered with metal caps to protect against precipitation.
In the laying of pillars and piers, all seams must be filled with mortar. Masonry in a wasteland is allowed only for vertical front seams, and the depth of the solution should not exceed 10 mm from the front surface of the masonry (moreover, this option is possible only in the case of erecting a pillar for further finishing). Horizontal seams must be filled completely, with trimming of the mortar and (if necessary) with jointing.
If the laying is carried out for the subsequent plastering of the wall, it does not matter how the dressing of the seams in the corner part looks from the outside. At the same time, attention is paid only to the quality of the dressing of the seams. In the corners of the foundation tape, one should choose such a method of laying the corner, in which the least number of incomplete bricks, especially quarters, will be used.
Transverse vertical seams should coincide in no more than three adjacent rows. That is, no less than in every fourth row, spoon bricks are covered with pokes. Begin and finish the laying of pillars and piers with a row of full-length bricks. If possible, incomplete bricks are not used at all, especially if the section (width) of the column or wall is less than 2.5 bricks.
When a pillar is one and a half bricks in cross section, it is difficult to call any side of a spoon or a stick, since the bricks of the outer row are laid “in a circle” (Fig. 47).
Figure 47. Bandaging of seams in the laying of pillars: a) square section with a side of one brick; b) rectangular section 1 × 1.5 bricks; c) square section with a side of 1.5 bricks (single-row dressing); d) square section with a side of 1.5 bricks (three-row dressing); e) rectangular section 1.5 × 2 bricks (two-row dressing);

Figure 47. Bandaging of seams in the masonry of pillars: f) rectangular section 1.5 × 2 bricks (three-row bandaging); g) square section with a side of 2 bricks (three-row dressing); h) rectangular section 2 × 2.5 bricks; 1–4 - laying bricks in rows
For the device of backfilling during the construction of a column of solid masonry of square section with a side of 1.5 bricks, halves of a brick are used. The system of ligation of verst bricks in this case is single-row, and the backfill remains not tied with versts. In pillars of a different section, such a scheme (it is called a “basket”) is unacceptable: verst rows of pillars must be tied with the inside of the masonry. But even when constructing a pillar with a cross section of 1.5 bricks, another variant of masonry is possible, with dressing of a verst and filling (Fig. 47, d): this is a variant with a three-row dressing of seams. Here, too, in each row it is necessary to use one half of the brick, but this half is not laid in the center, as in single-row dressing, but each time in different corners of the column.
For the construction of pillars with a section of 1 × 1 brick or 1 × 1.5 bricks, only single-row dressing is used. For pillars with a cross section of more than 1.5 bricks, a three-row dressing is mainly used, since a single-row one requires the use of a large number of incomplete bricks: to dress all vertical seams in all adjacent rows of masonry, it will be necessary to lay three-quarters in almost every row to shift the seams by a quarter brick. If at least one of the sides of the column is two bricks, the first row of masonry is laid out in two rows of bonders. Pillars with a section of 2 × 2 bricks are made only from whole stones.
Pillars with a section of 1.5 × 2 or 2 × 2.5 bricks require the use of two halves in every four rows of masonry.
The walls with quarters are laid out so that the quarters are securely tied with the main mass of masonry (Fig. 48, 49). Quarters are needed to install window and door blocks, but it is possible to install windows and doors in openings without quarters.
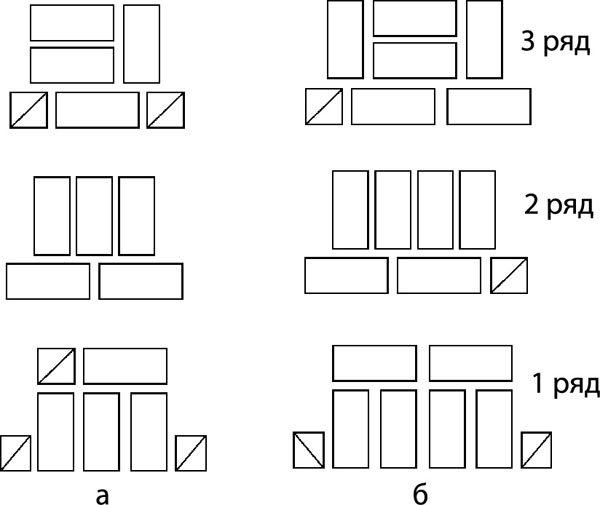
Figure 48. Ligation of seams in piers with quarters with a wall thickness of 1.5 bricks: a) the width of the pier is 1.5 bricks; b) the width of the pier is 2 bricks; 1–3 - laying out bricks in rows

Figure 49. Ligation of seams in piers with quarters with a wall thickness of 2 bricks: a) the width of the pier is 3 bricks; b) the width of the pier is 3.5 bricks
The first row in the outer verst is laid with pokes, and for quarters, incomplete stones (quarters) are used. In the next row, the seams between the quarters and full-length bricks of the outer verst are covered with whole bricks or halves. Partition walls of a different width are arranged according to the same principle as those shown in Figures 48 and 49, with the addition or subtraction of the width to that required by the project.
Walls without quarters are laid out according to the same principle as rectangular pillars or ordinary ends (restrictions) of walls.
Each laid row of masonry in pillars and piers is checked for verticality and horizontality using a level and a plumb line, since it is extremely difficult to correct a mistake made in the correct laying of such a small area.
Lintel masonry
Lintels in brick structures are necessary to continue masonry over the opening. In brickwork, reinforced concrete and brick lintels are used, the most common of which are reinforced concrete. Brick lintels, in turn, are ordinary and wedge-shaped, and wedge-shaped brick lintels are straight (or flat, Fig. 50) and arched. Arched lintels are simply called arches and are distinguished by the height of the rise (or the length of the arc of a circle): arched, semicircular, lancet, etc. Arches will be discussed in this chapter a little later.

Brick lintels have higher decorative qualities than reinforced concrete ones, and are more suitable for brickwork. True, if the masonry is intended for further plastering or cladding, this advantage does not make sense.
The device of brick lintels is more laborious, especially when choosing a wedge-shaped lintel. As a rule, they are performed only by experienced masons.
If there is a narrow pier between two brick lintels (less than 1 m wide), the laying of rows between the lintels is carried out on the same mortar as the lintels. To make ordinary brick lintels, a solution of a brand not lower than M-25 is used; for wedge-shaped - a solution of a brand not lower than M-10. The seams in the laying of the jumpers must be completely filled with mortar. Laying in the wasteland is unacceptable. Bricks are used selected (without defects), full-sized, grades of strength not lower than M-75. The laying of jumpers always begins with the bond rows.
For openings with a direct ending with a width of more than 2 m in individual construction, only reinforced concrete lintels are used.
Ordinary brick lintel
At the level of the top of the opening (when the masonry is brought to this level), formwork is installed, for which strong boards 40–50 mm thick are usually used. The formwork is arranged taking into account the execution of a quarter along the upper edge of the opening (if a quarter is necessary). The formwork is supported in the grooves left when laying the slopes of the opening. Instead of furrows, it is possible to support the formwork on bricks fired at the right level from the masonry (according to the principle of the plow device). If the opening has a width of more than 1.5 m, the formwork is additionally supported by wooden racks (support bars firmly installed in the center of the opening). It is possible to support the formwork only on beams, without furrows or brick outlets: in this case, two beams are installed on each side of the opening (and additionally in the middle if the opening has a width of more than 1.5 m).
The solution is spread on the formwork with a layer of 20-40 mm. Reinforcement is laid on the mortar bed in the form of rods with a cross section of 4-6 mm with an interval of half a brick in the thickness of the masonry (i.e., the next rod is placed every half-brick), but at least three rods for the entire width of the wall (the interval between the rods is reduced if the wall is thin). Under the future quarter (if available according to the project), reinforcement bars are additionally laid. For corrugated rods (periodic profile) a diameter of 4 mm is sufficient, smooth rods must have a diameter of at least 6 mm. Instead of rods, you can use reinforcement in the form of steel strips with a section size of 1 × 20 mm. The strips are laid flat, according to the same principle as the rods.
Reinforcing bars are embedded (embedded) into the mortar to the same depth, so that they are approximately in the middle of the mortar bed along its thickness. The ends of the reinforcement on both sides of the opening must rest on the brickwork (not on the formwork) by at least 250 mm. Smooth rods must have bends (hooks) at the ends (to bend the ends of the reinforcement, an additional length is required, and not from the 250 mm mentioned above). These "hooks" are bent around the brick in the masonry.
Ordinary lintels above openings 1.5–2 m wide are arranged with a height of 5–6 rows of masonry; for openings of smaller width, a working height of a lintel of 4 rows is sufficient (the minimum height of a brick lintel is a quarter of the width of the opening). The seams in the lintel masonry must be strictly tied, both in the transverse and in the longitudinal direction.
When all 5–6 rows of masonry gain sufficient strength, the plank formwork is dismantled. On average, the formwork is removed 12–24 days after the completion of the laying of the lintel. The better the weather conditions, the faster the masonry will gain strength. Thus, at an outside air temperature of up to 5 °C (but not less than 1 °C), it is necessary to wait 24 days before removing the formwork. At a temperature of +5 ... 10 ° C, the lintel is kept in the formwork for 18–24 days; at a temperature of 10 ... 15 ° C - 12-18 days; at a temperature of 15 ... 20 ° C - 8-12 days; at temperatures above 20 °C, 5 days are sufficient. These recommendations are given in the minimum allowable time and are only suitable for ordinary and reinforced brick lintels, in which there is no thrust due to the inclination of the stones.
After dismantling the formwork, the furrows against which it rested are laid with bricks or sealed with mortar. If the formwork was supported on bricks released from the masonry, they are cut down.
Wedge brick lintel
For the installation of a wedge-shaped lintel, like an ordinary one, formwork boards are installed, the mortar is spread. Reinforcement is not required in this case. Bricks use ordinary or special, wedge-shaped (wedge-shaped).
The slope of the bricks forms a spacer (wedge). The angle of inclination is calculated during the project and transferred to the template, which is then used when laying the lintel.
After the formwork is installed, it is used to mark the location of future rows of masonry, taking into account the thickness of the seam. Unlike conventional masonry, the bricks will be arranged vertically (i.e., almost vertically), and the markings will be made on a horizontal plane. The number of rows should be odd, and the middle row should be placed strictly in the middle of the opening. The central vertical row of bricks is called the castle, since it closes the lintel masonry.
The brick is placed on the edge (on a poke or on a spoon) from the edges of the jumper to its middle, with a slope at the edges. Laying is carried out simultaneously from both edges, with mandatory dressing of the seams between the rows. The correctness of the slope is checked with a cord, the end of which is fixed at the design intersection of the seams.
The middle brick is literally wedged into the masonry last (it should fit tightly between adjacent bricks, wedging the jumper and providing space). Previously, if necessary, the castle bricks are pressed. The middle brick, unlike all the previous ones, is installed vertically. To move from the calculated angle of inclination (at the edges of the lintel) to vertical seams adjacent to the middle brick, the seams between the bricks of the wedge-shaped lintel, when using ordinary bricks, arrange a variable section (in the form of wedges): in the lower part - at least 5 mm wide; in the upper part - no more than 25 mm. When using wedge bricks, the need to make wedge-shaped seams, as a rule, disappears.
Brick lintels are not used in the construction of buildings with likely uneven ground settlement. If the building will be on a soil base with uneven settlement, then even with the necessary expansion joints and the correct choice of foundation, it is better to make lintels over the openings from reinforced concrete.
Wedge-shaped jumpers are kept in the formwork (until it is dismantled) for at least 10 days, depending on weather conditions. At temperatures up to 5 °C (but not less than 1 °C), the minimum exposure time is 20 days, at a temperature of 5 ... 10 °C - 15-20 days, at an outside air temperature above 10 °C - 10-15 days.
arch masonry
Arches are spacer arched structures of a curvilinear shape, designed to cover an opening in a wall or a span between two free-standing supports (pillars, columns). A lateral thrust is created in the overlap of the opening: the pressure from the overlap does not go straight down, but with a shift to the side, which allows you to keep the stones in the arch itself if it is made of brick.
Arches are used not only in openings, but also as the completion of decorative niches in the wall, as well as in the masonry of fireplaces. A brick arch can be arranged both in a brick wall and in a masonry of small concrete blocks.
In relation to the height of the rise of the arch to its width, arched, semicircular and lancet arches are distinguished (Fig. 51). In addition, there are arches of special shapes (horseshoe-shaped, three-lobed, keeled, etc.). In them, the decorative value sometimes prevails over the constructive one.

Figure 51. The main types of arches: a) bow; b) semicircular; c) pointed
Vaults, which differ from arches in great thickness, can take the same shape in cross section. The thickness of brick arches should be at least half a brick.
The arch lifting arrow is the difference in height between the heels (reference points) of the arch and the upper (middle) point of its inner surface. The distance between the heels is called the span, or the width of the opening.
For decorative purposes, arches are arranged not only over openings, but also over niches in the walls (for example, to diversify a blank brick wall).
Brick arched lintels have a number of advantages over reinforced concrete ones: ease of installation (for reinforced concrete lintels, it is necessary to prepare bent reinforcement, the erection of formwork is required in both cases); the possibility of erecting a jumper alone; aesthetic appearance.
For the construction of brick arches, a solution of a grade of at least M-10 and full-sized, selected bricks of the correct form, ordinary or wedge-shaped, are used. Cement to create a solution must be quickly hardening (even at low positive temperatures - for example, 5 ° C). Therefore, the mortar for laying brick arches is prepared on the basis of Portland cement. Portland slag cement, pozzolanic Portland cement are slowly hardening at low positive temperatures, so their use in this case is unacceptable. For the construction of arched lintels, ordinary or wedge-shaped (curved) bricks can be used. In the first case, the masonry will have to be carried out with wedge-shaped joints (at least 5 mm at the bottom and no more than 20-25 mm at the top). The smaller the radius of the arch and the larger its span, the more difficult it is to make an arch from ordinary, non-wedge-shaped bricks. It is also possible to cut an ordinary brick under a wedge shape, although this process is quite laborious.
When erecting an arch from an ordinary (not wedge-shaped and not undercut) brick, the minimum allowable radius of its circumference is determined by the height of the arched lintel (not the lifting boom, but the height of the brick row): for an arched lintel half a brick high, the minimum allowable radius is 550 mm, for a lintel with a height of in one brick - 1170 mm, for a jumper with a height of 1.5 bricks - 1770 mm.
Seams in arched lintels and vaults must be completely filled with mortar; laying in a wasteland is unacceptable.
It is desirable to carry out masonry at a temperature not lower than 5 ° C (it can be reduced to 1 ° C). If there is a danger of frost, antifreeze additives are mixed into the solution. In this case, the installation of arches is permissible at an average daily outdoor temperature of up to -15 ° C (not lower).
For the installation of an arched lintel of any shape, the wall must be erected to the level of the heels (reference points) of this lintel.
The process of erecting an arch consists of the sequence of actions given below.
1. Manufacture and installation of formwork. Before erecting a brick arch, it is necessary to design not only the arch itself, but also the formwork to create it. The formwork for the arched lintel consists of several elements (Fig. 52). It is most convenient to make formwork from wood and materials derived from it (chipboard, fiberboard, plywood). In order not to arrange furrows or releases of bricks in the masonry, the formwork is supported on racks (wooden bars of the required length) attached to the side faces of the openings. Enough two racks on each side of the arch. On each side, strong boards (wedges) are supported on a pair of racks in several layers. Layers of wedges ensure smooth lowering of the formwork during its dismantling. In addition, wedges of small thickness are used to tamp the working (circular) part of the formwork to a horizontal position, if the installed racks for some reason turned out to be of different heights.

Figure 52. The process of erecting an arched lintel using the example of a semicircular arch: 1 - supports; 2 - wedges; 3 - circular formwork; 4 - square template; 5 - cord
On the wedges, a circular formwork is mounted from beams and thin boards (or from wood-based panels). To simplify the installation of circular formwork on initial stage its installations strengthen a puff board between the heels of the arch on each side. This board is connected to the wedges and the bottom boards of the circular formwork, and is supported on the rack bars. On the puff board, mark the center of the circle, which corresponds to the outlines of the arch. In a semicircular arch, the center of the circle is in the middle between the heels of the arch, in the arch, in the center of the opening, but much lower than the heels. For a lancet arch, two circle centers must be noted, since each side of the arch has its own circle. For convenience, the center of the arch circles is indicated in the project or sketch, according to which the jumper is arranged. In order to fix the cord in the right place, the formwork for arched and lancet arches is supplemented with boards (Fig. 53) where the center of the circle is located (additional boards can be fixed on rack bars). Additional boards fasten directly to the masonry of the opening or to the formwork posts.

Figure 53. Control and measuring structure during the construction of a beam arch: 1 - a board located at the level of the center of the circle; 2 - cord or rotating rail
In the marked center of the circle, a cord or a rotating rail is fixed on a nail or other fastener to determine the radii (for convenience, the cord can be marked with the radii of the formwork and the arch itself). The sheathing boards of the circular formwork must be installed at the same distance from the marked center of the circle. The cord is not removed after the formwork: it is useful for controlling the laying of bricks in the arched lintel.
Circular formwork can have a different design, depending on the project. The most reliable formwork with solid transverse curvilinear struts at the end (Fig. 54). Spacers are also called circles. Such supports are installed on each side of the arch, and sheathing boards are mounted on them, which make up the surface of the circular formwork.

Figure 54. Circular formwork with solid supports: 1 - support; 2 - boards of a circular surface
Another version of the device supports - arched (not solid, Fig. 52). The elements that make up the formwork arch must be rigidly fastened together with metal brackets embedded in wood. Fasteners are also necessary when constructing solid prefabricated circling formwork.
The described two versions of the circle device are prefabricated (composite), since the supports are pre-assembled from several elements. A solid circle can be made from a wide board, chipboard sheet or bent elements (metal or wood). The first two options will be solid solid props, the last one will be an arched solid prop.
The masonry of the arch arch is performed according to one of two options: flush with the wall masonry; with a protrusion from the wall masonry (it is advisable to arrange a protrusion no more than 6 cm or a quarter of a brick). The second option is more interesting from a decorative point of view, as it emphasizes the work of the arch as an architectural structure.
The sheathing of the plank formwork for the installation of jumpers should be as smooth as possible, if possible it should be covered with insulating material (for example, dense polyethylene film) or sheathed with roofing iron to ensure that the surface slides and prevents it from being firmly bonded to the mortar of the jumper masonry. To fulfill this condition, it is possible to perform sheathing not from boards, but from fiberboard.
When choosing materials for creating the upper part of the formwork, one should be guided not only by their strength, but also by their lightness, since it is quite difficult to raise the template to the height of the arched lintels.
It is more convenient to assemble the upper part of the circular formwork, consisting of circles and sheathing, separately, and then mount it in the right place by installing it on racks and wedges. For the manufacture of a circle, 5 mm is subtracted from the design width of the opening (the allowance is left in case the template expands in wet weather so that it can be easily dismantled under any conditions). The height of the circle is taken equal to the height of the rise of the arch, minus the thickness of the intended sheathing (fiberboard sheet or boards). From chipboard or plywood, after creating a circle drawing on this material, the first circle is cut out, and the second circle along it. To create a curved line in the drawing (an arc of a circle that makes up the outline of an arch), a peg fixed in the ground is used, installed in such a way that it is the center of the circle for the workpiece lying nearby. A cord is tied to this peg, the length of which is equal to the radius of the same circle, and the outline of the circle is drawn on the workpiece with a pencil along the cord.
The circle for the bow arch is made not with sharp corners along the edges, but with an indentation down by 10 cm, for better support of the template on wedges and racks (Fig. 55).

Figure 55. Template blanks for making beam arches
The circles are fastened together using self-tapping screws or nails with spacers in the form of pieces of timber or boards so that the thickness of the resulting template corresponds to the thickness of the arch and is constant over the entire area of the template. It is necessary to focus on the thickness of the arch, and not on the thickness of the wall, since the arch can protrude beyond the plane of the wall and, because of this, be thicker.
Sheathing boards or a fiberboard sheet are attached to the upper (curvilinear) surface of the template. Sheathing is attached to nails.
On the boards (sheathing) of the circular formwork, rows of brickwork are marked, taking into account the thickness of the seams. Marking should be done not only on the upper plane of the formwork, but also on its ends, since the upper plane is covered with a mortar bed before laying bricks (marking on the upper plane is only needed to check the conformity of the markings on both ends).
If the vault of the arch is shallow, the sheathing can not be arranged. In this case, only 2–3 circles are installed along the depth of the vault, along which markings are arranged and masonry is carried out. In order to avoid tilting during the laying of the vault, the circles must be firmly fixed (wedged) in the transverse direction: if it is not necessary to arrange the upper skin, then the spacers between the circles must be present in any case.
A ready-made template of circles, spacers and sheathing (or without sheathing) is mounted in the opening on supports and wedges. Between the supports (in addition to the puff that connects the heels of the arch), approximately in the middle of the opening in height, a spacer board can be fixed for greater strength.
Sometimes, for the construction of arches, a fixed metal formwork (corners, bent profile) is used. The design turns out to be very strong, but when the masonry settles, the arch can crack at the seams.
2. Laying bricks. Bricks are laid from the heels to the arch lock, simultaneously on both sides, focusing on the layout of the formwork. The heels of the arch can be arranged in several ways. In semicircular and lancet arches, the lowermost bricks (these bricks are heels) are laid on a wedge-shaped seam on the even base of the previous rows of masonry (or on a flat seam if the bricks for the arch are wedge-shaped). This is not enough to make a beam arched lintel: it requires the installation of inclined heels before laying full-sized bricks in the rows of the arch. The heels are made of obliquely hewn bricks, which are chipped according to a pattern (Fig. 56).

Figure 56. The device of the heel for the arch arch: a) the outline of the arch; b) heel pattern; c) reverse heel pattern; 1 - the heel of the arch, assembled from bricks hewn according to patterns; O - the center of the circle of the arch; R - radius of the circle of the arch
Depending on the geometric parameters of the beam arch, one or more templates may be required (if the height of the heel exceeds one row of masonry). Since the templates will still have the same bevel angle, you can use one template, with markings on it for various lengths of processed bricks, which is required by the project. For primary marking and chipping, a regular heel template is used, and for fitting bricks, a reverse template is used. In Figure 56, the device of the heel of the arch arch is shown schematically. In practice, it is obligatory to bind the heel bricks cut according to the pattern with ordinary masonry bricks located in the neighborhood. The bricks of the bow arch begin to be laid when the heel masonry gains sufficient strength.
The arch can be arranged in an existing wall if this wall has sufficient strength (the conclusion of an experienced designer is required). In this case, additional work appears: the device of a niche or opening in the existing masonry, taking into account the dimensions of the arch and the formwork for it; laying new bricks (instead of those that fell out during the hollowing of the niche) around the arch after its construction.
If the arch is lined with bricks other than ordinary bricks and protrudes beyond the plane of the wall, the conjugation of the extreme bricks of the lintel with the fifth can be arranged in a different way (Fig. 57). The heel is brought out at a slope less than the slope of the extreme bricks of the bow arch (i.e., with a deviation of the seam from the radial direction), and the first (extreme) bricks of the arch are hewn to a wedge-shaped or triangular shape.
Figure 57
After laying the heels, they begin to build the arch in rows (i.e., to lay the vault). For arches, unlike straight lintels, a lower mortar bed is not required.
The laying of the heels (in order to avoid shifting the vault during operation) is reinforced with a steel strip or corner, embedding them across the vault into a mortar bed under the heels.
To determine the angle of inclination of the next brick, a cord is used, stretched from the center of the arch circle, and a square template (see Fig. 52), made specifically for this arch project. The work of the square template is based on the fact that the seams between the bricks in the arch masonry must be perpendicular to the tangent to the circle at the point from which this seam departs. One of the sides of the square (which is applied to the surface of the circular formwork) must correspond in curvature to the lower surface of the arch. To simplify the laying process, the seam is arranged with an orientation to the square template, and adjusted in place already with a cord check.
In addition to the radially fixed cord, to check the correctness of the masonry, they use the usual mooring cord, fixed on the orders (Fig. 58). In this case, the marking of vertical rows is carried out in order not according to the typical height of a row of brickwork, but taking into account the design height of the masonry of each row of the arch (the intervals between height marks will decrease with increasing row number).

Figure 58. Checking the laying of arched rows with a mooring cord: 1 - ordering; 2 - mooring cord
The keystone, as in a straight wedge-shaped lintel, must be wedged into two adjacent stones. At the same time, it is impossible to knock on it, otherwise the design of the arch may “disperse” (the seams will move). The castle brick is inserted into the place left for it with emphasis (pressure) by hands.
The keystone can be larger than ordinary bricks in the arch, but such a difference in size must be foreseen by the project and indicated when marking the rows on the formwork. As a rule, the total number of stones in the arch is taken to be odd, so that the keystone is located strictly in the center. In rare cases, an even number of bricks is taken, and a castle of two stones is arranged in the center. The resulting structure will be less durable than with a single capstone.
If the masonry is not intended for further plastering or cladding, the seams are treated with jointing. With a thickness of vaults of a quarter of a brick, their upper surface is rubbed with mortar during the laying process. With a greater thickness of the arch, this is not done.
If the opening has quarters, the laying of the arch is carried out in two stages: the device of the front arch and the device of the backing. The backing arch is erected according to a larger template (by the size of a quarter). Each arch is performed sequentially according to the points given here (from the preparation and installation of the template to the final finish) or simultaneously (all points are performed immediately for two arches). The second option is more suitable if the arches, as well as the rows of bricks above them, are tied together.
If the arch is erected flush with the masonry plane of the wall, during the installation it is necessary to check its compliance with this plane. The check is made using a rule, a plumb line and a stretched cord.
3. Puff device. Puffs are called steel or reinforced concrete ties, rigidly fixed with their ends at the heels of the arch (or at the heels of one of the cross sections of the arch). In individual construction, puffs are used extremely rarely, their function is to repay the thrust in arches and vaults with a very large span. If, however, the project assumes a tightening device, it is pulled immediately after the end of the arch masonry.
4. Clamp the arch with a brick. After the device, it is desirable to erect all rows of masonry up to the height of the keystone on the same day or after 1-2 days. Masonry before this should gain some strength. When compressing the arch, a certain amount of hewn bricks will be required, taking into account the angles of inclination of the arch in place. From the created vertical pressure, the arch acquires greater strength. If you postpone its clamping for an indefinite time, cracks may form (in this case, they say that the arch has “burst”), which often do not affect the strength of the structure, but spoil the appearance.
5. Dismantling the formwork. After the erection of a brick arch, it is kept in the formwork for at least seven days. The exposure time depends on weather conditions: at an outside temperature of 1 °C to 5 °C, the formwork is removed after 10–20 days; if the temperature is kept at the level of 5 ... 10 ° C, the aging period is 8-10 days; if the temperature exceeds 10 ° C, the formwork is removed 7-8 days after the laying in the arch. If the arch or arch was built at negative temperatures, with a solution of antifreeze additives, they are kept in the formwork for at least three days.
On the other hand, the longer the circular formwork template is under the arch, the more difficult it is to remove it later and clean the surface of the arch itself from below. Therefore, in warm and dry weather (20 ... 25 ° C), the formwork is sometimes removed on the same day that the arch was erected. It is enough to allocate 2-3 hours for the setting of the solution.
If, nevertheless, the formwork is not removed on the same day, but after a few days, at this time it is necessary to cover the arch with polyethylene (especially in wet weather) so that cracks do not appear in the arch due to swollen wood.
To dismantle the formwork, the wedges are first gradually removed (on both sides in turn). In this case, the circular formwork is gradually and evenly lowered. Then the entire structure is stripped from top to bottom. The dismantled formwork can be used to install the same jumpers if the project provides for more than one arch.
6. Fine finish. If the arch protrudes beyond the wall masonry surface, the protrusion of the arch masonry is covered from above with roofing material. In addition, immediately after the formwork is removed, the seams in the arch are cleaned of excess mortar. This moment is especially important if the arch is made with facing masonry (not for further finishing). The seams are cleaned with a brush and wiped with a dry cloth. If the bottom is incomplete filling of the seams, they additionally lay the solution, working from the bottom up.
Laying columns under the logs. When installing plank floors on the first floors, an underground is made between the ground and the floor, protecting the floor from ground dampness. Floor boards are laid on logs, which are laid on brick columns with a section of 1 brick. It is not allowed to use silicate bricks for laying columns and artificial stones, the strength of which decreases with moisture.
The columns are installed on dense soil or on a concrete base. Columns erected on the ground must be two rows of masonry above the ground level in the underground.
Prior to the start of masonry, the places for installing the columns are marked, and their extreme rows, along which the logs will be laid along the Walls, are installed close to the walls, and the extreme columns of each row are indented by 1/2 brick.
The columns are laid out with a single-row dressing by two masons of the 2nd category. One of them prepares the place, lays out the brick and delivers the mortar, the other leads the masonry. The masonry level is checked with a two-meter rail and a level, which are applied to the posts in different directions. The top of the columns should be located at the same level specified by the project.
pillars. A multi-row dressing system when laying poles is prohibited, because it does not provide solidity and the required strength of the poles. A single-row dressing system with a shift of 1/2 bricks alternating side by side, which is achieved by laying three-quarters for dressing vertical seams in all rows, is unprofitable for laying poles, since with this method
you have to use a large number of three-quarters. Therefore, the posts are laid out according to a three-row dressing system, if the dressing pattern can be allowed according to the conditions for finishing the masonry surface. Masonry is made of a whole brick with the addition of halves. With this masonry system, the coincidence of external vertical seams in three rows of masonry in height is allowed. The bonded row is laid through three spoon rows. For masonry, a small amount of incomplete brick is required, for example, pillars with a section of 2X2 bricks are tied up with whole bricks, and in pillars with a section or 2X2 1/2 bricks, two halves are laid in every four rows of masonry. If thin walls adjoin the poles, they are connected by a stab released from the pole or steel rods, which are laid in the poles.
Walls. Walls up to 1 m wide are laid out according to a three-row binding system, and more than 4 bricks wide can be laid out according to a multi-row system. With a three-row dressing, for the formation of quarters in the walls, quarters are laid in the first bond row, and halves in the spoon rows.

Three-row ligation system when laying poles with a section: a - 2X2 bricks, b - 1 X 1 bricks, c - 2 X l 1/2 bricks

Three-row dressing system when laying piers with a section: a - 2 X 3 bricks, b - 2 X 3 1/2 bricks
Pillars and piers are usually loaded more than other structures, so they are not allowed to lay out empty. Incomplete filling of only vertical joints to a depth of 10 mm from the front surface is allowed. Pillars and piers with a width of 2 1/2 bricks or less are laid out only from selected whole bricks.
FROM pillars are placed ( rice. 79) in accordance with the suture dressing system in three rows. In this case, a row of pokes is laid through a triple spoon row. The given masonry system is the most acceptable due to the fact that the system of dressing in several rows does not guarantee strength, and this may lead to masonry that will fall apart into layers. Pillar masonry according to the dressing system in one row needs a significant amount of three-quarter bricks, and this entails a lack of rationalism in the use of bricks. In a dressing system designed for three rows, vertical alignment of the seams is allowed for three masonry rows. Pillars in the form of a square or polygon are laid out of brick, hewn or made according to a pattern, in accordance with fig. 80.
Rice. 76. Brick layout for rows of bonded faces: A - two and a half bricks thick; B - one and a half bricks thick; B - the thickness of the half-brick wall
AT The accuracy of the masonry in accordance with the height is verified using a level and a plumb line during masonry with a frequency of at least two times for each meter of height. When the laying out of the next tier is completed, with the help of a geodetic tool, how horizontal the rows and marks are. If the axes of the structure deviate, this slip is removed at the level of floors between floors. Inconsistencies between floor height marks should be eliminated on each subsequent floor.
![]()
Rice. 77: Brick layout for rows of bonded faces:
A - two and a half bricks thick; B - one and a half bricks thick

Rice. 78. Mortar spreading: A - laying a row of spoons; B - laying a number of pokes; B - backfill
Table 55 Methods for laying brick structures
| Masonry methods | The order of operations and methods of work |
| Rows of versts are laid pressing into a full seam | Brick laying is preceded by the fact that with the help of a trowel a certain percentage of the mortar is raked from the bed and transferred to the edge of the brick laid earlier. The left hand presses the brick against the one laid earlier, and at the same time the trowel is raised, which entails a full vertical seam. The laid brick is planted with a handle knock, and the solution that comes out at the same time is removed with a trowel |
| Rows of miles are laid back to back in an empty seam, developed by F. I. Maltsev | Laying is preceded by raking the mortar part from the bed face with the face of the brick that is being laid. Having tilted, the brick is moved along the bed face. Having pressed him to the bed, he is brought nearer to the brick laid earlier, together with the mortar. At this time, a full-fledged vertical seam appears. The brick in the masonry is seated with pressure in both hands. |
| Rows of miles are placed end to end, the solution is cut into a full seam | The mortar bed spreads one centimeter from the surface of the wall located outside. The tilted brick is moved along with some mortar to the brick that was laid earlier. The left hand presses the brick to the one laid earlier, at this time a full-fledged vertical seam is formed. The brick is leveled flush with the wall surface and seated under manual pressure and tapping with a trowel handle. The solution squeezed out is removed with a trowel. |
| Laying zabutku in a half | In the interval between the rows of versts, located both outside and inside, a solution spreads. Two pieces of bricks are placed on the bed face at the same time and pressed together with a certain amount of mortar to the bricks included in the rows of miles and laid earlier. |
| Laying under the rail | The rail is laid in a section of nine by ten millimeters and two meters in length. Mortar masonry spreads at a height of 0.9 cm on the same level with the rail. Both the mortar and the rail are placed under the bricks, and when the masonry is completed, the rail is pulled out. During this process, an even seam is formed that goes deep into the seam, which does not need further stitching. |
Table 56 Tolerances in brickwork and masonry.
| Tolerance types | Deviation size (tolerance), mm | ||||||||
| For buildings from buta | For buildings made of bricks, ceramic and concrete stones of regular shape | For buildings made of large concrete and brick blocks | |||||||
| Foundation | Wall | Pillar | Foundation | Wall | Pillar | Foundation | Wall | Pillar | |
| Deviation from the dimensions of the project | |||||||||
| Thickness | +30 -20 | +20 -10 | +20 -10 | -15 0 | -15 0 | 10 | 5 | 2 5 | 2 5 |
| According to the marks of floors and cuts | 25 | 15 | 15 | 15 | 15 | 15 | 10 | 10 | 10 |
| According to the width of the piers | – | -20 | – | – | -20 | – | – | 5 | – |
| According to the width of the piers | – | +20 | – | – | +20 | – | – | +5 | – |
| According to the width of the piers | – | 20 | – | – | 20 | – | – | 10 | – |
| Adjacent window openings | |||||||||
| By displacement of the axes of buildings | 20 | 15 | 10 | 10 | 10 | 10 | 10 | 10 | 10 |
| Maximum deviation of masonry surfaces and angles vertically | |||||||||
| On the ground floor (height 3.2-4 meters) | – | 20 | 15 | – | 10 | 10 | – | 10 | 10 |
| For the whole structure | 20 | 30 | 30 | 10 | 30 | 30 | 10 | 20 | 20 |
| Stone brand | |||||||||
| For 10 meters length | 30 | 20 | – | 20 | 20 | - | 10 | 5 | - |
| Irregularities of the masonry surface along the vertical, determined by applying a control rail 2 meters long | |||||||||
| Under plaster | – | 15 | 15 | – | 10 | 5 | 10 | 5 | 5 |
| Not under plaster | 20 | 15 | 15 | 5 | 5 | 5 | 10 | 5 | 5 |
Note: the numerator contains tolerances for concrete blocks, the denominator - brick

Figure 79: Masonry pole 380 by 380
At reading that the pillars are usually more loaded than other structures, you can not lay them out in a waste. Allow only incomplete filling of vertical joints to a depth of 10 millimeters from the front surface. Pillars with a length of two and a half bricks or less should be laid out only from selected bricks. Docking to the pillars of walls and partitions is made by a sling released from the pillar, or steel rods, which are settled into the masonry. The rods take on the transverse tensile forces that occur when the masonry is compressed and resist the destruction of the masonry when the masonry is bent and stretched.
O Highly loaded stone structures should be reinforced with steel mesh and longitudinal compression or tension reinforcement. Most often, for brickwork, mesh reinforcement is used with welded and knitted meshes of rectangular shape.

Figure 80. Laying pillars:
A - with a section of 2.5 for 2 bricks; B - section 2 by 2 bricks; C, D - section "2.5 x 2.5 bricks; 1,2, 3, 4 - the sequence of actions during laying.
D The diameter of the mesh wire should not exceed 8 mm and be less than 3 mm so that the thickness of the seam is greater than the thickness of the wire. Reinforcement of brickwork is horizontal vertical, longitudinal and transverse. The grid may have rectangular or zigzag cells.
|
|
||||||||||||||||