Window trim on the outside. How to finish window slopes from the outside with siding
Today, in residential buildings, almost everywhere, they are changing the old, obsolete ones, replacing them with modern plastic ones.
The pleasure is not cheap, and some people, when changing windows in the house, in order to save money, refuse to install external slopes. But the decoration window slopes outside - this is an important component of the repair, and today we'll talk about it.
They have excellent heat and sound insulation, they do not need to be insulated and painted. Nevertheless, in order for the plastic window to serve for a long time, it is necessary to carry out all operations for its installation in strict accordance with the technical requirements.
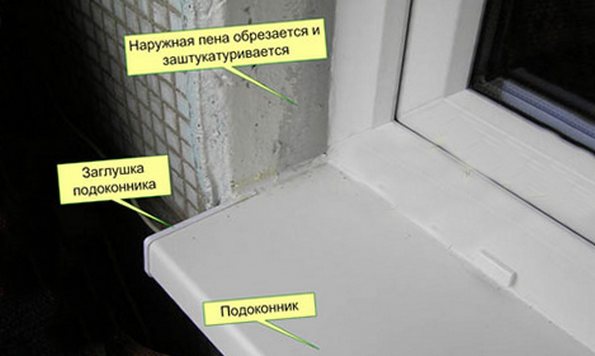
When installing a window in an opening, the gap between the frame and the wall is filled with mounting foam, which is afraid of direct sunlight and moisture. Under the influence of these factors, the foam can lose its thermal insulation properties and collapse. That is why it is unacceptable to leave the assembly seam open for a long time.
Do-it-yourself finishing of external window slopes
Best to get it done right away problem areas after window installation. This can be done in several ways. The most common in the decoration of window slopes from the outside are:
- plastering;
- application of sandwich panels.
1. Plastering, a cheaper method and, moreover, does not require special skill from the performer. It is quite possible to do it yourself.
The main thing is to do everything carefully, without spoiling or staining the profile. True, this operation will have to be performed more than once. After all, it is not very securely fastened with a plastic profile and has different expansion coefficients with it.
Under the influence of external factors, it will definitely crack and it will need to be restored.
You can perform plastering of slopes with a plaster mixture. The walls are pre-cleaned and then a rough layer of the mixture is applied on a cement or gypsum basis. After the rough layer dries, a finishing layer is applied, which can then be painted.
2. Due to the fragility of the plastered layer, for modern plastic windows a more acceptable method of finishing window slopes with sandwich panels.
The window looks aesthetically complete and harmonious. Sandwich panel consists of two plastic sheets, with a layer of foamed polyurethane foam between them.
When using this method, the thermal insulation properties of the window increase significantly, the material does not collapse and does not change its color, when exposed to external factors, it is perfectly washed, and is very durable. Drawback - Pretty high price and difficulty in installation.
Sometimes for exterior finish window slopes use cellular plastic. However, this option does not justify itself, since this material is very fragile, short-lived and fades in the sun.
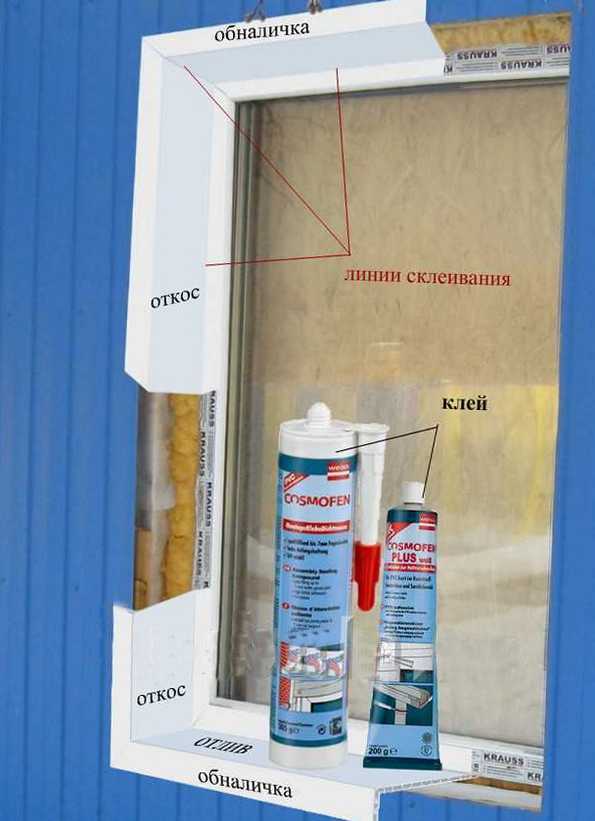
3. In addition to the above methods for finishing external slopes, there is another method that consists in the use of a sealing polyurethane tape.
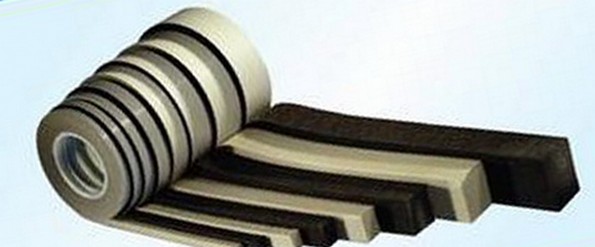
It perfectly protects the mounting seam from environmental influences and removes moisture. This method has proven itself well in Western Europe, but in Russia it is still used very rarely.
Video: how to finish the outer outer slope of the window.
Video: do-it-yourself window decoration from the outside with polystyrene foam.
And in conclusion, pay attention to the qualifications of the craftsmen who will finish the exterior windows with slopes. I think it’s worth paying more, but on this you will get decent quality, and save your nerves.
Or you can try to do this type of work yourself. Good luck!
HideSlope cladding is the final phase in the installation of new PVC windows. I must say that many experts believe that the finishing of plastic windows on the outside is an order of magnitude superior to similar work carried out indoors in terms of importance.
Why is exterior trim required?
After replacing the windows, left untreated, they look not only - not aesthetically pleasing, but over time this will have a detrimental effect on the tightness of the openings. Mounting foam, under the influence of sunlight and winds, will fall apart, turn into crumbs, and begin to fall out of the opening. As a result, this will lead to drafts “registering” in your home. Finishing window slopes from the outside makes it possible to increase the thermal insulation of the entire opening and gives the window an aesthetic appearance from the outside.
Used methods and materials for facing works
There are a number of ways to produce, consider the most famous of them. You can give a finished look and ennoble plastic windows using:
- plastering of slopes (use of plaster as a finishing material);
- sandwich panels;
- finished plastic products;
- drywall.
Decorative exterior plaster slopes for windows
The oldest and most cost-effective option. This is a long, painstaking and messy process. Plastering the window opening from the outside begins with an examination of the former slope. Using a hammer or spatula handle, the entire surface is tapped. If a muffled sound is heard, then there are voids and pockets in the plaster that have formed over time. In all likelihood, the material has peeled off the wall in places.
What to do? Only the complete dismantling of the old plaster to the wall itself (made of brick or concrete). Then, treat the surface with a primer. After the primer dries (after 3-4 hours), you can start plastering the external slopes. At the same time, remember that we are going to do the work on the street, as a result, it is better to use plaster for exterior decoration.
For plastering, you will need the following tools:
- trowel (trowel) for working with mortar;
- goniometer (malka);
- a hammer;
- caulk (made of wood or metal);
- plumb;
- solution container;
- tow;
- wash brush;
- foam rubber grater;
- square for measuring the slope of the bevel.
First, all cracks are sealed to reduce heat loss. This is done with the help of tow and caulking. Then, the first layer is applied, it must be thick so that it is possible to give the element the proper shape (at a slope). This layer is dried - it will take 24 hours. Next, a layer of primer, also dry. And the final one is a leveling thin layer of plaster. It also dries up. After that, the surface of the outer window slope must be sanded, re-coated with a primer and painted to match the facade.
PVC plastics are excellent moisture resistance, vapor barrier, chemical resistance, and foamed plastics have excellent thermal insulation.
For the construction of cashing out of plastic, you will need the following:
- U-shaped and F-shaped plastic profiles;
- lath made of wood 10-15 mm thick;
- knife or scissors for metal;
- stapler and staples;
- drill or perforator;
- self-tapping screws.
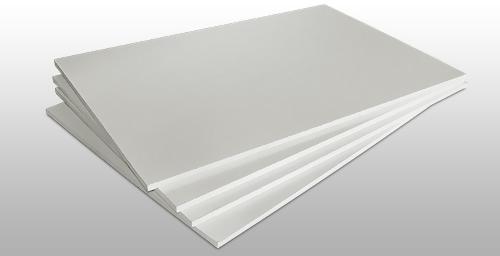
Foamed plastic in sheets
Finishing the window opening from the outside with plastic is carried out in the following order:
- First, slats are fixed along the boundaries of the slopes. Fasteners are made on self-tapping screws using a drill or perforator.
- Then, along the perimeter of the frame, the initial profiles are fixed. They are also fastened with screws.
- Next, an F-shaped profile is attached to the brackets. In the middle of the two tails, the slats should fit. Joints are finished with a similar profile.
- The last step is the right size. If the structure needs to be insulated, then a heater must be placed under the plastic. One end of the plastic plate is fixed in a U-shaped profile, and the other in an F-shaped profile.
All work has been completed.
Plasterboard lining of slopes
ON A NOTE! Use in the decoration of window openings from the outside is not desirable. If, however, as facing material drywall is chosen, then take a moisture-resistant option.
To protect drywall from moisture, use acrylic-based paints. In essence, a film will be created on the painted surface, which will not allow moisture or air to pass through. It is necessary to take care of protecting the window from the influence of various precipitations. To do this, it is better to build visors over each opening or a wide roof overhang (in a private house).
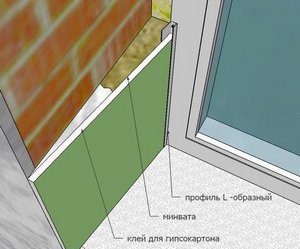
External window slopes from GKL can be installed in several ways. For example, first make a skeleton out of the rails, and then strengthen the slope itself on it. You can use a sloping corner. In doing so, you need:
- fix the corner on the window frame;
- then fix the prepared drywall strip on it;
- further, glue or any other adhesive, preferably moisture resistant, is applied to the outer edge;
- after that, the element is pressed to the surface.
We choose a moisture-resistant material for external slopes: drywall
Find out which are, what is their cost, the most economical option.
Learn how to do it right on our website. Features of the installation of wooden, metal and PVC flashings.
Easy to decorate windows plastic corners how to produce correctly read in our material on the site.
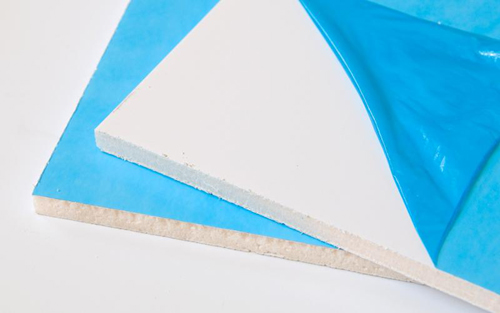
Cladding with sandwich panels
Sandwich panels for decorating window openings from the outside are two plastic sheets, between which foamed polyurethane foam is located. This method of facing window openings has a number of positive properties: it is easily installed, durable, resistant to atmospheric influences, has good thermal insulation performance, easy to clean, rich colors
For the installation of sandwich panels, you need:
- knife (cut sheets);
- U-shaped PVC profile;
- self-tapping screws;
- screwdriver or drill;
- liquid Nails.
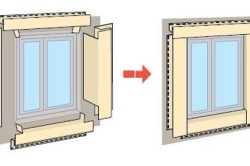
Finishing plastic windows from the outside with sandwich panels is carried out according to the following scenario. First of all, dust and dirt are removed. Then PVC profiles are fastened with self-tapping screws. They serve as the initial strips in which the panels are fixed. The profile is fixed flush with the window frame, around the entire perimeter.
Next, slopes are installed. To do this, panels of the required dimensions are cut out of the sheet. The first slope is attached from above. One of its edges is attached inside the profile, and the second on the surface using a liquid nail. The side elements are mounted in the same way.
If there is a need for insulation of the structure, then you can put a layer of insulation between the panels. As a rule, mineral wool or polystyrene serves as a heater. ON A NOTE! When finishing the window opening from the outside, it is better to remove the protective film from the sandwich panels only after the work is completed.
Sandwich panels
The invaluable positive qualities of the flashing
Final work on the outside is simply unthinkable without the use of this decorative element. It is attached to the joints between the window blocks and the wall. The flashlight has a number of positive qualities:
- it can be used both indoors and for finishing a window opening from the outside;
- creates powerful additional protection against wind;
- no difficulties during installation;
- wide range of colors and textures;
- made from various materials;
- Huge selection of configurations.
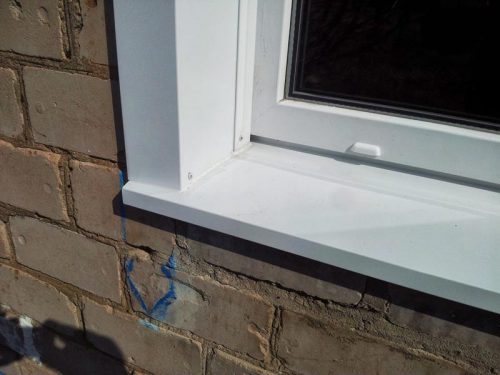
The flashings protect the tori of the double-glazed window well
Of course, the flashing is an optional element in window decoration, however, thanks to it, your balcony or loggia will acquire a neat and solid appearance upon completion of work. This decoration item is indispensable for sealing all kinds of cracks at the ends and at the junction points.
The most important component of the insulation of windows and walls are the outer slopes for windows. It is impossible to solve the problem of insulation and sealing of the room with one installation of a modern metal-plastic window. External window slopes will help here, which, in addition to everything, will become a beautiful decorative element.
What are the functions of external slopes
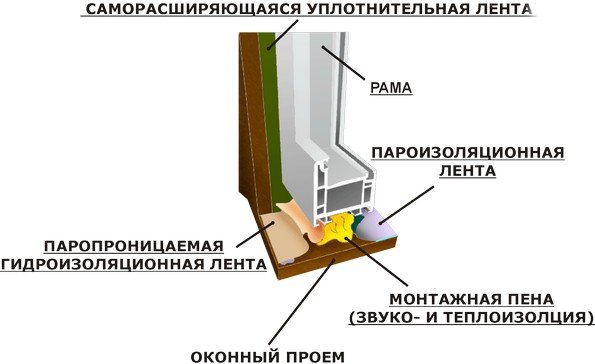
The docking seam, which is formed after the installation of the window block, is foamed, as a rule, with mounting foam. This material serves as a good fixer, as well as sound and heat insulator. But with all its positive qualities, mounting foam, unprotected by external slopes for windows, eventually collapses from precipitation and the sun.
Finishing the outer window slopes is as important as finishing the inner ones. Reliability and durability of window blocks directly depend on reliable external protection. External slopes for plastic windows without finishing lead to the appearance of condensate in the frame of the window block. As a result, a fungus appears, which is harmful to human health and the premises.
If you postpone the finishing of the outer slopes for an indefinite period, then at best, you will soon have to deal with serious repairs, at worst - replacing the window unit.
Advantages of external window slopes:
- reliable insulation of windows and walls;
- additional sound insulation;
- ensuring the reliability and durability of the window unit;
- aesthetic and attractive appearance of the window opening as a whole.
Types of exterior decoration of window slopes
Manifold finishing materials poses a difficult choice. First of all, it is necessary to pay attention to all the advantages and disadvantages of each type of finishing of external window slopes. Whatever you choose, don't forget:
You can not save on finishing material for window slopes. It is he who will become the main indicator of the durability of the window and heat in your home.
The most popular materials for installing external window slopes with your own hands include:
- plaster;
- plastic;
- sandwich panels;
- metal;
- Styrofoam;
- drywall.
Let's take a closer look at the pros and cons of each material.
Plaster
Plastering the outer slopes of windows is the cheapest type of finish. Dry cement is diluted with water to a certain consistency, then a thin layer is applied to the slopes. To give the slopes the desired appearance, the plaster is applied in several layers. Before applying each layer, it is imperative to check whether the previous one has dried well. Then the entire fur coat from several layers is subjected to grinding. At the end, paint of the desired color is applied.
Please note: The thickness of the plaster layer is determined as the mounting foam closes. The solution should reach the window profile.
The advantages of this type of finish end at a low price cost. When plastering, the external slopes turn out to be “cold” even after adding heat-insulating additives to the solution. The plaster mixture will never fully connect with the plastic window profile. The layer of plaster will begin to peel off. The junctions to the frame will freeze, condensation will occur, and then mold will appear.
The disadvantages of this type of finishing of the external slopes of plastic windows include the formation of a large amount of dirt and dust during the work. A long period (3-4 days) of its implementation will also not leave pleasant memories.
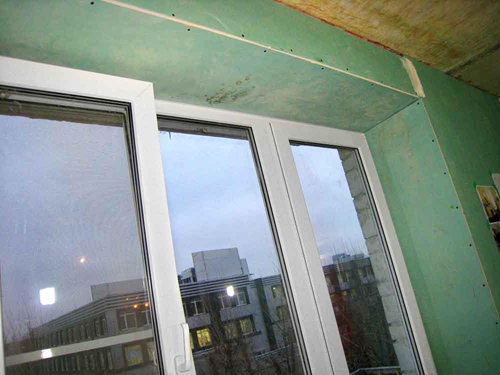
Drywall
It should be noted right away that drywall window slopes can be installed outside, but on one condition - if the window overlooks a glazed loggia, balcony or terrace. The lack of moisture resistance of this material adversely affects its quality under the influence of precipitation. Drywall deforms, delaminates and collapses.
The main advantages of such facing of external slopes for plastic windows include simplicity and ease of installation. The result is a flat, smooth surface that can be easily applied with paint.
A fairly inexpensive and pretty good way to finish slopes will insulate and save windows from condensation. But this result will be successful only if the surface preparation is correctly performed: it is treated with antibacterial impregnation.
On the modern market of finishing materials, it is possible to choose exactly the model of external slopes for windows that will completely suit you in appearance and technical specifications. We can only advise you to use a less expensive finish for a small country cottage, where you rarely visit in winter. But for a city apartment or an expensive country residence, the best option would be to use a more expensive material for quality device external slopes.
External slopes video
And here you can watch a short video about the need for street slopes.
Finishing window slopes from the outside with siding is done after the completion of the main facing work and allows you to give the house a finished and neat look. Siding provides additional insulation of window openings from the external environment.. The installation of this material is quite complicated, since it involves accurate measurements and cutting panels at different angles.
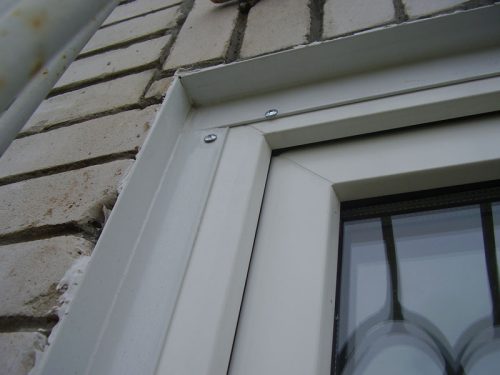
Photo 1. A window is an architectural detail of construction specially conceived in the design of a building: an opening in the wall that serves to let light into the room and ventilation.
Let us consider in detail such stages of facing work as the choice of material, the installation of fasteners, the correct marking and cutting of siding panels.
The choice of material for exterior window trim
Siding for window slopes, as well as facing material for walls, can be of several types:
- metal;
- vinyl;
- wooden (block house).
There are also such types of cladding as ceramic and cement siding, but due to their mechanical properties, they are not very well suited for finishing window openings. As for the color scheme, the slopes look original, which stand out in contrast against the background of the wall (photo 1).
When finishing window slopes from the outside with siding, in addition to the facing material itself, you will need to purchase the following fasteners:
- finishing and window trims;
- H-shaped and J-shaped profile;
- low tides;
- internal and external corners for decorating joints;
- chamfer.
Required Tools

Necessary set of tools for work: hammer, metal building square, hacksaws with fine teeth, tape measure, level, pencil, screwdriver
To install siding slopes, you will need a fairly standard set of tools. It includes a medium-sized hammer, with which it will be convenient to attach the crate and siding to the wall, a metal building square to control compliance with the correct installation angle, hacksaws with fine teeth - one for plastic, the other for metal. To track and mark the vertical position of the slope, a tape measure, a long piece of cord or thick synthetic thread, a construction pencil or chalk are useful. The presence of a powerful screwdriver in your arsenal will significantly speed up the work, since tightening the screws requires a lot of effort. The construction level will help in controlling the quality of siding laying - without it it is difficult to determine the horizontal installation of panels.
Slope installation sequence
Sheathing of slopes begins with an audit of the state of the window openings on which the cladding will be installed. When working on the cladding of a new house, this step can be missed, but if you have taken up the slopes of a building that has been in operation for a long time, be sure to pay attention to the presence of cracks in the walls, as they weaken the adhesive force with the crate. If cracks are found, they should be carefully repaired, and after the putty has dried, apply several layers of deep penetration primer to the surface of the window opening. After finishing repair work a crate for fastening the siding is stuffed onto the surface of the wall.
Corners and profiles for attaching cladding panels should be cut at an angle of 45°. This is done with a conventional hacksaw or a special circular saw with cutting angle control. Such a tool is quite expensive, but for a large number of works it can be rented.
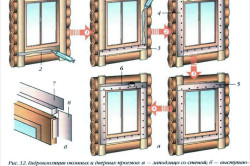
The installation of siding around the window may have some features and differences depending on the position of the window opening relative to the main surface of the wall. Due to the fact that the wall of the house has a layer of sheathing, insulation and cladding, the window can ultimately be recessed into its surface by 5-19 cm. The structure of the slopes, the presence or absence of some fasteners largely depend on this structure.
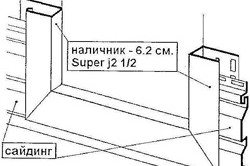
Figure 1. Slope scheme when the window is flush with the wall
The simplest version of the slopes is obtained when the window frame is level with the wall (Fig. 1). This situation happens in the absence of a layer of insulation, for example, if the house has internal thermal insulation. The traditional concept of slopes for such a window is used conditionally, since plastic platbands with a J-shaped profile are used instead.
It is a little more difficult to slope a window recessed into the wall surface at a distance of up to 19 cm. This value corresponds to the maximum allowable depth of a window frame according to European standards, therefore maximum dimensions up to 22 cm, taking into account the margin of 1.5 cm for connection with profiles and platbands.
Sometimes there are cases when it is necessary to sheathe windows with siding that are deeper than 19 cm. This is especially true for houses located in a cold northern climate, where it is necessary to set a thick layer of thermal insulation. The standard window trim will be too narrow and will not cover the entire slope space. What to do in this case? This issue is solved very simply: the window trim is cut into pieces, the length of which corresponds to the depth of the slope, and is laid not parallel, but perpendicular to the frame. Thus, it is possible to perform a slope of almost any depth. To fix the outer edge of the slats, platbands in the form of corners are used.
Finishing windows with siding with your own hands is quite simple, it is enough to study in detail the sequence of actions and stock up necessary materials and tools.
Installation of metal and plastic sills
The lower part of the slope must be equipped with a low tide - an external window sill made of steel, aluminum or plastic. It provides protection of the wall and seams from the penetration of atmospheric precipitation.
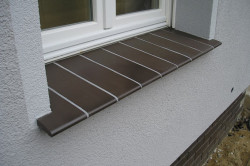
A wide window sill from the side of the street will give you the opportunity to decorate it in the summer.
The standard width of the tides is from 90 to 400 mm, which is quite enough even for the deepest slope. When finishing window slopes from the outside with siding, the future installation of the tide should be taken into account, so the lower part of the window opening may not be sheathed with siding - it will be blocked by an external window sill.
The choice of material for the ebb is a rather important process, since the absence of problems in the operation of openings depends on its result. Modern industry produces several types of ebbs, the most common of which are steel, aluminum and polyester. Each type of such window sills has its own advantages and disadvantages, the features of their use depend on the climate and the material from which the siding is made.
Installation of ebbs is carried out using mounting foam, which ensures the tightness of the coating. The edge of the window sill, which is located near the window, is attached to a recess in the frame specially designed for this. At the same time, the opposite edge should protrude a few centimeters above the slope, ensuring the flow of water to the ground, and not to the wall of the house.
When installing any coating outside the house, you should especially take care of its waterproofing. When atmospheric precipitation penetrates into the heat-insulating layer, the latter loses its properties and quickly becomes unusable. The lower part of the slopes is protected by properly installed ebbs, and the side and top may require a waterproofing layer. If you do not save on the quality of siding, window slats and accessories for their fastening, as well as carefully consider the installation, then waterproofing may not be required, which has been proven by the experience of installing slopes in various situations.
In addition to the presence of a waterproofing layer, high-quality installation of the cladding involves the treatment of all joints with silicone sealant.
Conclusion on the topic
Facing the house should not only protect it from the influence of environmental factors, but also look beautiful and neat.
Properly designed slopes emphasize thoughtfulness appearance walls and do not allow water to penetrate under the surface of the siding.
The presence of windows in the house that are not insulated from heat exchange with the street means an increase in heating costs, increases humidity and promotes the development of mold and fungi. Modern materials allow you to negate these problems, providing your home with warmth and comfort.
Windows Sophos- glazing of balconies and loggias price