How to glue plastic slopes. Plastic decorative corner: how to glue an arched one, for wallpaper and slopes
When the doors and windows are installed, you need to finish the slopes; as a rule, this is the final stage. To hide small roughnesses and give a complete aesthetic look, many people use ready-made corners. How to correctly cut and glue a corner made of plastic, cork or MDF? Below are detailed recommendations for their installation.
1 Why do you need to attach corners to slopes?
Let's start with the most important thing - why is this necessary? What role do the corners play - only decorative or do they have more serious functions? We will not argue with the fact that if framed, plastic corners are made by hot bending a sheet of polyvinyl chloride. Basically, they have the same shelf width - from 10 to 40 mm in increments of 5 mm. However, there are asymmetrical specimens, for example, 10x25 mm, but regardless of this parameter, the angle between the sides is 90 degrees. If it is necessary to transform an arched opening, this is done using a special flexible profile. Their advantages can be called relatively low cost, they do not need painting, unlike the same wood.
The next type is cork corners. Such decorative elements are quite often used for arched openings, but this does not mean at all that their use is limited only to this area. They can also be used to finish slopes of various shapes. Cork has a number of advantages, including strength, fire resistance, practicality and environmental friendliness. In principle, such material has practically no disadvantages, unless your a pet wants to sharpen its claws on it, this will damage the surface.
It is also worth noting wooden and bamboo products, which will always be signs of excellent taste and will fit into almost any interior. In addition, we must not forget about their environmental friendliness. True, such elements are somewhat more expensive than their counterparts made from other materials, and besides, they often require painting. More from natural wood You can also compare a material like MDF, only it costs significantly less, because wood dust is used to create it.
Photo gallery: finishing materials
It can be seen that the range is quite extensive, and there is plenty to choose from. But what should be guided by this? Of course, no matter how much we would like to, the budget is almost always limited. Therefore, first of all, we have to proceed from our financial situation. As mentioned above, plastic products have a very reasonable price, and they are appearance not much inferior to analogues from natural materials. But, in addition to the price, you should also pay attention to the fact that these decorative elements fit harmoniously into the design of the room.
For arches, you should purchase special arched corners of different sexes; they ideally maintain their position when bent. Please note that the wider the sides of this element, the greater the load it can withstand.
3 Installation of corners on window or door slopes
What glue to use
In addition to the corners themselves, we will also need an adhesive composition with which we will attach the selected element. When choosing it, it is worth remembering that quite often, especially if it is necessary to glue a narrow product, the glue seeps out from under it and, naturally, ends up on the walls. As a result, the latter may be damaged, which, accordingly, will negatively affect the appearance of the room as a whole. Therefore, you should choose an adhesive composition whose excess can be removed from the surface.
Basically, corners are glued to new slopes, but nevertheless, check that the surface is relatively flat, since large bumps cannot be hidden by any decoration. It should be free of foreign objects such as nails, screws, etc. It also needs to be degreased; white spirit is suitable for this purpose.
How to cut correctly
Before discussing how to attach corners to slopes, you should find out how to cut them correctly. After all, this stage is the most labor-intensive and, perhaps, even the most important, since it determines how closely their edges will be joined, and this directly affects the aesthetic appearance of the entire room. It is best to trim with a fine-tooth hacksaw. First you need to measure the length of the opening, then put marks on the corner itself so that the segment corresponds to this parameter. Then we cut off the part that will be adjacent directly to the slope strictly according to the marks, and the part that will be adjacent to the wall at an angle of 45°.
To trim the corner, use a fine-toothed hacksaw
How to glue
Finally, we got to the main question, how to glue the corners onto the slopes. However, before proceeding directly to fixation, you should carry out, so to speak, fitting. Once you are sure that everything is trimmed correctly, you can move on. We apply an adhesive solution to the inside of the corner, at the junction of the sides, in increments of approximately 10 cm. At this stage, a mounting gun will be an indispensable assistant. After this, we quickly press the product to the surface and fix it in this position with masking tape. You should start with a horizontal slope, and then proceed to the side slopes. We remove excess sealant from the surface of the walls with a damp cloth and let it dry thoroughly. You can remove the tape only after 24 hours.
Video: attaching corners to window slopes
Thus, plastic corners can be placed on the slopes of a window or door. As you can see, there is nothing complicated in this process.
Video: how to cut and glue corners to door slopes
Having figured out what such products are made of, what their features are and having decided on the choice, you should learn how to install corners on slopes. detailed instructions is given below.
- Using the start profile U-shaped.
- By using Z-profile(sockets)
How to mark slopes.
Let’s say right away that the slopes are installed when installed windowsill.
First we mark and secure the upper slope. We mark it so that it covers the entire top. Measure the width of the frame from above and add 2cm on each side. Then we measure the width and length of the inner upper slope, connect the two points and cut it off. Slope cutting This is done using a jigsaw, it is advisable to use a metal file - it will not tear the plastic and the cut will be smooth. The upper slope is in the shape of a trapezoid. Now you can attach it to the frame, bend it a little and pour the first portion between the frame and the far edge of the slope polyurethane foam. The polyurethane foam expands and supports the far edge of the slope from the inside. Wait a little and add more foam - already in the middle part of the slope. The main thing is not to overdo it - if you pour a lot of foam, it can “pull out” the slope. If you want to use mineral wool, then at this stage you can lay a layer of insulation in the middle. Then we level the near edge of the slope and immediately secure it to the wall with masking tape, leaving a distance of 1.5-2 cm between the slope and the wall. After this distance the final layer is then added polyurethane foam.
When the upper slope is secured, we mark and cut off the side slopes. Everything is much simpler here. We simply measure the distance between the newly installed upper slope and window sill. The installation principle is the same. We insert it, pour foam into the far end of the slope, then into the middle, then fasten it to the wall with masking tape, leaving a distance of 1.5-2 cm.
Method of fastening to polyurethane foam.
When installing slopes, we use the first fastening method - using polyurethane foam. So simple and effective method installation of slopes solves several issues at once. No need to mess with glue - polyurethane foam, applied to a dust-free and slightly moistened base, is itself a good glue. Foamed polyurethane, and this is polyurethane foam, is one of the most effective insulation materials today. In other words, when we buy 1-2 cans of polyurethane foam to install slopes, we purchase both glue and insulation. True, you need to know that when hardening, polyurethane foam increases in volume and expands the structures between which it is placed. Therefore, one side of the slope should be inserted into the groove at the window, approximately 1 cm. and rest against anchor or anchor plate, and the other should be glued with paper tape to the wall. Before gluing the paper tape, apply a building level and make sure that the slope is level.
The slopes can be installed the next day after foaming the gaps between the wall and the window block, when the mounting foam has hardened, or immediately, when the foam has not yet hardened. In the first case, we use a stationery knife to cut out a depression of approximately 1 cm by 1 cm in the frozen foam. - then insert the cut slope there. In the second case, when the foam is soft, we simply insert a slope of the required size.
By the way, when installing slopes, it is more convenient to install the top slope first so that it covers the entire top, and then the side slopes.
It is better to fasten window slopes so that they are not at right angles, but “open”, that is, looking to the sides. This is when the distance between the slopes of the window frames is less than that of the wall surface. They try to make the “dawn” angle of all window slopes in one room the same.
Fastening slopes using a Z-profile (grossers)
The slopes can be fixed using a special fastening for slopes, which are inserted into the groove of the window profile at a distance of approximately 40-50 cm. That is, 4 pieces are enough for a window 1.5 m high.
Slope clamp HABA1(suitable for REHAU, PLAFEN, 3-5 stone Proplex, Exprof, LG, Krauss, T rocal, 3 stone KBE, VEKA, Deceuninck Forvard) window groove width 3.5 cm. the base of the clamp is 4 cm.
Slope clamp HABA2(5 cameras KBE, VEKA, Deceuninck Favorit 6 cameras GEOLAN, 3 cameras BAUTEC)
Slope clamp HABA3(3cam. REHAU, MONTBLANC, BRUSBOX, LAOUMANN, 4cam. BRUSBOX, 6cam. MONTBLANC)
Slope clamp HABA4(Rehau Briliant-Design, Rehau Delight-Design, Rehau Sib-Design, Rehau Geneo, 5 chamber Brusbox, Kaleva and Montblanc.)
Cost of clamps for slopes - 3.5 rub.

Slopes can also be secured using such a Z-profile. It is cut with a hacksaw for metal 1.5-2cm wide. and screwed with self-tapping screws (bugs). It must be said that this method is used when the window has not yet been installed.

Plastic double-glazed windows are the ideal choice for anyone who dreams of high-quality sound insulation, an attractive and stylish appearance for their home, and maintaining warmth and comfort in the room in any weather.
If previously the slopes plastic windows were treated with plaster, then relatively recently a new means has appeared for reliable fastening of corners, slopes and other elements of a double-glazed window - glue for PVC windows , which effectively and firmly fixes all structural parts.
Today, there are many types of adhesive compositions for plastic double-glazed windows, which differ from each other not only in cost, but also in components, qualities and characteristics.
To make the best choice glue for plastic windows that are planned to be installed in a residential building or work space, you can study everything existing species on one's own.
- Bison POLYMAX.
- COSMOFEN 345.
- Tytan.
The main qualities that any adhesive intended for working with PVC must have are the following properties and characteristics:
- Absence negative impact composition components onto plastic. Many modern types of glue are not intended for this material, since they contain chemicals that can corrode and destroy plastic structures over time.
- Fire safety. The adhesive mixture intended for processing double-glazed windows must be non-flammable.
- No toxicity. This quality is especially relevant if plastic double-glazed windows will be installed in a residential area.
You can fix all the elements of double-glazed windows yourself, without resorting to the help of specialists. To do this, it is enough to study the technology of work and choose the right tools and materials.
VIDEO ON THE TOPIC
Instructions for sealing joints and seams of plastic windows
After installing the window sill, a gap will form under the glass unit. There are several ways to remove it.
- Silicone sanitary white. It forms a film and dust and dirt stick to it and cannot be removed. Also, over time, the silicone film begins to peel off at the edges.
- Acrylic sealant. It gradually turns yellow and also attracts dust. As a result, we get a yellow-dirty stripe.
- Adhesive for PVC windows (liquid plastic). This option is more preferable; it allows you to quickly close the gap without unpleasant consequences. The seam will not be externally distinguishable from a double-glazed window; it can be wiped with a damp cloth during cleaning.
How to use liquid plastic:
- We glue masking tape to the window sill, departing about 1 mm from the double-glazed window frame. This will prevent it from getting dirty when applying glue.
- We glue the glass unit in the same way.
- We clean the seam from dust and excess foam.
- Fill the gap with liquid plastic. Due to the convenient tube, it is easy to squeeze out. Remove excess glue.
- Remove the masking tape.
How to glue slopes to windows
To install slopes with your own hands, it is not at all necessary to have a huge amount of specific knowledge and skills.
 We cut and glue the slope to the window
 It is enough to carefully study all stages of installation and carefully follow the existing technology.
The entire installation procedure consists of several stages:
- Carrying out measurements to determine the required profile sizes.
- Processing slopes using glue for plastic windows, which can be purchased at any hardware store.
- Reliable, even and neat fastening of slopes to the structure.
After the slopes have been secured, it is necessary to leave them until the glue dries completely, which usually takes from several days to a week.
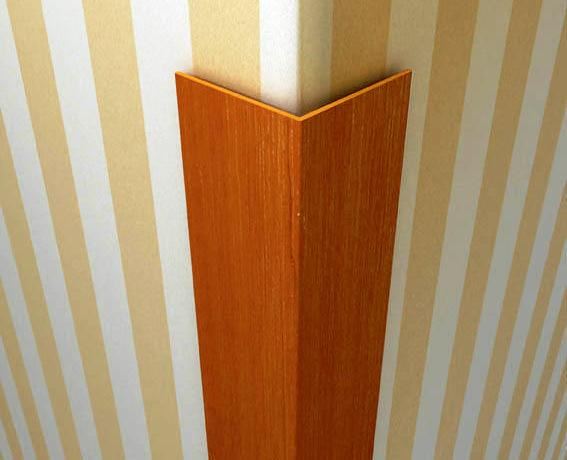
How and what is the best way to glue a plastic corner
Such a decorative element as a plastic corner has, among other things, important practical significance. Its main task is to protect corners as well as materials exterior finishing from mechanical damage. Such wall materials include wallpaper, slopes for windows and window openings, arched structures (arches), and sometimes baseboards. Today we will take a closer look at how to glue a plastic corner, what glue to use, what types of this structural element there are, and what size is best to choose.
The main purpose
As noted just above, the main reason for attaching a protective PVC corner for wallpaper, arches and tiles to the corners of the walls. is not only a decorative function, but also the protection it gives for certain construction or finishing materials in the interior of apartments and houses. With this design, you can protect various vulnerable areas from damage that can be caused by impacts from pieces of furniture of various sizes, careless handling of household appliances, and sometimes overly playful children and pets.
Attention! If you decide to stick on a decorative plastic corner, then be sure that this mounting element will not only provide safety for wallpaper, PVC panels and window slopes, but will also make the interior of the room more “complete” and attractive. So, let's look at the gluing process in more detail.
Types of plastic corner

It should be noted that in terms of its purpose, as well as in appearance, this fastener may be different. The following types can be distinguished: external, internal, perforated, colored, decorated “like wood”. In addition, some of its types can be used for work on the ceiling.
Advice! If you are not satisfied with the color of the PVC corner and want to paint it, then you should use the same rules and instructions as when painting other PVC surfaces.
As for which size is best to choose: look at the situation, guided by both aesthetic and practical considerations.
How to stick it correctly
Before fixing the corner, it is necessary to carry out certain preparatory work. To begin with, the plastic material must be cut and adjusted. This can be done with a sharp knife or durable metal cutting scissors, since their household counterparts can be easily damaged during the cutting process. Please note that working with a knife is fraught with danger, therefore, it must be done with extreme caution, in compliance with all necessary safety measures.
In addition, pruning work can be done using a grinder. Please note that in this case it is recommended to use a metal carving disc. Take into account the fact that the overall quality of the work depends on how smoothly and efficiently the trimming was done.
Do not forget! There is no need to use silicone to hide the imperfections of an uneven trim. The fact is that after some time, areas covered with silicone may begin to become covered with dust, spoiling the overall appearance of the corner, as well as the area that was covered with it. If the work is performed not by you, but by hired specialists, then we also recommend carefully monitoring how they perform their work.
Think for yourself: it’s better to have a small but even gap along the entire length of the corner than a dirty one that is not always neatly covered with silicone or acrylic sealant. The point is also that this fastening element can have different colors and be colored.

Here are the most common color options:
What to glue and what glue to use
So, what glue is best for gluing plastic corners? One of the best options is the so-called. "liquid Nails". With their help, you can firmly and reliably glue this decorative element not only in all rooms, but also in the bathroom or kitchen, which, as you know, are places with high humidity, requiring all fastenings to be made with increased resistance to such difficult conditions. By the way, choose liquid nails that will become transparent after installation. In addition, it is permissible to use acrylic sealant of the appropriate color.
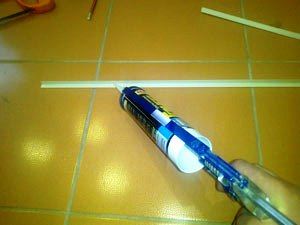
In addition to purchasing glue, you will need to buy a special gun with which you can apply liquid nails to the work surface. When applying glue, you must be careful: apply the glue in a thin wavy line, closer to the middle of the wrong side of the corner. This way, you will significantly reduce the likelihood that glue residue, when pressed, will end up on the decorative front side. In those cases when glue residues do get on the front side or on the wallpaper, you must first wait for them to dry completely, and only then carefully remove them using a sharp knife, scalpel or blade.
Now a few words about how to properly fix the corner while the glue dries. If when working with smooth and flat surfaces (for example, window slopes) you will have fewer problems, then, for example, when installing on arches that have a curved silhouette, certain questions may arise. In order to secure the corner, in such cases it is advisable to use tape various types(choose in each specific situation, based on your conditions). The most common types of mounting tape are:
See useful instructions:
Conclusion
In our case, of course, the most correct solution would be to use masking tape. With its help you will need to fix the corner. The adhesive tape must be removed the next day, provided that the glue has completely dried. By the way, many people wonder: how to bend a corner. In fact, in arched structures this is not required, since it is soft enough and will itself take on the contours of the arch (if they are not too sharp, of course).
In cases where the angle of the working surface is quite sharp (for example, 45 degrees), or the radius of the arch is small, you can cut the plastic corner into several parts and secure each of them separately in the manner described above, carefully joining them.
http://this-oboi.ru