Bicycle rear hub: device, maintenance, disassembly and assembly. Bicycle front wheel: how to assemble, disassemble, install
Just as a bicycle cannot be imagined without a wheel, so a bicycle wheel cannot be imagined without a hub. Without it, not a single bicycle wheel will spin. Strictly speaking, a wheel and a hub to it on a bicycle are like a fulcrum and a lever. Without such a "union" there can be no cycling.
The “rolling” of any large depends on the quality of the hub (obviously, the better the rolling / sliding in the hub, the easier it is for the wheel to spin), and hence its efficiency. Therefore, it is worth considering in more detail: what is this bicycle part? What are the criteria for its selection? And also to figure out what materials are used to make bushings, what is their device, types of fasteners, etc.
Table of contents:Bicycle bushings: device
 A bicycle hub is actually the main part of the wheel of this vehicle. Its axis is clamped directly on the frame or on the fork dropouts. And it is connected to the wheel rim by outgoing spokes. As for the torque, both the bike hub and the wheel itself rotate due to the bearing.
The choice of hubs for bicycles on the modern market is huge. And every the cyclist selects this spare part “for himself” according to the material of manufacture. Bushings are made from:
- heavy duty aluminum alloy(parts are light, resistant to corrosion);
- become(parts come out cheaper in price);
- titanium alloy(so far only in some models of individual manufacturers, for example, for the Shimano XTR series).
In addition, bushings can be stamped, cast or turned. The first and second ones will be stronger than the third ones, besides, they have an impeccably flat surface, which is also important.
Front and rear bike hubs
The front hub of the simplest design is located on the front wheel of the bicycle. And her only option is to spin the wheel. In the cylindrical body of this part there are holes (in the flanges at the ends) for the spokes, and there are also an axle and bearing assemblies.

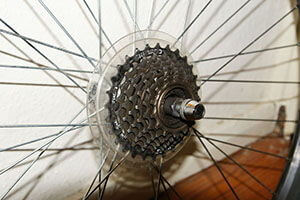
But the rear hub is already on the rear wheel. It is more complex and performs more functions. In addition to providing rotation, this part also serves as the base for a cassette or ratchet.
Until recently, all rear hubs were threaded, but today this design is a thing of the past. In new sports bikes (and not only) with many speeds, there are already improved models, drum ones. With these parts, the ratchet mechanism (the moving part of the rear hub) is an integral part, and the cassette remains only a set of stars.
With bushings of modern design, the following are reduced to nothing:
- the ability to break the thread at the time of installation;
- uneven wear of the ratchet and stars;
- large energy losses of the node.
 Now the weight of the bike hubs has become less and the rigidity is greater (by increasing the distance between the bearings). The slots of the drum made the fastening much more reliable (it is almost impossible to tear off the cassette from them), and the splined connection ensured the simplicity of the spigot mounting. Plus, now you can not change the entire cassette, which is quite expensive, but only individual stars.
However, progress in this area does not stand still. Some well-known manufacturers (KING, CRISS, etc.) generally produce bushings with a unique mechanism. Almost eternal, the design of which is a pair of gear rings made of steel, and a spring. When rolling, such rings do not touch the wheel, but when pedaling the ring, a spring presses into the sleeve, establishing the desired connection. A simple, reliable and extremely durable solution.
Mount type
On a bicycle, the wheels are held precisely due to the fact that the axial bushing ends are inserted into the holes of the frame feathers and fixed there. The most common are the following options for such fastening:
- eccentric, in which it is easy to mount / dismantle the wheels (practically without the use of tools);
- and the cheapest wrench, in which there are 2 nuts for each sleeve (in this case, the wheels are attached and removed using a wrench of the right size).
In mountain bikes, in addition to conventional bushings, disk bushings are used, designed for the possible installation of a disc brake rotor. In this case, there are 2 standards of rotary fasteners:
- slotted, equipped with a retaining ring;
- and ISO on six bolts.
Quality MTB-class bikes, on the other hand, are often equipped with double contact bike bushings or labyrinth seals - all to reduce wheel rotation resistance to a minimum. True, this may suffer protection from water and dirt.
Bearing type
Bicycle hubs are equipped with only 2 types of bearings:
If we talk about bearings of the second type (industrial), then there are 2 of these for each bushing. Anthers tightly cover them and reliably protect against negative external influences, therefore, the elements of industrial bearings do not need any frequent or complex maintenance. This option is universal and suitable for almost any type of cycling. True, any industrial bearing is fundamentally more expensive than a bulk bearing, but the price is justified by it:
- high quality;
- and excellent performance.
However, the industrial version has its downsides. And it is precisely because of them that bulk parts have not yet been ousted from the market. In particular, industrial bearings are difficult to install. Under the conditions of a bicycle trip, for example, this is extremely difficult, almost impossible, since it will require pressing out and then pressing in the already assembled element. But with a bulk bearing there will be no problems. Broken ball? Replacing a part is a matter of 10 minutes from the moment the cyclist stops and discovers a malfunction.
Number of spokes
There is a direct relationship between the number of spokes in the hub, the reliability of the wheel and its weight. Today, manufacturers offer consumers bushings with holes for the number of spokes from 12 to 48. But experienced cyclists put models on 32 spokes or 36.
Manufacturers
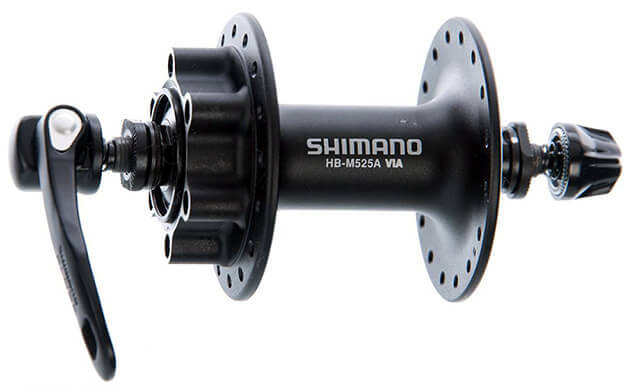
 In the middle price segment, Shimano is a recognized manufacturer of quality bicycle hubs.. Its products are based on radial thrust bearings and, due to this circumstance, Shimano hubs are repairable and easily adjusted during the operational process. It is easy to recognize such bushings even visually, according to the non-standard method of spoke fastening - flangeless.
Many experienced cyclists believe that the Deore LX products demonstrate the optimal price-quality ratio. But the most budget of existing options are Alivio bike hubs (the front one is only $10 and the rear one is $15).
Among the newcomers to the bicycle market in this segment, Novatec (Taiwan) should be noted. Its products are of high quality and modest price. The company produces bicycle hubs of the original design, with good functionality.
The owners of expensive bikes are in high demand for bike hubs from Hope, Chris King, Tune, DT Swiss.
Bushing Care
The maintenance of the vast majority of bicycle hubs is the care of the bearings included in their design. Bearings should be regularly:
- Clean.
- Lubricate.
- Regulate.
- And also sort out and dry if moisture gets in.
In general, there are certain subtleties in the issue of caring for bicycle hubs:

Choosing the Right Bicycle Hubs
Looking for a bike hub? Take advantage of the recommendations of cyclists:
- do not save, if funds allow, buy a bike hub of a higher class (you can buy a dynamo hub or even a planetary one);
- read before shopping real reviews in the Internet;
- select the type of bearing according to the conditions of your own driving;
- pay attention to the rear stars (specifically their type);
- It's better to buy a cassette than a ratchet.
In general, it is better to consult "live" with a specialist and / or an experienced cyclist who has changed more than one bike. Pros will definitely give valuable advice to a beginner.
![]()
Conclusions:
- When choosing a hub for your own bike, you need to pay attention to:
- the material from which it is made;
One of the main details of bicycles is the hub, the quality of which determines the main characteristic - "rolling". There are a huge number of them, but the rear hub of the bicycle, the device of which is quite complex, causes great difficulty.
They are distinguished by:
- device
- the material used for manufacturing, therefore, strength;
- weight;
- size;
- manufacturing method.
- Since the bike has two wheels, there are two bushings - the front one, which allows the wheel to rotate freely, and the rear one, in addition to the function performed by the front one, the rear one is responsible for the roll of the bike, i.e. its efficient driving without an applied load.
The back design comes in several modifications:
- no free play - rear brakeless;
- without brake mechanism, but with free wheeling;
- rear hub of the bicycle with a foot brake, a freewheel device.
A feature of the latter device is that in order to stop the bike, it is necessary to rotate the pedals in the opposite direction. Inside this device, there is a brake mechanism, which consists of a drum and pads, driven by a star rotating in the opposite direction.
A variation of the drum is the worm rear hub of a bicycle, usually installed on single-speed road bikes. Despite the low efficiency, which, without a doubt, is a minus, the device has a huge resource, which crosses out the mentioned minus.

Speed bikes are equipped with brakeless rear hubs, which are lighter than brake hubs, smaller in size and simpler in design. While the bike is in motion, the free play prevents the pedals from turning.
The axle of the rear hub bike can be clamped on the dropouts or on the frame. The spokes extending from it are connected to the rim, and thanks to the bearings they rotate the wheel.
A simpler device at the front wheel hub that performs only rotation bicycle wheel. The flanges located at the ends of the body, made in the form of a cylinder, have an axle, bearing assemblies, holes for installing spokes.
More complex structure at the rear of the bike. Its device is so difficult because, simultaneously with the rotation function performed by it, it is the basis for a ratchet or cassette.

The rear bike hub holds the wheel thanks to the axial ends of the frame stays fixed in the holes in one of the existing ways:
- using eccentrics (without dismantling the wheel and special tools);
- nuts (using a wrench to tighten them, taken at the rate of 2 pieces per bushing);
![]()
- disc bike hubs (on mountain bikes), which are designed to mount the rotor.
Material
The material used is steel, bronze, aluminum alloys.
Manufacturing methods
Depending on the manufacturing process, the bushings are divided into:
- stamped;
- turned;
- cast - the most durable.
The latter are very heavy. They are put on wheels with radially arranged spokes to increase the radial loads.
On high-end bikes, to reduce weight, they put rear hubs with hollow axles of a larger diameter and increased rigidity.
On highways and mountain bikes, they are installed with collapsible bearings, which are distinguished by increased efficiency. Installing them is not difficult, and adjustment is not required.
The most common today are bicycle rear hubs equipped with tapered angular contact rolling bearings.
disassemble rear hub speed bike to adjust is not as difficult as it seems. In order for these parts to last longer, they must be lubricated, cleaned, adjusted, and changed bearings in a timely manner.
In the price segment, the leading positions belong to the manufacturer Shimano, whose parts are distinguished by the fact that, thanks to thrust-radial rolling bearings, the function of their adjustment and repair becomes available.
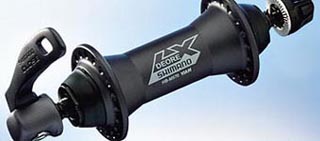
Their hallmark is the possibility of fastening spokes without flanges. best quality, according to a large number of cyclists, possess in this brand Deore LX. Alivio is considered a good option.
Noteworthy are the products of the Taiwanese company Novatec, which is confidently conquering the market.
It consists in caring for the bearings included in the composition - cleaning, lubricating, adjusting.

In order for these bicycle parts to serve for a long time, the following rules must be followed:
- sort out the rear sleeve if moisture gets on it;
- do this the more often, the more intensively the bicycle is used: for a city bike, it is enough to perform actions once a season, as for a road bike, and for a mountain bike, twice, or even three times, more often;
- diagnose when extraneous sounds or backlash appear; carry out periodic lubrication.
What lubricates bicycle hubs? This question is relevant for many cyclists. When assembling the rear hub of a bicycle, it is recommended to use grease for bearings, such as Litol and SHRUS. For gears in a ratchet and dogs, liquid lubricant is more suitable (you can mix it with a thick one).

Be sure to remove the old grease before application, using WD 40 or kerosene. Apply fresh grease in a thin layer after the solvent has dried. If this is not taken into account, then excess lubricant when driving will lead to contamination, which will shorten the life of the part.
Disassembly and assembly
The following instructions apply to most cassette rear hubs, allowing you to quickly and competently handle the assembly and disassembly of the rear hub of the bicycle.
The device of these parts from different manufacturers is identical. There are only minor differences that do not affect the disassembly process.
Before starting repairs, workplace clean it so that there is no dust, threads and hairs left on it that can ruin the part.

Disassembly is discussed using the Hyperglide as an example.
Safety
Many bike parts are manufactured from chrome molybdenum hardened steels and hardened steels and are therefore brittle. Therefore, you need to work with them carefully, be sure to protect your eyes.
This basic safety rule will help to avoid injury when disassembling the rear hub, which must be knitted into the wheel. You can't use a vise for this.
The device of the bushings of the rear wheel of the bicycle is such that their disassembly begins with the removal of the retaining ring. Needle-nose pliers can be used to remove the inner ring from the bearing with the locknut: the “nose” is carefully advanced into the splined groove, holding the sprockets (as if directing them in the direction of free play).
The same method is used to remove the retaining ring, which has a right-hand thread (turn it counterclockwise).
When working with the transmission, do not forget that the direction of rotation of the bicycle pedals must match the direction of tightening. That is, they unwind the rear sleeve against the clock. A right hand drivetrain will also have a right hand thread on the rear hub.
![]()
To disassemble the rear wheel hub of the bicycle, you need to pull out the cassette by removing the retaining ring. Cassettes are usually fastened with rivets. Some have sprockets in two sizes, so removing them must not disturb the order.
Sprockets should be cleaned with kerosene, methyl ethyl ketone, or acetone.
The next step is to remove the axle. To do this, you need to remove everything that is on the end of the axle opposite to the sprockets, pulling it out a distance sufficient to remove the bearings.
After removing the seal, two nests become visible on the inner ring of the bearing.

This will require special tools. Using a system of levers corresponding to the size of the sockets, the ring is unscrewed clockwise. Having coped with this work, you can proceed to the next step - removing the bearings.

Having done this, they are lubricated so that they sit well in place. From the core of the removed rear hub, you will need to remove all the washers (at least three of them) without damaging them. They need to be wiped and kept in the same order.
Any solvent will work to clean the washers. They must dry well before assembly. Prying the bearings with a small screwdriver, they are placed on a rag.
Washers save everything.
They should be reinstalled if there are no major problems. If problems with gear shifting are noticed, you can try to remove the thinnest of them, assemble and check if the problem has disappeared.
If not, the washer is returned to its place, and the thicker one is removed. If only the thickest of washers can achieve an acceptable load, the rear hub may be worn out and needs to be replaced.
Before reassembly, make sure that the bearings are in their respective races from which they were removed. They must be installed in their places, without rearranging them to the other side of the wheel, since the gaps formed during wear are different for them.
Sufficiently small cassette bushing bearings are easily lost, but it is not recommended to use a magnet to find them, because, when magnetized, they will attract iron particles, which will lead to their rapid wear.
At the stage of their cleaning, they are wrapped in a rag to remove excess grease. The process is then repeated by soaking a clean cloth in the solvent.
If defects or obvious signs of wear are found, replace it with a new one.

Of the tools for this work, you need a wrench for 12 or a pair of universal wrenches (as in the picture). The clamping screw is rotated counterclockwise, since it has a right-hand thread.
The main thing is to do it carefully so that the screw does not split. To facilitate the process, you can make a simple device that allows you to increase the length of the lever - put an additional tube on the key. Brute force must not be used, so as not to spoil the rear hub.

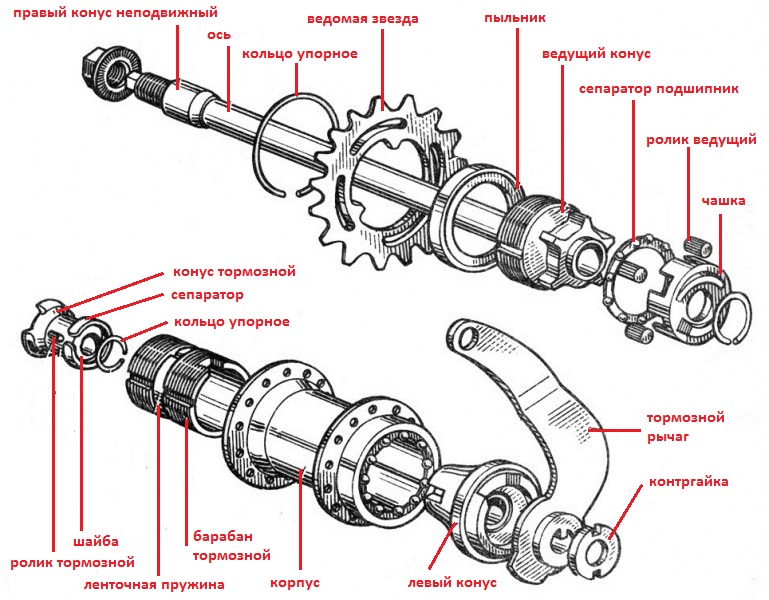
In the picture provided in the section "How to disassemble and assemble the rear hub?" parts that cannot be removed are marked in red. If they are damaged, they will need to be replaced.
At this step, the rear hub is completely disassembled. It remains to clean the lock screw threads and other threaded connections with a wire disc brush to prevent seizing after the part is in place.
If faulty components are found, they are replaced with new ones. When assembling, the pawls are installed in the correct direction and place. Otherwise, the cassette rear hub will not rotate.
When assembling the core, a lubricant and an anti-seize agent are applied to the threads of the locking screw. In the same way that was used to remove the retaining ring, the core is fixed by applying a force of 3-7 kgf.

A lubricant is applied to the bearing mounting channel, which works like glue, holding them in place while the rest of the parts are being installed. Now, having lubricated the ratchet ring, they are placed inside the shell.
When one side of the rear hub is assembled, the core is carefully placed in the cage, secured, the washers are installed, being very careful, the bearings are inserted into the cages so that they do not deform. On the free run, the work of the part is checked.
To screw in the combination ring, rotate the rear hub shell counterclockwise to ensure that the bearings are properly seated. If everything is assembled correctly, the ring is tightened with force.

It is easier to install them, starting from the side of the ratchet.
Installed
In order to adjust the load correctly, the cone placed in the ratchet should be fixed with a lock nut. On the transmission side, it is recommended to block the axle, center it as much as possible (if bolted).

Copiously lubricate the bearings on the side of the ratchet, screw the cones into them to set the preload, turning the locknut clockwise.
At first, the cone is not tightened too much so that it has little resistance to rotation, i.e. you can unscrew it by hand.
If the process is jammed, then, most likely, bearings that are completely worn out require replacement, and even the rear sleeve for clamping conical parts, which should not twist on its own.
The device of the cassette is such that it can be inserted in the only way: tighten the lock nut with force, checking that there is no play in the cassette. It remains to check the gap between the brake pads and the rim, as well as whether the wheel rotates freely. After the preload is set, you can fix the cone with a lock nut.
Having installed the wheel on the bike, they rotate the pedals: first in one direction - forward, then in the opposite direction to remove excess grease. It should flow out within a few minutes. The bike is ready to go.
Video: Bicycle rear hub front hub - what is it?
Welcome everyone! Winter is coming, which means it's time to prepare the bike for the summer, and today's topic for writing an article is bicycle hubs and everything about them.
Why exactly? Everything is simple, how can you disassemble, maintain and repair some bicycle assembly without knowing its design, properties and mechanism of action ?! No, of course, there are those who repair everything at random, however, normally, only half can be repaired, but oh well 🙂 In order to be aware of all new articles and reviews, we advise you to subscribe to the newsletter, in which you will be notified about new articles.
Whoever reads our article not for the first time is already well acquainted with the principle of presenting information, and whoever reads for the first time, we recall, we do everything in order.
From this article you will learn:
1. Myths about the sleeve.
2. Which sleeve to buy.
3. Minuses of threaded connections of the sleeve.
4. Advantages of splined bushings.
5. Mud protection sleeve.
6. Ex-centric Maxle.
7. Rules for choosing a sleeve.
Somehow we considered the history of the bushings in the article about, so we will not repeat ourselves.
A hub with a wheel is a lever and a fulcrum. We all know that the larger the wheel, that is, the lever itself, the better the roll, and the better the sliding and rolling in the hub, the easier the wheel turns, it turns out, the same roll. There is a myth that some of the energy, or the so-called power from pedaling, is lost in the hubs. We want to note that the opposite has been scientifically proven. Ouspensky's book The Theory of the Bicycle contains numbers that prove that bushing losses are so small that they can be neglected. It turns out that the loss in the bottom bracket with the chain is 4.5%, the front wheel spends 7.4% of the loss, and rear wheel– 18% total energy. And now, attention. The losses in the wheel bushings are only 0.47% of the energy!!! So, if you want to improve the rolling, change the tires and the chain drive. Why such a small percentage of energy loss is explained by the design of the hub itself: the balls rotate around their own axis, as well as around the wheel axis, plus, all this is in the lubricant. Therefore, do not save on lubrication during bushing maintenance, put as much of it there as if it were not yours 🙂 Soon we will review different lubricants, shovel through many forums and write an article about the best bearing lubricants for different bike components and different riding conditions.
Many people write to us that they bought new bushings and are satisfied with the good rolling. When you ask about how old the bike is, they answer “About 5 years”. It becomes frankly ridiculous, because it's a waste of money. There are only a few people who ride over 5 thousand kilometers in a season and are forced to replace bushings after 5-6 years of bicycle operation, and even this does not happen very often. And it is not always necessary to change the entire bushings. Many high-quality manufacturers of bicycle components and bicycle hubs have a bearing housing that can be easily replaced with a new one. The cost of such sockets is not high, the quality, of course, is an order of magnitude lower than the factory one, but this is already much better than simply throwing away a whole sleeve. For example, Sasha and I have bikes of 96 and 2005, respectively, and they still ride on native hubs. I would say, they don’t just drive, but fly, because the coast is crazy. What's all about us, yes oh, read on about bushings!
A new bushing will always spin an order of magnitude worse than the one that was already in operation. If you want to know more information, study tribology, the science of wear. A in simple words we say that the new bushing should run in a little, wear out, and then the roll will be better. Don't believe? Put a new bushing, make a push, count the number of revolutions. Drive 100-150 km, repeat the experiment. We guarantee that the number of wheel revolutions with the same push force will be greater than the first time. Also, if you don't want bushing problems, don't be stingy and buy a high-end bushing, it's a smart investment.
When it's time to choose a hub, the question is "Which hub to buy?". And rushed .... Half say that only on industrial bearings, and half say that only tapered, or, so-called, bulk bearings. The team will be the golden mean, which will objectively talk about the advantages and disadvantages of different bushings.
First there was a ball. Then there was the bulk bearing. Then there was the industrial bearing. That's the whole story 🙂 In theory - industrial bearings, this is a relatively new development, which means it's better. In practice, cycling tourism - the simpler the knot, the better it is. Ordinary bulk bearings are, frankly, a little hemorrhoids, but which can be treated, while industrial bearings are cotton candy that will bring us an incurable disease, diabetes. And now it’s clear - for driving around the city and for a distance of up to 200 km per day, or 500 for a trip, industrial bearings are the very thing! They are very comfortable, do not require adjustment, and are well protected from the effects of the external environment. As for long hikes with heavy loads - then the choice is for bulk bearings. It's simple, those that other bearings roll very easily, but industrial bearings are much more difficult to install, and bulk bearings require a simple but fine adjustment. Under the conditions of a hike, replacing an industrial bearing is simply unrealistic, or in other words, very costly. Moreover, we never know when one or another bearing will fail. If the ball breaks in bulk bearings, replace it, it takes 10 minutes, from stopping, to complete assembly of the wheel, but the industrial bearing will require pressing and pressing back a new, assembled bearing.
It's up to you, and we've given our opinion.
Bushings are front and rear. The difference from the first is the presence of a seat for the rear stars. Previously, the rear stars were solid, and wound onto the thread. Now everything is different, and this design goes down in history.
The fact is that threaded connection bushings and ratchet has many disadvantages:
- Chance of stripping threads during installation.
- Uneven wear of the ratchet mechanism and the stars themselves.
- Insufficient strength and rigidity.
- Large energy losses in the node.
True, such rear stars are still installed on bicycles due to their cheapness and interchangeability.
That is why cassettes have replaced rattles. Thanks to the spline connection of the sleeve with the cassette, great success has been achieved!
Namely:
- Less weight.
- The ratchet mechanism was installed inside the splined drum, which means that the loss of energy during rotation in the bearings has decreased.
- The distance between the bearings has become larger, which means that the rigidity of the bushing has become higher.
- The reliability of fastening due to the slots has become much higher, and it is not realistic to tear the cassette from the slots.
- Easy to install, thanks to the slotted connection.
- Now you can replace individual stars, not the entire cassette.
The material for the bushings was steel, now aluminum alloys are used, and, very rarely, titanium alloys, as in the Shimano XTR series.
We wrote above about the ratchet mechanism, many do not know how it works, but everyone knows that this is the so-called ratchet. But, this is not the correct name. Let's talk about the ratchet mechanism and its working principle.
The ratchet is the moving part of the rear hub. Its design is simple - it is a ratchet and pawls (from 2 to 6). The pawls are spring-loaded and cling to the teeth of the ratchet, thereby transmitting torque from the stars to the wheel. When the sprockets are not moving, the pawls are pressed and do not come into contact with the ratchet, which at one time rotates freely. The pawls and their springs fail the fastest, which can be easily replaced in drum bushings, and very hard in ratchets.
But, some companies, namely CRISS, KING, etc., have developed a mechanism that is simply eternal. These are two steel gear rings and a spring. During rolling, the gear rings do not come into contact with the wheel, and during pedaling, the spring presses the rings into the hub, thereby establishing the connection of the rings with the wheel. Simple and reliable.
Another type of bushings is roller. If the front roller bushes are brake bushes, then the rear roller bushes are reverse brake bushes. We will describe these bushings in more detail in another article.
Mud protection of the sleeve is good, only in moderation. Conventional boots, improved boots are the go-to option, and contact and labyrinth seals are complex fixtures that increase rolling resistance in the hub. But, anthers, these are the same condoms that do not guarantee 100% protection 🙂 The best way to protect against dust is to sort out the sleeve in time, especially after driving a deep ford or swimming in salt water.
We examined the classification of bushings according to the type of fastening of the rear stars. It's time to consider the bushings by the type of attachment to the bicycle frame.
What do we know about such a mount? This is something that can be secured with a bolt, or with an ex-centric. That's it, 90% of the population simply does not know more information, but we will tell you!
We will not talk about standard axle lengths, clamping force and the like, we will talk about new bells and whistles to quickly fix the wheel in the fork dropouts or in the chainstays of the frame.
The material for the axes of the bushings are steel, aluminum and titanium alloys.
As everyone knows, ex-centrics do not hold wheels well on extreme-style bikes. For this, the ex-centric MAXLE and MAXLE Lite were invented. Its essence is very simple - the absence of a clamping nut on one side. Instead, there is a thread on the axle, and, accordingly, a threaded hole on the fork dropout. The installation procedure is simple. First, the eccentric is threaded through a threadless hole, then the axis is screwed into the threaded hole and the entire axis is clamped by the eccentric. But the eccentric itself is not simple, but special. The tube-body is cut into four petals, and during the clamping it is firmly fixed in the fork dropout. Feature - use only with disc brakes. Lite version - differs only in weight and material used. The weight is about twice as light. Do you have money, do you drive aggressively, have you broken more than one axle? Then Maxle is for you! And do not think that this is an advertisement, other companies then also began to produce similar bushings, and very successfully.
These are the most basic and most successful designs of wheel-in-frame mountings. History remembers many "Kulibins" who tried to invent something new, but they did not succeed.
And yet, it is worth paying attention to one interesting thing - this is a depreciation bushing.
It's funny, but it's true! The design of the bushing is very complex. Yes, and the weight of the bushing is large, and there is not much sense from that bushing. If in a nutshell to describe the essence of the action of depreciation, then everything is simple. The sleeve itself runs along the axis along the guide bracket. So that the bushing stroke is not just a shat, the free space is filled with an elastic element. That's all show-off. That is why no one knows about it, but it exists - a depreciation bushing. Now you can easily argue with your friend about the existence of a damper sleeve for a bottle of beer. Stop, not beer, of course, but juice. Something our team broke into jokes today 🙂 It's time to finish the descriptions of the bushings, and in the end we will sum up a little about the bushings and the correct choice of bushings.
How to choose the right bushing:
- if you have free money - it is better to buy a higher level bushing;
- you don’t need to chase the advice of marketers and be guided by mean numbers, but it’s better to ask your comrades for feedback;
- bulk or industrial bearings - it's up to you to decide by comparing the conditions for using bearings (we wrote about this above) with your driving conditions;
- when choosing a bushing, you should pay attention to the type of rear stars. It is better to take a cassette than a ratchet;
- ratchet is a threaded connection on the sleeve, the cassette is splined;
- if the driving conditions and available funds allow - you should pay attention to the choice of a hub dynamo. Read about them on our website;
- the planetary hub seems to be more expensive, but it includes three components - the hub, a set of rear sprockets, a caliper and an expensive chain.
If you have additions - write comments, we will be happy to answer, discuss and supplement! Have questions - ask! Feel free to communicate and expand your circle of knowledge. To stay up to date with events, subscribe to the newsletter.
Watch a helpful video on how to maintain bushings. Enjoy watching!
We wish you all the best on the roads and good work of the components! See you again :).
Best regards, team
In order to disassemble the bicycle hub, the first step is to remove the wheel. I suggest flushing the wheel to keep sand and dirt from getting inside the hub. When preparing to disassemble the bushings, one must be prepared for the fact that bearing balls may fall out of it, so disassembly should be done over a clean newspaper or rag.
Bushing disassembly

We remove the eccentric (if any) (No. 1 in the figure). To do this, unscrew the cap nut to the end, remove the spring, pull out the clamp axis;

Remove the boot on the left side (if any). Next comes the lock nut (No. 2 in the figure), the washer (No. 3 in the figure) and the cone (No. 4 in the figure) with edges for the key;


With one key we hold the cone, and with the other we unscrew the lock nut, remove it and the washer;


Remove the bearing balls from the hub housing. In some bushings, the balls can be combined into one industrial bearing, in this case, you just need to remove it;

Remove old grease from balls and bushing body. This can be done with a cloth soaked in kerosene, and then dried on a clean cloth.
Bush assembly and lubrication
Remember that the right and left ends of the axis are different. The right cone is screwed onto the axle tightly and fixed with a lock nut, it is never removed from the axle, and adjustments are made using the left cone. Do not confuse from which side you insert the right cone.

Apply new grease (thick) to the surface of the ball cups;


Insert the axle from the right side. When installing, do not push the balls out of the opposite side of the bushing;

Screw the left cone onto the axle, screw it almost to the stop, but do not tighten it. If you tighten the cone too much, then the axle will not spin, and if it is too loose, then the wheel will move from side to side. Put on the washer and locknut, and at the end don't forget to put on the rubber boot.
What part is impossible to imagine a bicycle without? Whether we're talking about a premium sports bike or the simplest budget bike, the answer is clear, it's a wheel. Why wouldn't the wheel spin? right, no bushing. The better it is, the higher the rolling of the bike, which directly affects its efficiency. Let's take a closer look at how the bike hub is arranged.
Bicycle hub device
The bike hub is the main part. Its axle is clamped on the fork dropouts or frame. Spokes extend from it, connecting it to the wheel rim. Due to the bearings, the hub and the wheel are spinning.
Bicycle Hub Selection Criteria
Today, the bicycle parts market offers us a huge selection of bushings. Let us dwell in more detail on each of the bushing selection criteria.
Material
Bushings are made from aluminum and steel. Aluminum are more expensive due to their light weight and corrosion resistance. Their reliability is affected by preparation method: Stamped and cast bushings with a perfectly smooth surface are stronger than turned ones. At the same time, steel parts are more affordable, but subject to corrosion. In addition, they have an impressive weight.
Location on the bike
Front hub with eccentric clamp.
On the front wheel of the bike is located. She has the simplest design. This is due to the fact that the part performs a single function - the rotation of the wheel. In an ordinary bicycle, the front hub has a cylindrical body. On the flanges located along its ends, there are holes into which. The bushing housing contains bearing assemblies and an axle.
Rear bushing.
Shimano Center Lock.
Bulk bearing.
Bicycle bushings are supplied with 2 types of bearings. In the first case, these are bulk bearings. They have the shape of a cone fixed on the wheel axle and a metal cup included in the hub body. Between which the bearings "roll".
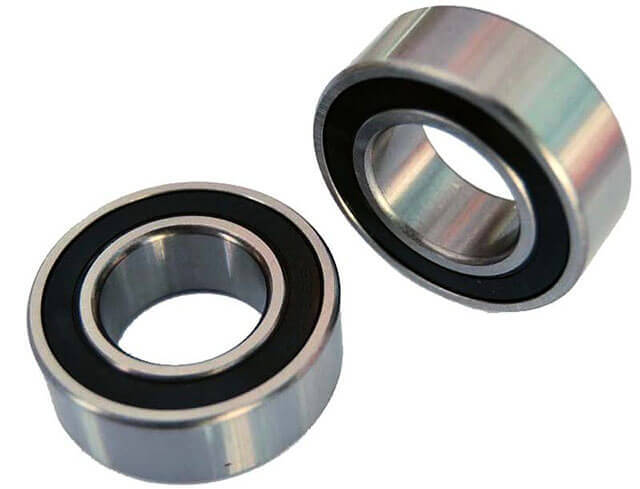
Bearing with boot.
The components of the second version of the industrial bearing are the inner and outer cage, balls, separator and anther. There are 2 such bearings for each bushing. The anther is tightly closed by the bearings, so the bushing does not need frequent maintenance. And perfection of a design provides simplicity of installation and replacement of details. The last version of the bike hub is more versatile. It is suitable for almost any type of riding. Perhaps, her only flaw can be called expensive. However, it is fully justified by the high quality and performance.
Number of spokes
There is a direct relationship between the number of spokes in the hub and the reliability of the wheel, as well as its weight. On the bicycle parts market today you can find bushings with a number of spokes from 12 to 48. The most popular among experienced cyclists are models for 32 and 36 spokes.
Company manufacturer
![]()
Shimano Deore LX.
Shimano is rightfully considered the world leader in the production of bike hubs in the middle price segment. The main difference between the products of this company are thrust-radial rolling bearings and the option of adjusting the bike bushings during wear and maintainability available thanks to them. The hallmark of Shimano bike hubs is the non-standard way of flangeless spokes. For most cyclists, best regards cost / quality in the line of this brand has Deore LX. A more budget option for those who want to save money would be Alivio. The rear hub of this model can be purchased for 15 USD. e., and the front - for 10 c.u. e.

Novatec D362.
The attention of cyclists deserves the bushings for bikes from the Taiwanese company Novatec. As a newcomer to the bike parts market, this brand, meanwhile, confidently gaining prestige thanks to affordable price and decent product quality. Under this brand, bicycle hubs are produced that are diverse in terms of design and functionality. In the expensive price segment, bushings are made by companies such as Chris King, Hope, DT Swiss and Tune.
Cycle Care
The maintenance of most bicycle hubs is to care for the bearings. included in their composition. They need to be lubricated, cleaned and adjusted regularly. In order for the hub, and, accordingly, the bike to serve you for many years, you should know such nuances of care.
- If moisture gets in, the sleeve must be sorted out.
- The more extreme conditions the bike is operated in, the more often its bushings need to be rebuilt. It is clear that the details of the urban or can be sorted out less often than its mountain counterpart. In the first case, maintenance is enough once every 5000 km (or once a season).
- If a backlash or other extraneous sounds appear during the ride, then the bike needs more frequent adjustment.
- is made only after thorough cleaning of the sleeve from the previous one.
- The quality of lubricants also affects the service life. It is recommended to use greases like SHRUS or Litola undiluted in order to avoid washing them out of the mechanisms.
- The sleeve on angular contact bearings is disassembled using special cone keys and. If these tools are not available, then it is best to use the services of a bicycle workshop.
- Replacing the spokes in the front bike hub without discs or in this order. First, insert the spoke from the side into the flange. To install the spoke into the rear hub, you will need to additionally remove the sprocket and brake rotor using special tools. Shimano wafer hubs make the process easier. In the latter case, there is no need to remove parts to replace the spokes. However, it will be necessary to clean the sleeve from dirt more often, since it tends to clog into the slots in the housing.
- In addition to bearings, the bushing itself deserves close attention. It is necessary to carefully check its integrity, the presence of possible cracks in the place of the spoke holes and on the body.
- When working with bushings of any class, contact with moisture should be avoided.
Thus, when choosing a hub, one should take into account its purpose and such basic parameters as material, fastening, number of spokes and bearing type. The operation of the bushing is affected by both the quality of the seals and the type of bearings. An important factor is timely maintenance, cleaning and lubrication. Parts must be manufactured in accordance with tolerances and specifications, have a flat surface, match each other's dimensions to the nearest millimeter. Price is also an important criterion. If your budget allows, then acquiring an expensive quality hub will be the right investment for your bike for years to come.
Video. Bicycle rear and front hubs. What is this?
The author of the article is Yulia Alchebaeva