Do-it-yourself inspection hole in the garage: dimensions, photo
If you want to equip your garage in such a way that it has maximum functionality, then its space must be supplemented with a viewing hole. At the same time, you can not only store your car in it, but also store things, repair and inspect the car.
Features of the viewing hole
If you will equip a viewing hole in the garage with your own hands, you need to choose the dimensions at the first stage. But it is important to think about whether you really need such a component. Two decades ago, the presence of this element in the garage was not discussed, however, with the development of service stations, a category of car owners appeared who did not see the point in servicing the car on their own. An inspection hole in the garage with your own hands made of iron can be equipped. But if you do not want to spend time and effort on an independent technical inspection, then you will not need it. Some argue that a recess in the garage can negatively affect the elements of the car, because fumes rise from the bottom. This is true only in the case when the work is not done according to technology. After all, it is important to insulate the pit, to make it convenient for your own use. By providing the underground space with an airtight cover, you can be sure that even a poorly insulated pit will not be a source of fumes.
When it is not possible to equip a viewing hole
Do-it-yourself inspection pit in the garage can not be equipped in all cases. This will depend on the lines of groundwater occurrence. If their level is higher than 2 meters, then such work will be impractical, this is due to the fact that the space will be filled with water. But if there is a need, even the most critical conditions can be overcome by having a good drainage system, as well as high-quality waterproofing. A do-it-yourself inspection pit in a garage is often built from concrete, it also needs to be supplemented with drainage, but this task is quite difficult, only knowledgeable people should deal with it at the stage of building a garage. If you have to create this system on an existing building, this may be accompanied by the application of a large number of forces and means. Among other things, such manipulations are not always effective.
If the occurrence of groundwater under an existing building indicates that the pit should be abandoned, then this hint must be heeded. An alternative solution may be the equipment of a lying pit, which may well replace a full-fledged one in some cases. If you equip a viewing hole in the garage with your own hands, then you need to invite the appropriate specialists who will be able to analyze the level of groundwater. If you decide to spend the least amount of money on these manipulations, then you can check it yourself, but it will take much more time. To do this, you should dig a pit, but you should not immediately concrete it. You need to wait for the flood season, heavy rain will do. After that, you will be able to evaluate its consequences.
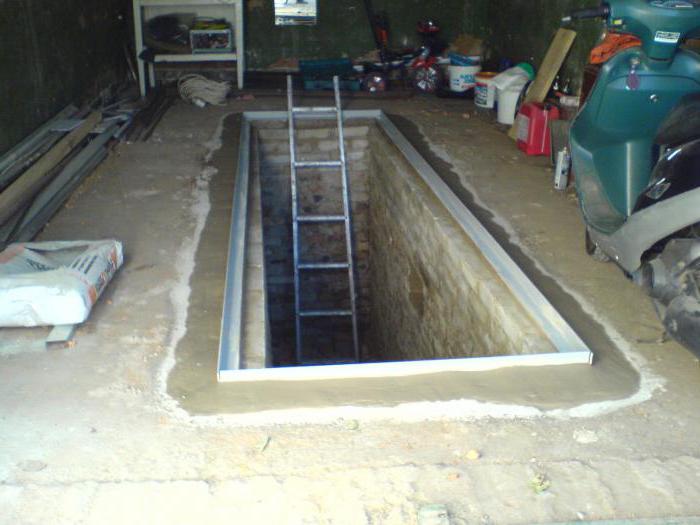
Inspection hole dimensions
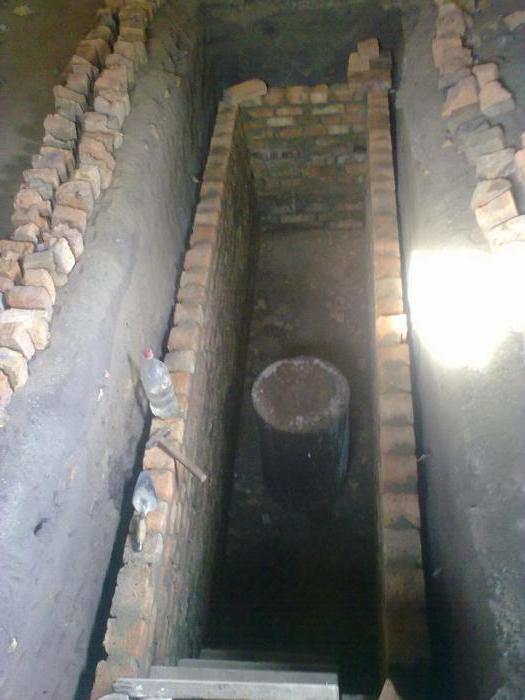
If it seems to you that a viewing hole is a fairly standard part of a garage, you may be wrong. Such a device may have several options. It can be combined with a cellar and a basement, make a narrow recess, which will be operated using a ladder, and also arrange a lying pit, which was mentioned above. Dimensions should be chosen depending on the master who will most often use the pit. It is important to take into account the size of the car, as well as its intended location. The width should not be less than 80 centimeters; 1 meter can be chosen as the optimal parameter. In depth, the pit should measure from 1.8 to 2 meters. This parameter is the most important, and it will depend on the height of the person. The most suitable option is considered to be a depth that is 15 cm more than the height of the master. Most often, he uses a size within 2 meters as a length. If you will equip a viewing hole in the garage with your own hands, then when planning it is necessary to take into account that the mentioned indicators are not given for the pit itself. It is necessary to dig it out with allowances of 50 cm for width and length. As for the depth, you need to increase it by 25 cm. If you plan to insulate the walls, then the dimensions of the pit must be increased by the width of the insulation, most often this figure is 50 millimeters.
Floor arrangement
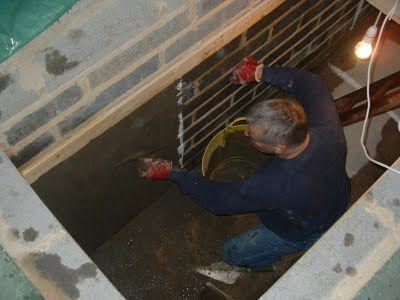
After the pit is prepared taking into account the selected dimensions, you can do the floor. If you correctly approach the construction, then there will be no issues with dampness during operation. Thus, it must be taken into account that the inspection pit in the garage, equipped with your own hands, must be equipped with ventilation. To do this, a hole is left in the floor through which a flexible hose is inserted underground and to the surface. It is an air duct on which a cover is put on. Initially, it is necessary to fill up the preparation for concrete. It will be represented by two layers, the first of which assumes the presence of gravel, while the second - sand. The first layer is filled up with a thickness of 10 centimeters, the second - 5 centimeters. Each of them should be watered with water and well compacted. The surface of the floor should be treated with clay and a layer of waterproofing should be laid. Next, the reinforcement is mounted and concreting is carried out. As soon as the mortar layer gains its strength, another layer of waterproofing should be put, only after the master can start finishing.
Alternative floor arrangement
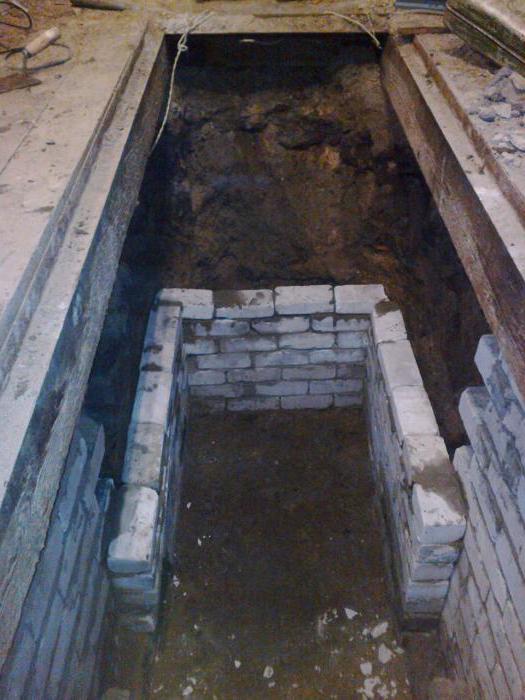
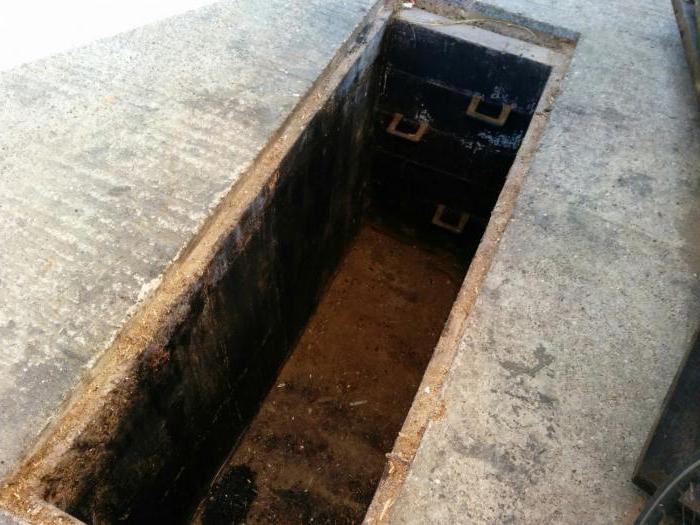
If you do not want to bother yourself too much, then you can go the easier way, for this it is enough to lay out the bottom of the viewing hole with a brick. However, this approach can be considered rational only if groundwater is located at a sufficient depth. This is due to the fact that good waterproofing cannot be achieved in this case.
The choice of materials for waterproofing
If you are going to equip a home-made viewing hole in the garage with your own hands, you can choose its dimensions yourself. However, it is important to think about waterproofing. There are a great many such materials on the market, but it should be noted that the one you choose must be effective. This is especially important for the reason that the pit will be subjected to heavy loads in terms of excess moisture. However, it is important to exclude the option of overpayment. Guided by the above considerations, polymeric membranes, which are presented in a single layer version, can be especially distinguished from a number of commercially available materials. Their thickness can vary from 1.5 to 2 millimeters. With regard to two-layer membranes of this type, their maximum thickness can be equal to 3.1 millimeters. This material is characterized by resistance and durability. But it has the most impressive price compared to others. Rather, installation will be expensive, which requires the need for special tools and certain skills.
If you want to save money, then you should choose bituminous materials, these include roofing material and bituminous grease. Installing them is quite easy, but you should not count on a service life that exceeds 20 years. A do-it-yourself inspection pit being built in the garage, the dimensions of which were mentioned above, can be waterproofed with bituminous components. The material is sold in rolls, you can cut it to the required dimensions, and then stick it with an overlap of 15 cm. You can glue it by heating or using a bituminous solvent. An alternative solution to the above two methods is considered to be a waterproofing lubricant. It was invented relatively recently and is inexpensive. Applying it is easy enough. The surface must be damp, then the material will completely saturate the concrete and protect it from excess moisture.
Insulation of a viewing hole
Do-it-yourself inspection pit in the garage (the photo of which is presented in the article) is rarely insulated. Experts say that inexperienced craftsmen needlessly neglect this manipulation.
This is especially true for those garages that are heated. If you make thermal insulation, then you minimize the cost of heating.
Insulation must be glued to brick or concrete, after the walls and floor can be subjected to decorative finishing. If during waterproofing work you may doubt the choice of a certain material, then experts advise using expanded polystyrene as a heater. However, it is important to consider labeling. Thus, PSB-S-35 is perfect for the floor, while PSB-S-25 can be used for walls.
Wall construction
If a self-made inspection hole is being built in the garage, then for its walls you can choose one of the two most common solutions. One of them involves the use of concrete, while the other involves the use of bricks. If desired, both options can be plastered or tiled, as well as fiberglass. Preparation before using concrete or brick looks the same. The surface of the walls is covered with a layer of clay, on which dense polyethylene is covered. At the next stage, the formwork is installed, the thickness should be equal to fifteen centimeters.
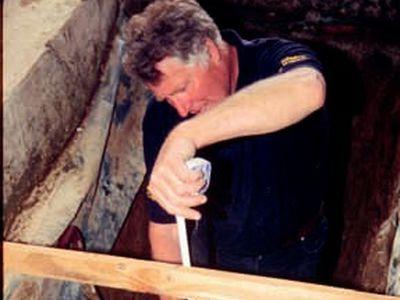
When a do-it-yourself do-it-yourself inspection hole is made in the garage, the construction of walls must be accompanied by the fulfillment of two conditions. One of them provides for the need for a safety rail. Its task is to prevent the wheel of the car from falling into the pit. Among other things, it prevents water from entering the wheels directly into the pit. It should be made in the form of a plank, which resembles the shape of the letter T. It contains metal at its base, and it is necessary to strengthen the element to the formwork, placing it flush with the floor surface. This bar will act as a support for the lid. Among the additional components are niches and ledges in the wall, they will become shelves for various tools and necessary things. The master will be able to appreciate the convenience of such ledges at the first use of the pit for its intended purpose.
Lighting
If you build a viewing hole in the garage with your own hands, she simply needs lighting. Some masters oppose the presence of lighting fixtures inside. A number of motorists use portable lamps that have a powerful battery. However, if you take into account the level of comfort, then the presence of internal lighting is worth considering. If you want to arrange everything according to the rules, then you should be guided by SNiP, which indicate that the voltage in the outlet inside the pit should not exceed 36 V. Special lamps can be found for this voltage. It is strictly forbidden to use standard 220 volts inside, as they can become a threat to life.
Pit cover
When you equip a viewing hole in the garage with your own hands, you can create a reliable cover from the boards. To do this, use wood, the thickness of which is 50 mm. However, a thickness of 35 millimeters will suffice. This is due to the fact that the boards will not experience a constant load. The lid can be made of different materials, it will depend on what the edging of the pit was formed from. If this is a steel corner, then the cover can be made from several shields. In their lower part, you can fix small rollers. Shields can be formed from wooden planks, the width of which varies from 30 to 35 millimeters. When a do-it-yourself inspection pit is made of bricks in the garage, the cover can be formed according to the roller shutter principle. To do this, use boards whose thickness is 40 millimeters, while the length will correspond to the width of the pit. On each board, grooves must be made at both ends into which a steel cable is threaded. Springs should be installed between it and the bar, which will provide mobility. The cable is fixed on the last board, while a handle is installed at the opposite end. It will only be necessary to pull on it a little, which will allow you to open the pit as much as necessary for a certain kind of work. In general, almost all materials can be used to make any part of the pit and its components.