Sheathing a wooden house outside with siding. Proper installation of siding on a wooden house
If you want to finish the facade using a dry method, siding will suit the house, which suits most modern buildings, especially if they are built from sandwich panels or foam concrete.
Finishing the house with this material can be done independently, without spending a lot of effort. Siding is not only different beautiful view building that he can create, but also at a bargain price.
Considering the complex characteristics of the proposed materials for wall decoration, pay attention to the following factors:
- operating conditions of the finish;
- the total cost of finishing;
- environmental friendliness.
Information about the characteristics of siding that may be useful in making a decision on cladding a house with siding:
- durability;
- subject to temperature deformations;
- resists direct sunlight, adverse external influences;
- impact resistant;
- it is easy to install;
- the finished facade is easy to repair;
- fire safety.
If you decide to use siding for your home, the first thing you need to do is visit a hardware store in person. When buying online, it will be difficult for you to find out the following features:
- color uniformity from the outside and inside indicating the quality of the material;
- quality of mounting holes;
- the uniformity of the thickness of the panels along the perimeter and among themselves.
Types of finishing material
Siding has excellent technical specifications. Due to the wide range of colors and textures, there is a steadily growing demand for a house sheathed with siding on the materials market.

It is available in these variations:
- vinyl;
- aluminum;
- basement;
- steel;
- copper;
- cement;
- wood.
Any of the above types is suitable for finishing exterior walls. Focus on your budget, the desired appearance of the facade. The cheapest will be vinyl (the most popular), the most expensive - including wood or copper. The first two types are usually used to finish wooden house do-it-yourself without spending too much time.
Material quantity
To calculate the amount of the main material (panels, hydro-, vapor barrier), you need to measure the area of \u200b\u200bthe facade for finishing, minus the area of \u200b\u200bwindows, plus five percent from above. The number of profiles is equal to the length of the corner lines of the house, including the contact angles of doors and windows, the perimeter and doubled.
For a rack profile, it is enough to find out the length of the walls from the ground to the beginning of the roof, multiply by the length of the perimeter, divided by 60 cm. between fasteners (70 cm). For you need self-tapping screws:
- LN 9 - for a galvanized profile, the ability to find out only an approximate number.
- TN 25–30 - for wood, for counting, we multiply two by the U-shaped mount, adding five percent.
What is useful for facing
Usually, do-it-yourself siding at home requires the following tools:
- screwdriver;
- screwdriver;
- roulette;
- scissors;
- grinder / saw with small teeth;
- a hammer;
- level;
- square;
- stairs leading up to the roof.
Before finishing the house with siding, study its complete set, which consists of the following parts:
- starting, corner, finishing, connecting strips;
- elements for slopes;
- drainage systems;
- spotlights.
Getting to the preparatory work
Without preparing the facade for work, you should not start cladding. Remove interfering elements: window shutters, external ebbs, cornices, window sills, drainpipes. Seal old cracks with mortar or foam. Mold, rot, old paint and peeling plaster should be removed from a long-built house.
After, treat the walls: flame retardant, wall antiseptic wooden house, special primer brick or concrete. Next, you need to carefully examine the facade in order to understand whether the facade cladding with siding needs an additional frame. It may not be installed only for smooth log walls, in other cases, especially when insulating, its installation is mandatory.
Frame installation
As we just said, in most cases a frame is needed: from rails for log house and from a galvanized profile in the case of concrete or brick walls at home.

Attention: the slats that are needed to sheathe a wooden house with siding are processed after drying with the same materials as a wooden house.
So, how to sheathe the facade of a private building with siding:
- mark lines for a closed contour using a tape measure and a level;
- put a mark on the lower point of touch of the wall to the plinth, making a second contour, where in the future we will set the initial bar;

Be careful: in case of deviation of the second contour from the level indicators, the finishing panels of the walls may skew.
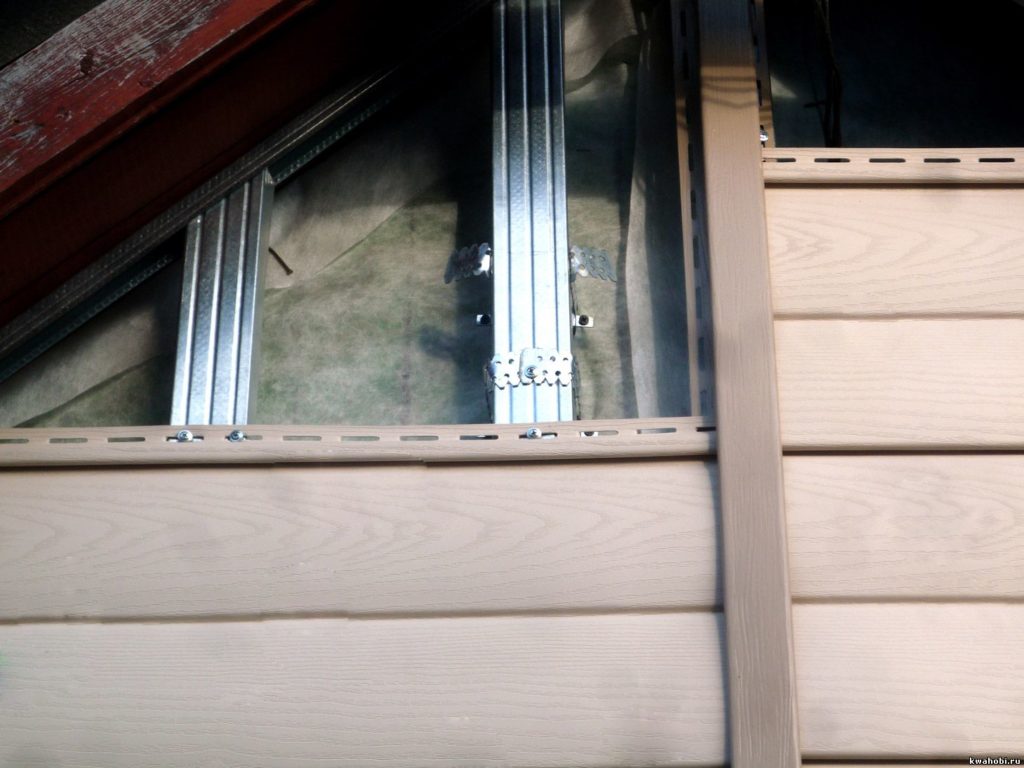
- start the installation with vertical rails, which are mounted using U-shaped fasteners;
Tip: for a tight installation, you can put pieces of wood or foam under them.
- on corner lines, places of future lighting, as well as near door and window openings, additional guides are made;
Attention: if vertical rails are connected to each other, air circulation will not work, which will expose the facade to destructive biological influences such as fungus or mold.
- do-it-yourself layers of hydro- and vapor barrier are laid;
- layers of rolled mineral wool or foam boards are laid between the crate, if necessary, fixed with clamps.
plinth trim

If you want to use this material for, use the following instructions:
- install horizontal profiles on the frame;
- attach the initial strips from above;
- measure the supporting parts with a level and a corner;
- fasten the profiles and knees together;
Attention: for fastening strength, use dowel-nails up to 8 cm long for this process.
- if you want to end up with a stable base, mount the profiles horizontally.
If this is the first time you are faced with the need to perform sheathing with such material, and you are not sure how to properly sheathe a house with siding, study the following material:
- when fixing the panels, keep a gap between the siding and the self-tapping screw of 1 mm
Attention: if you forget about the thermal gap when finishing the house, the finish will soon become covered with cracks due to expansion when heated.
- leave 0.3-0.5 cm of space between the edge and end connection;
Tip: if siding is done in winter, the gap distance is increased due to temporary compression of the material.
- fasten all the screws in the center of the hole, except for one at the top of the gable, which is driven into the center of the panel itself and the screws of the top panels.
Without doing these simple rules the technology of siding the house with siding will be incorrect, and the frame will not hold the material well.
Let's start facing the facade with panels
Step by step, you have come to the main point that siding has - fixing the main panels, for this:


- attach the initial profile using the level;
- put panels on it, each of which is attached to the crate;
Attention: the mount is done with the help of self-tapping screws of the color of the siding, when choosing which attention is paid to the hat - for a strong fastening it must be large and with corrugations.
- fasten the panels from the bottom until you reach the gable;
- assemble the cornice, for which serifs are applied to the pediment and the installation of the launch panel;
- attach a crate to the plank;
- mount the cornice with self-tapping screws.

What to do with openings
For finishing the slopes of doors and windows with panels, if present, there are special accessories that include the following elements:
- slope profiles;
- window avilons;
- platbands and others.
For facing slopes, after repairing windows and doors, you can use two mounting options. Ways to sheathe slopes with siding:
- overlay - it is more reliable for protection against moisture;
- butt - has a more beautiful appearance.
Against the backdrop of the complexity and high cost of implementing the previous options, the technology of siding a wooden house can exclude them. To do this, the frame along the perimeter of the opening and arrange it with a J-profile. In this case, the siding bypasses the slopes, which are faced separately using a different technology.
Conclusion
Vinyl siding will almost always fit your home perfectly. Despite this, some owners use a log blockhouse to preserve the look of expensive natural wood with their own siding. It is very convenient to finish a house in which the windows are at the level of the walls, without external slopes.
Metal siding is used for commercial properties, where its ability to provide the benefits of sheathed construction, which it cannot do for a private house, except that it complicates the work. If you do not have a strong desire to understand how to sheathe a house with siding with your own hands, hire professionals.
The fact is that if you do the finishing yourself, in case of failure, there will be no one to blame. Also, because of inexperience, you run the risk of wasting twice as much materials, especially if you are not in the habit of carefully studying the nuances of the sheathing process before starting it.
Despite the fact that with regard to finishing the house with siding, there are different opinions, this task is within the power of any person. So that the end result does not disappoint you, you need to strictly follow the requirements of the technology and take into account any little things. For those who are unfamiliar with the nuances and stages of finishing, it will be useful to read the following article.
The choice of siding
For every person who decides to do exterior trim at home with their own hands, the problem of choosing a suitable material is very relevant, which will not require attention for a long time and will not cause special care for caring for it. But making a choice is not so easy. To do this, it does not hurt to first get an idea about the types of this material offered on the market, as well as their features.
Vinyl siding
To make this type of siding polyvinyl chloride is used, in addition to which the composition contains various additives that prevent fading and warping of the surface.
In fact, vinyl siding for home decoration looks like a regular strip, in which one edge serves to attach screws and nails, and the other is assigned the function of a latch-lock to secure the next panel.
Vinyl siding is attractive for many reasons, among which one of the most important is the low acquisition costs, since PVC siding is quite inexpensive.
He also has other virtues, which should be known to everyone who plans to purchase this finishing material for the home:

No less pleasant is the fact that this material does not require special care. This is largely due to its structure, since dirt and dust do not get inside the panel, and it is quite simple to remove them, for which it is enough to use plain water.
- Rather low resistance to mechanical stress;
- The inability to retain the original color and shade for a long time, provided that poor-quality material was used.
Thus, if you are interested in minimal cost time and money to decorate the facade of your house, then you should pay attention to vinyl siding. However, you can enjoy all its advantages only if you correctly approach its choice. Therefore, before making a final decision, you should make sure that it has warranty documents and quality certificates from the manufacturer.
 What distinguishes houses that are finished with metal siding is the presence of a respectable, aesthetic and expensive look. However, they still have one important difference compared to their vinyl counterparts. This means more high price metal. Among the available options for this siding, those made of aluminum and galvanized steel are the most in demand.
Of the advantages that aluminum products have, one should single out an infinitely long service life, and the reason for this lies in their immunity to corrosion.
As for products made of galvanized steel, they cannot be considered as "eternal". These panels are able to please their owner for several decades only if they are the following conditions are met:
- Coloring of products should be done at the production stage. Processing in other conditions using a sprayer or brush will not achieve the same result. Only if this requirement is met can the siding be able to retain its color and protective layer.
- Owners should be very careful with galvanized steel siding panels. They should do their best to minimize the appearance of scratches. If rather deep damage appears on its surface, this will create fertile ground for the development of corrosion processes, and then it will no longer be possible to count on the fact that this siding will last a long time.
Frame assembly: step by step instructions
Before proceeding with the installation of the frame with your own hands, you must prepare a number of tools and materials:

When everything you need for installation is ready, you can be sure that you have met all the conditions to ensure a quality installation. Now you can start assembling do-it-yourself frame of the future facade.
First you need to calculate the distance from the wall of the house, where you want to place the outer edge of the facade. To do everything right, you should take into account the surface topography. Otherwise, such a situation may arise that, having calculated a certain distance from the wall, it subsequently turns out that in its middle there is a protrusion that does not allow making a flat plane. For this reason, it is recommended to choose a place for marked points along the edges on top of the wall, at the very bottom of the canopy.
It is necessary to take a chopping cord, connect two points with it, and then, using a plumb line, you need draw a similar line on the ground. The lines created in this way will become a guide for you, which must be taken into account during the installation of a vertical profile or timber.
 In cases where it is planned to use a frame made of a CD steel profile, a 3 cm UD guide profile must be fixed along the ground and the visor. Subsequently, you will have to insert the ends of the CD profile into it. If there is no concrete blind area near the walls on the ground, as well as the possibility to fix the UD, during the installation of the frame in the lower part of the facade, you will have to start from the line and level readings.
Parallel to the wall of the house draw straight vertical lines, which should be located every half a meter. After that, you need to select the two extreme ones and apply points with the same step. After that, using upholstery thread, you need to connect the dots on other lines, as a result, a structure resembling a grid should appear.
In places where the lines intersect with each other, you need to create holes, and then, using a quick installation, nail P-"samples" to them, which can also be replaced with metal corners for the timber.
Keep in mind that most often dowels with a diameter of 6 mm are used as fasteners. In cases where the basis outer wall represented by an old brick or block, it is recommended to use fasteners with a diameter of 8 mm. In this case, you will be sure that the dowels are securely fastened to the wall.
Next, you need to cut the profile of the required length, for which you will have to use scissors or a grinder. The resulting fragment must be placed in the guide profile for siding, and then fixed with self-tapping screws to the P-"samples" so that there are no vertical deviations.
To do this work accurately, you can check the level readings, or even before starting work, install two extreme profiles, and pull the thread between them. When you start to mount the rest of the profiles, you can focus on it.
This completes the installation of the frame, in principle, after that you can proceed to the installation facade panels. However, according to the technology of finishing the house with siding, the walls must first be insulated.
wall insulation
 Most often, owners choose for the role of an insulator expanded polystyrene or mineral wool. However, which of these options will be the most preferable?
If you seek advice from specialists on the better to sheathe a house, then it is better to use mineral wool, because, thanks to this material, the walls retain the ability to "breathe", and on the basis of this it can be concluded that they will last for the period determined manufacturer. However, if you do not set yourself the goal of living with "eternal" walls and are ready to make certain sacrifices, then you can consider the option with polystyrene foam.
Do-it-yourself mounting technology for these sheets provides for them wall surface sticker, after which they are additionally fixed using a special mount with a very wide hat.
The adhesive composition can also be used to install cotton wool. However, it is not necessary to do this; to ensure the necessary reliability, only “umbrellas” will be enough. Thus, at the stage of insulation, choice of material and installation technology, one must proceed from the following parameters:
- Financial opportunities;
- Availability of free time;
- Level of training and weather conditions.
If you still choose the most common materials for finishing a house with siding, then it is desirable for mineral wool use adhesive solution combined with umbrellas. You should not have problems with this, given that this work itself is quite simple: after the fragments of the material of the required size are prepared, they are covered with a layer of glue and then fixed on the wall. After waiting for the moment when the glue dries, we take the tool and “shoot through” the plates.
Panel installation: step by step instructions
 Having completed all the steps described above, you can proceed directly to finishing the house with siding. According to the instructions, in order to properly install the panels with your own hands, you must adhere to the following scheme:
- We take the guide profile and fix it to the wall around the perimeter;
- Next, panels are inserted into the profile, after which we proceed to assemble the siding, adhering to the vertical installation scheme.
Thus, it becomes clear that the last stage is the least difficult. However, here too has its own nuances that you need to know about. When screwing in the screws, you need to make sure that they do not enter completely. Then, when it gets especially hot with the onset of summer, the material will have free space for expansion. If this recommendation is neglected, then this may subsequently lead to cracking of the panel.
Conclusion
To finish the house with siding, there is no need to purchase special equipment and gain additional skills in working with this material. You can achieve the desired result if you follow the installation technology exactly and have at your disposal necessary tools and materials. Particular attention should be paid to the most accurate observance of the stages that make up the siding installation process, since any little thing can affect the result, and, as a result, the service life of the panels.
Of all the possible ways of facing cottages, it has gained the most popularity: it protects walls from adverse weather conditions, is durable, and gives individuality to facades.
Siding a house is easy if you follow the rules. The article provides step-by-step instruction for cladding different types siding, including metal siding.
Step 1: Choose your siding
There are many types of this popular finishing material. Siding happens:
- Metal - steel and aluminum coated with pural or PVC are produced in RAL colors, with different thicknesses of the panels, for external cladding it is necessary to choose panels with a thickness of 0.7 mm.
- Vinyl PVC, various widths, colors and imitation of various materials (wood, brick, wild stone).
- Acrylic - also differs in color and texture, is considered to be of higher quality and more durable than vinyl, but it also costs more.
- Fiber cement - durable, resistant to temperature extremes, UV radiation, but due to its greater weight it requires a solid foundation (brick, blocks).
- Wood - lining or also a variety of siding, an environmentally friendly, but less durable type of finish that requires regular treatment with an antiseptic and fire retardant.

When considering the cost of panels, homeowners are more likely to choose cheaper vinyl, although acrylic siding is not much more expensive and has better characteristics: it does not fade in the light, is more resistant to temperature changes, and is resistant to mechanical damage.

Let's focus on light fastness. According to this indicator, vinyl is inferior to all competitors, besides, some unscrupulous manufacturers save on expensive dyes, as a result, after a couple of years, the panels fade, and often unevenly - with spots.
TIP: clad the walls better panels pastel shade and white trim (for flashings, edging, spotlights, ebbs).
Panels good quality have the following characteristics:
- Consistent geometry in thickness, length, width.
- Uniformity of coloring without spots or stripes.
- Integrity - panels should not have chips, cracks, stains.
- Strength - all elements must be flexible and durable.
- Certificate of conformity.

The most popular products of domestic manufacturers of vinyl siding:
- dock.
- Northside.
- Holzplast.AltaProfile.
- Grand Line.
When buying quality material, a conscientious seller will attach the manufacturer's installation instructions.
Step 2: Calculate material requirements
Before buying, you must determine the required amount of materials for cladding. To do this, you will need to draw diagrams of all facades with the exact location of windows and doors, architectural elements and cornices, with dimensions and heights. If it is planned to insulate the house simultaneously with the cladding, it is necessary to add an allowance for the thickness of the insulation. On the diagram, it is necessary to mark areas with different colors.

Further, using geometry for the 5th grade of a secondary school, the area of \u200b\u200bwalls of different colors for each facade is calculated, then the areas are added up. With a large number of window and door openings, their area is subtracted from the total area of the cladding.
Except wall panels, additional elements will be required for cladding:
- The starting bar is along the perimeter of the house minus the width of the doors.
- Finishing rail along the perimeter of the house, taking into account the angle of the roof.
- Docking profile H-profile for connecting base panels with insufficient length.
- Corner outer profile - according to the number of outer corners of the house.
- Angular internal profile - in the presence of such angles in the plan.
- Soffit - a profile for filing cornices and gables, produced with perforation for ventilation of the roof insulation and without perforation.
- Plinth strip - provides protection for the protrusion of the plinth relative to the walls, equal in length to the starting strip.
- Low tide - along the length of window openings.
- Wide J-profile for trimming the slopes of windows and doors.
- Hinged profile - to protect the upper slope of windows and doors.
- Narrow J-profile is universal.
- Wind board for decorating the end of the cornice.
To hang the panels you will need a frame device. The frame can be made of timber if you plan to clad with vinyl, acrylic or wood siding, or galvanized profiles for metal or fiber cement siding.

When finishing a wooden house, the best option is a wooden frame; for buildings made of bricks or blocks, it is better to choose metal, since the service life of a wood frame is less than the service life of walls and a finishing profile.

To protect walls made of wood materials during cladding, it is necessary to perform wind and moisture insulation from a special film or PVC membrane, this will increase the durability of the building.

If you need to insulate the house, then at the same time you need to purchase the appropriate materials:
- Insulation - expanded polystyrene, mineral wool boards or mats.
- Adhesive composition for temporary fixing of boards or adhesive foam.
- Dowel screws with a metal core and a thermally insulated head - 5-6 pcs. per 1 m2.
- Vapor barrier film mounted between the wall and the insulation.
- Wind-proof film or super-diffusion membrane mounted on the outside of the thermal insulation.
- Self-tapping screws.
In the event that it is planned to clad an already insulated house, dowel screws are needed with a length that ensures fastening of the frame beams to the thickness of the walls by at least 50-70 mm.
For a wooden frame without insulation, bars with a size of 50x50 mm are selected, while installing the insulation, the thickness of the timber should correspond to the thickness of the insulation, it is possible to lay the insulation and frame in two layers, in this case the thickness of the timber will correspond to the thickness of each layer of insulation. The beam is mounted on the walls with a run-out of 30-40 cm. To calculate the need for lumber, it is better to first draw a second diagram in accordance with the facade.
For a counter-lattice (distance strips) that provide a ventilated gap between the wall / insulation and the cladding, a beam of 40x30 mm is needed.
IMPORTANT: before installation, treat all lumber with flame retardant and antiseptic.
For work you will need a tool:
- Plumb.
- Building level.
- Roulette.
- Cord or twine.
- A hammer.
- Drill with nozzles or screwdriver.
- Knife, scissors, hacksaw or jigsaw.

Do not forget about personal protective equipment: durable gloves and goggles; you will also need a ladder and scaffolding if the height of the house is more than 4 meters.
Step 3: Preparing the Foundation
Before starting work, it is necessary to prepare the walls: remove the drainage system, lighting fixtures and cables, antennas, clean, and if necessary, align the walls. The preparation method depends on the material of the walls of the house.
Preparation of wooden walls:
- Cleaning of old paint, assessment of the condition of the wood.
- In the presence of damage by a fungus, mold, insects - treatment of wood with special deep penetration compounds.
- Grinding.
- Dedusting.
- Caulking of intervents seams.
- Impregnation with flame retardant for 2-3 times on a dry basis.
- Impregnation with antiseptic for 2-3 times.
- Primer.
- Applying a protective compound.
Preparation of walls made of bricks or blocks:
- Cleaning of the paint layer, white spots, efflorescence, oil stains, mortar.
- Alignment of walls in the presence of recesses of more than 3 cm.
- With simultaneous insulation - adhesive primer.

Step 4: facing work
The work begins with a markup in kind, previously drawn on paper schemes.
PLEASE NOTE: A significant difference between the installation of insulation with a metal frame: frame holders are mounted on the walls, then insulation is performed by piercing a heat insulator and a moisture-windproof film on the holders, then bearing profiles are mounted.
The first to install angular vertical profiles metal frame or wooden crate. These elements must be mounted with great care. Wall irregularities are leveled by installing metal profiles at a distance from the surface or by laying bosses under a wooden beam. Control the geometry with a level or plumb line.
After installing the corner elements, to simplify work on the basement of the walls, it is necessary to pull the cord strictly horizontally.
Next, mount the lower and upper horizontal frame profiles, then all vertical ones. Mount the holders of the drainage system and lighting. Insulation is mounted, covered with a moisture-windproof membrane, which is attached with a stapler to a wooden crate. The beam of the counter-lattice is fixed to create a ventilated gap.
After mounting the frame, a starting profile is installed. The accuracy of the lining largely depends on the quality of the installation of the starting bar. Then comes the installation of the finishing profile, connecting H-profiles, J-profiles for fixing the flashings around window and door openings.

Basic installation rules:
- Installation of strips is carried out from the bottom up.
- Do not tighten the self-tapping screw until it stops, there must be a play of 1 mm.
- When installing the cladding in winter, provide for a gap for thermal expansion of materials, it is the larger, the higher the summer climatic temperatures.
Step 5: Finishing
After the cladding is completed, a drainage system, lighting equipment, antennas, and outdoor units of air conditioners are installed.
Conclusion
By adhering to these rules and manufacturers' instructions, you can effortlessly give your home a presentable look, protect walls from bad weather and create a comfortable indoor microclimate. Of particular importance are the preparatory work, high-quality preparation will allow you to quickly and professionally mount the cladding.
Such a question as siding a wooden house worries almost every owner of such buildings. Finishing material is very popular due to its reasonable cost, simple installation technology and interesting appearance. But not everyone seems so, people who first encountered it have no idea not only how to fix the panels, but also about the performance.
Do-it-yourself installation of the crate
Any do-it-yourself siding installation on a wooden house begins with the preparation of the main coating. As is often the case in our country, the walls of the house outside are not perfect, so a crate is needed to compensate for unevenness. The base can be assembled from galvanized, aluminum profile or wooden bars. In this case, you can be guided by several principles:
- The metal crate will last longer and will not warp it from temperature changes and changes in air humidity like wood;
- The tree, in turn, significantly saves the budget, and the material is easy to work with (for an inexperienced worker).
Common vinyl siding, block house and basement siding are very popular in our country. All these types are mounted horizontally, from the bottom up. Therefore, in our case, we will consider mounting the frame directly under these types of materials. On our own, we add that the boards made under the “chopped log” look very nice.
General provisions
When finishing the house for siding, vertical racks must be placed at a distance of 50 - 60 cm from each other (mount the crate on which the basement siding will be fixed, you need at intervals of no more than 40 cm).
Before starting work, it is desirable to remove any irregularities from the surface of the walls that may interfere with the installation of the frame, and, if necessary, insulation.
As mentioned above, the location of the siding profile must be vertical, so the procedure should be as follows:
- A vertical is hung from each side of the wall, and 2 profiles are set along it;
- The top of one is connected to the top of the other with a fishing line. Similar actions are performed with the bottom.
- Following the specified interval of 0.5 or 0.4 m (depending on the type of material), the following verticals are fixed, on which the siding will need to be fixed;
- The frame around the window and door openings must be assembled from all sides, as the siding will be attached to it.
Wooden beam cladding

A wooden crate for siding on a wooden house will save you some money. In this case, you should be very careful about the condition of the wood. The beam should not have the following defects:
- Fiber bundles;
- deformations;
- Traces of rot, black or blue spots.
Immediately after purchase, all material must be laid in the shade, in a horizontal position and treated with an antiseptic.
useful at work
Since the repair is being done in a wooden house, it does not hurt to treat all the walls with these liquids.
Galvanized profile crate

In the case of using a metal profile, at a distance of 50 or 60 cm from each other, you should mark the lines along which you will need to fix the suspensions or brackets (this is necessary so that the fasteners are located strictly vertically relative to each other). The number of elements per 3 meters of the profile should not be less than 6 pieces. The convenience of their use lies in the fact that the unevenness of the walls of houses can be compensated for by numerous holes in the suspension.
Do-it-yourself warming of the house with mineral wool under siding
How to properly perform insulation, and not throw money away? This question is asked by many building owners. There is only one correct answer in this situation; the only heat-insulating material that is recommended to decorate the house from the outside is mineral wool and its analogues (stone, slag). The use of expanded polystyrene in this case is not recommended. Styrofoam does not have sufficient vapor permeability, which does not allow it to be used as an insulating material for wooden houses.
Step-by-step instructions for installing thermal insulation depend on the material from which the crate will be assembled. In case of use for these purposes wooden elements, the insulation plates are pressed against the surface of the walls of the house by the timber itself, on top of which another frame is mounted, it is on it that the siding for the wooden house is attached. 
Using metal material (profile and hangers) for mounting the battens, the situation with the insulation of the facade is somewhat simplified. The ends of the suspensions, fixed on the wall of the house, are bent perpendicular to the surface, and thermal insulation plates are put on through them. This must be done carefully, gradually piercing a hole with each side of the suspension. The greater the density of the insulation, the more difficult it is to do.
 Having fixed all the plates with the help of special dish-shaped nails and closing the wall, you can begin the installation of the crate. The only thing to remember is to check the tight fit of the thermal insulation to the surface. In some cases, the insulation is additionally fixed with glue.
Advice from the "facade"
Do-it-yourself insulation of the foundation (damage) of a wooden house
 Often for wooden houses, finishing the foundation and the so-called dam is a headache. Due to the fact that the houses are very old, their lower part was significantly dilapidated, and in some cases rotted, therefore it was lined with bricks. In such cases, they can be insulated using extruded polystyrene foam. The material is not afraid of moisture and rodents, therefore it is ideal for these purposes.
Installation of plates is carried out in the same way as in the case of mineral wool. The only difference is that it is recommended to foam the joints between the sheets. This will allow us to talk about the complete sealing of the foundation. In the future, you can sew up this part of the house with basement siding imitating brick.
Installation of siding on the crate
The technology of sheathing a wooden house with siding implies the exact fulfillment of the manufacturer's requirements for working with the material (the conditions are indicated on the packaging). The main one is compliance with temperature gaps. 
The fact is that plastic panels, when heated, they are able to expand by 1 - 2 cm, when cooled, on the contrary, they narrow. You need to know this and leave free space between the trim elements, depending on the ambient temperature.
Basic Steps
In order to transform your house on your own, you need to know how to sheathe siding in accordance with all the rules, so you should follow this work in the following order:
- Corners should be set along the edges of the wall surface. External or internal it depends on each building individually.
It doesn't matter what material is used: ordinary vinyl siding, basement or metal siding, the work begins with fixing the corners, the starting profile and the planks.
- The following steps required to sheathe a wooden house with siding involve installing a starting profile. The bar must be fixed on the wall strictly according to the level. The quality of the work performed depends on this;
- If the length of the walls exceeds the size of one panel, you need to choose the installation location of the connecting "H - profile". It is desirable that it be placed symmetrically to another or edge of the surface. For example, in the middle of a window, a doorway, or so that it divides the entire surface into equal sections;
- Siding installation technology involves the sequential installation of panels into each other from the bottom up. For this, there are special locks that firmly fix the connection. The first strip must be installed in the starting strip by snapping the connecting lock;
useful at work
In case of uneven ground level, the “J-trim” bar is used as a starting profile. Such a bar will allow you to cut the first strip of the panel diagonally and fix it without violating the appearance and technological requirements. The following bands are fixed sequentially.
- Vinyl siding is fixed to the crate with self-tapping screws. It does not need to be fully screwed in. There should be a gap of 2 - 3 mm between the cap and the panel. It is necessary so that the element can narrow and expand when temperature conditions change (finishing a house with metal siding does not require compliance with such conditions);
- Having reached the upper strip, you need to install a finishing bar on the wall;
- Having measured the distance from the upper edge of the fixed panel to this bar, cut a blank from the new strip and use a special knife to make locks for the latches that are in the finish;
- Install the topmost panel and make sure that the locks cut into it snap into place and prevent the strip from falling off. Finishing the wall outside with siding, it is imperative to cut out such latches. This will prevent the top element from falling out in strong winds;
Installation of siding on a wooden house is carried out sequentially, according to the instructions indicated earlier, until the even surface of the walls is completely covered.
Finishing the gable with siding
Having completed sheathing a wooden house with siding, you should finish the upper protruding elements, gables. First of all, the outer corners and the “J-trim” strips are fixed on them. If the place for setting the angle is clear, then the situation associated with the bar needs clarification.
It is mounted on the lower horizontal ground part, covering the finish, which ended the main surface. Another element must be fixed to the upper vertical “step”, it is advisable to raise it as high as possible, pressing it against the roof covering from the inside. Sheathing with gable siding can be done using special strips or by “cutting” the remnants of the material from the common surface. In this case, there will be practically no waste left, and the color of the whole house will be the same. The work procedure is similar. Finishing is carried out without insulation, short segments of the desired size are cut and fixed on self-tapping screws with the obligatory “not stretching” to the stop.
Additional useful information
Knowing superficial information on how to sheathe a wooden house with siding with their own hands, many do not think about the many nuances associated with this work. They are no less important, so it is recommended to take them into account:
- Plinth siding installed close to the ground can warp (burst) due to the movement of the ground when the temperature changes. It is advisable to leave a gap of 1 - 2 cm;
- Before you start finishing a wooden house with do-it-yourself siding, it is recommended to visually check the joints between logs or timber. outer wall often damaged by insects or fungus. If necessary, replace the rotten area or foam it;
- Installation of siding on a wooden house built less than 1 year ago is not allowed. The walls must shrink;
- Basement siding is mounted in only one order. Strictly left to right and bottom to top. In the event that an incomplete panel is required to complete a row, it may be necessary to additional crate under her. The horizontal jumper is installed without hangers, on the 2 extreme verticals;
- Renovating an old village house with new plastic windows can be a bit of a problem. Sometimes, the frame can be installed "not level, but along the wall." This is done in such cases when the differences in the thickness of the slopes between the top and bottom are very large. In this case, this opening should be trimmed only after a careful assessment of the situation. In any case, this error will come out somewhere. Or the thickness of the slopes will be uneven or the takeoff will pop up in some other place. This is the difficulty of finishing a wooden house with siding.
Sheathing your own wooden house outside with siding is not so difficult. To do this, you need an assistant and small skills in working with the tool. But after the completion of the work, the design of the walls will become individual and will definitely not leave anyone indifferent.
The use of wood in the construction of a house leaves an imprint of worries about further care. To maintain the attractiveness of the facade for a long time, regular surface treatment of the outer walls will be required. Finishing a wooden house with siding is characterized by greater efficiency. Along with the decorative function, siding perfectly protects the facade from negative impacts. The main characteristics of various types of panels and a description of the installation process will help you choose the best option for finishing and independently carry out the lining of a wooden house.
Choice of cladding
The characteristic of siding is determined by the material from which it is made. There are four main types of finishing panels in the production of which are involved:
- polymers (vinyl or acrylic);
- metal (aluminum or galvanized steel);
- fiber cement;
- wood.
Vinyl siding is optimal for finishing the facades of wooden houses. The reason was the numerous advantages of the material:
- He successfully copes with the protective function.
- A rich color palette and a variety of textures provide a wide field for design solutions. If you want to preserve the natural concept of the building, it is ideal to decorate the house with wood-like siding.
- Excellent performance characteristics are accompanied by an affordable material cost for most consumers.
- Ease of installation and ease of care for the decoration of a wooden house.
Comment! Among the significant negative points is the low impact strength of vinyl siding. With severe mechanical stress, there is a risk of dents or cracks.

Metal siding is used much less frequently. Steel panels are not considered at all as a finish for a wooden structure due to susceptibility to corrosion processes. Aluminum siding is more practical, but high physical characteristics overshadow the significant weight of the product and high price. This creates difficulties during installation and increases the estimate for finishing wooden walls.

Fiber cement siding is considered an innovation in the facing materials market. This type of finish is more suitable for brick buildings. The reason for the unpopularity of the design wooden surfaces similar to metal cladding - big weight, complex installation and high cost.

Natural wood panels look spectacular, but the material has a number of negative points:
- relatively short service life;
- the need for periodic processing of wood finishes with protective equipment;
- the price of products is much higher than vinyl panels.
An analysis of all options brings to priority positions the decoration of wooden walls with vinyl siding.

Calculation of the need for material and preparation of the base
Before going to the store, you should determine the need for finishing material and related items. If self-calculation is difficult, sales consultants will help, who need the following information for calculations:
- The length and width of a wooden house.
- Wall height.
- Fronton height.
- number and size of windows.
If a Entrance door the only one, its parameters do not have any special meaning. The calculation algorithm is simple:
- the sum of the areas of the walls and the pediment is determined;
- subtract the area of window openings from the result obtained;
- the final figure is divided by the area of \u200b\u200bone unit of siding.
Comment! The result is increased by 10%. A margin is required in case of damage to the finishing material when cutting or directly finishing a wooden structure.

In addition to siding, you will need a set of additional elements for finishing. This includes:


Competent finishing with siding of a wooden house can be carried out without separate additional elements. Docking and finishing profiles are not required to be purchased. Experts close the top panel with a J-profile, which serves as the basis for a set of spotlights.
In addition to siding and additional elements, you will need fasteners, insulation and much more. Brief information about the need for a wooden house with a size of 9x6 m and a height of 3 m is presented in the table:
Before starting siding wooden wall She needs preparation. Main stages of work:
- Test of strength. Make sure there is no serious damage.
- Removing old finishing materials cleaning from dust and dirt.
- Dismantling from wooden surfaces of pipes, cashiers, drains and other elements that may interfere with siding finishing.
- Treatment of walls with flame retardants and antiseptics.
Options for cladding a house using woodgrain siding in the photo:


Frame installation
Finishing with siding is preceded by the installation of a frame. Key points of the process:
- At the corners of a wooden house, guides are being installed.
- The choice of pitch between intermediate profiles depends on the material of the thermal insulation.
- For a wooden crate, slats 50x80 mm or 40x40 mm are suitable.
- Self-tapping screws or nails with anti-corrosion coating are used as fasteners.
- Initially, the vapor barrier is fixed with a stapler.
- When the installation of the crate is completed, the insulation is fixed between the guides.
- Completes the preparation of a protective layer of waterproofing.

trimmed with siding wooden structure more on the photo:

Facing with siding
When the frame and the heat-insulating layer are ready, they proceed directly to finishing the wooden walls with siding.
Installation of starting and corner profiles
To determine the starting place for finishing from the bottom edge of the crate, lay 5 cm upwards and mark the point with a self-tapping screw. Then, in sequence, the line is drawn around the entire perimeter of the wooden building. A cord is fixed on slightly screwed screws.
Then they move on to marking the corner profiles for siding. The edges of attached parts are also marked. The first starting profile is fixed with a reference to the cord, the indent from the future edge of the corner profile is 6 mm.
Advice! Installation of the remaining starting strips is carried out with a gap of 1-1.2 cm between them. The free space is intended for free movement of the siding as it expands as a result of heating.
When the fixing of the starting strips is completed, a horizontal level check is carried out. Deviations are unacceptable, otherwise the siding finish will be skewed. The installation diagram is shown below:
Before finishing with siding, they also carry out the installation of corner strips, which are for internal and external corners. The fixation of the latter is carried out according to the following algorithm:
- Mark the edges of the spotlights.
- A guide is applied to the corner of a wooden house. The gap between the soffit and the profile is 3 mm; at the bottom, an overlap of 6 mm is provided below the starting profile.
- Before the capital fixing of the corner profiles, they check the compliance with the vertical level, if necessary, make adjustments.
The scheme for installing corner profiles is shown below:
In the photo, the siding of a wooden house is finished:


Fixing panels and window openings
Before a full-fledged decoration of wooden walls with siding, you should do the design of window openings. Initially, waterproofing is fixed around the openings. Then comes the finishing with J-profiles or platbands. Profiles are interconnected. When installing, do not forget to make bridges in the form of cuts to remove precipitation. The following diagram clearly demonstrates the entire process of finishing windows with siding.
Finishing with siding begins with a section of the house, which is less noticeable to others. Small mistakes of beginners will not be evident. The siding panel is alternately inserted into the corner and start profile and pressed until it clicks. A gap of 6 mm between the first finishing element and the lower part of the lock serves to compensate for expansion when heated.
Holes for fasteners in siding have an elongated shape. The self-tapping screw is fixed strictly in the middle of the hole and the perpendicularity relative to the wooden wall is monitored. It is not necessary to tighten the fasteners strongly due to the same compensation for thermal expansion.
In the process of finishing with siding, regularly after installing 2-3 lamellas, the compliance with the horizontal line is checked.
Final touches
The finishing process is completed by the installation of siding under the roof. Basic moments:
- Determine the gap between the penultimate panel and the lock of the finish bar.
- The distance is reduced by a couple of millimeters and the width of the last part is obtained.
- The panel is cut along the edge from the side of the lock connection.
- On the upper edge, hooks are made with a gap of 20 cm.
- The bar is fixed on the penultimate panel and inserted until it clicks into the finishing profile.
The finishing of the pediment is identical to the work on the facing of the wooden wall. Sheathing is carried out using starting profiles and elements for internal corners.