Interior decoration of the walls of the frame house
- Home |
- House, plot, garden |
- Building, finishing, repair |
- Eng. systems |
- Interior design |
- Forum, blogs, communication |
- ads
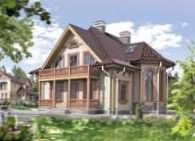
Project J-206-1S
Technology 27-12-2010, 17:07Interior decoration
TO interior decoration it is necessary to proceed after the completion of civil works, laying of internal engineering networks and their verification, installation of insulation and its vapor barrier. Ultimately, high-quality interior decoration, together with exterior decoration, determines the appearance of the house, the comfort of living in it, and a healthy climate.An important role, especially for builders, is played by the achievement of high labor productivity in interior decoration. When using wood frame and drywall technology for interior wall and ceiling cladding, high quality finishes are easily achieved, as well as high speed work.
In this section, we will consider the installation of drywall interior cladding, its preparation for fine interior finishing of ceilings and walls in various rooms, as well as installation rules inside apartment stairs.
Other sheet materials can also be used for cladding, but currently the most environmentally friendly, affordable and cheapest material is drywall. It is produced in our country in sufficient quantities and has been used in construction for many decades. In addition, drywall is a difficult-to-combust material, which is important for the fire safety of a residential building.
When using wood frame technology, the sequence of work for interior decoration will be as follows:
ceiling lining;
wall covering;
preparation of facing for final finishing;
final finishing of ceilings and walls (painting or applying wallpaper);
clean floor installation.
Separately, work is carried out on the installation of internal stairs and internal doors. The position of these works in the sequence of interior decoration depends on the method of their manufacture and installation.
MAIN PROVISIONS IN DESIGN AND CONSTRUCTION.
1. The frame parts must provide, when installing the inner lining on them, a flat surface of the walls and ceiling.
2. In some cases, to reduce the required distance between the supports of the sheets, it is possible to install additional support rails across the racks or beams of the frame. They can also be used to align the front faces of the frame elements. The dimensions of the rails that can be used for supports are given in the table.
3. Plasterboard sheets are a gypsum core, all planes of which, except for the end edges, are lined during manufacture with cardboard, the adhesion of which to the core is ensured by the use of adhesives. According to the shape of the cross section of the longitudinal edges (hereinafter we will call them working edges), sheets are produced in two types: UK - with edges thinned on the front side and PC - with straight edges. To achieve good quality interior finishes in residential premises, it is better to use UK sheets. For bathrooms and toilets, waterproof drywall sheets must be used. Along with ordinary plasterboard sheets, special fire-resistant sheets are produced, which must be used in rooms with an increased fire hazard (a room for placing heaters, a garage, etc.). The minimum thickness of drywall that supports the insulation (on the attic floor and external walls) is 12.7mm.
4. Drywall sheets can be placed lengthwise, across or along the frame or support rails. The end edges of the sheets must be supported by their edges on the frame or support rails. The working edges (having a bevel and glued with cardboard) can be placed across the frame, observing the norms specified in the table. In any case, it is necessary to strive to arrange the sheets so that on the surface to be coated they are connected to each other by working edges. At the intersection of the walls with the ceiling, and the walls between themselves, the sheets can be connected by any edges. Between the lower edge of the sheet and the black surface there should be a gap of 20 - 30 mm, covered with a plinth.
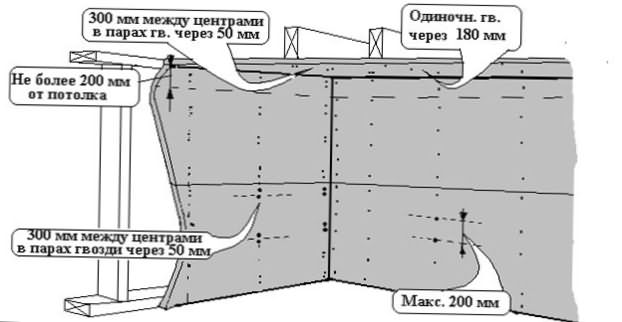
5. Galvanized nails with a wide head, countersunk screws or self-tapping screws can be used to fasten the sheets to the frame. It is better if the nails have a “ruff” type notch on the leg. Nails and screws should be located no closer than 10 mm from the edge of the sheet. The distance between hammered nails on the surface should be no more than 180 mm, on the walls no more than 200 mm. Nails can be driven in pairs, in a pair the distance is not more than 50 mm, between pairs of nails on the ceiling and walls is not more than 300 mm. Nails must be hammered in at a slight angle relative to each other. Drywall sheets on the ceiling can be supported along the perimeter of the walls by drywall sheets nailed to the walls. At the same time, sheets nailed to the walls must be fastened no further than 200 mm from the ceiling surface. If screws are used for fastening, the distance between them can be no more than 300 mm for the ceiling. On the walls, the screws should be spaced at least 400 mm apart, where the studs of the frame are located at a distance of no more than 400 mm. If the distance between wall studs is more than 400mm, the distance between screws should not be more than 300mm. Heads of nails, after driving them, and screws should not protrude above the surface of the sheet, while a complete breakthrough of the paper layer of the drywall sheet is not allowed.
6. The seams between the fixed sheets are sealed with three layers of putty. On the first layer, immediately after its application, it is necessary to glue a paper strip or "sickle". To achieve a good quality finish, the following conditions must be met: the temperature in the room where the finish is made is at least 10 degrees C and the holding time after each layer is at least 48 hours. Each layer must be sanded after drying. In addition to the seams, it is necessary to putty places where nails or screws are hammered.
7. To cover the frame of premises with high humidity, it is necessary to use a special waterproof drywall. In addition, the walls adjacent to the shower and bath should be covered with a water-repellent coating. Currently, the best water-repellent coating is ceramic tile. With reliable sealing of the seams, it can be glued, with a waterproof adhesive, directly onto drywall. The height of the water-repellent surface in the shower, from the stand is not less than 1.8 m, from the edge of the bathtub is not less than 1.2 m.
8. The final finish of the floor must be smooth, clean and wrinkle-free. In rooms where water can get on the floor, it is necessary to use waterproof materials for finishing the floor (ceramics, linoleum, concrete screed, etc.). In the bathroom, laundry room and other areas or places where plumbing fixtures are installed, it is necessary to lay a waterproofing layer under the final floor finish. The concrete screed must be 19 to 38 mm thick and the wooden parts of the frame adjacent to it must be waterproofed.9. If, when assembling the floor frame, a coating of non-groove boards or sheet material (plywood, etc.) was used without supporting all the edges on the frame elements, then, before installing a finishing floor covering of linoleum, tiles, parquet, carpet, it is necessary on black install additional paneling on the floor. For this, plywood, chipboard and fiberboard can be used. The thickness of the panel covering must be at least 6 mm. Sheets of this additional coating are punched along the edge through a distance of at least 150 mm, and on the sheet area itself along the grid, where the side of each square is at least 200 mm. The nails used for this, whether screw or knurled, must be at least 19 mm long for resurfacing panels 6 to 7.9 mm thick, and 22 mm for thicker panels. Joints of sheets of additional coating and subfloor panels must be at least 200 mm apart.
10. When using long wooden tongue-and-groove boards for finishing the floor, in any case, there is no need to install additional panels if the boards are placed across the beams of the floor frame. Outside the residential part of the house, for example, on a veranda or porch, it is possible to install a finishing coating directly on the frame of floor beams, while using non-grooved boards. The required sizes of boards for finishing the floor, and nails for their installation are given in the table.
11. When installing ceramic tiles, the base must be made, as shown in the figure:
PRACTICAL ADVICE FOR DESIGN
1. For interior decoration, it is necessary to select environmentally friendly building materials.
2. When designing interior decoration, it may make sense to move away from many traditional elements of the interior space of the house. For example, when using an efficient air heating system and window units with high resistance to heat transfer, you can abandon the window sill in the traditional sense. The absence of this bulky design will save money, time for work and a modern interior. It is also possible to refuse platbands of windows and doors.
3. In bathrooms and toilets, it is necessary to provide for good waterproofing of the wooden parts of the frame of the house.
4. When designing the height of ceilings in rooms, it is necessary to take into account the dimensions of the wall sheathing panels, while achieving the minimum number of their scraps that cannot be used.
5. The thickness of drywall for wall and ceiling sheathing should correspond to the distance between the frame posts and the floor beams (see table B).
PRACTICAL ADVICE FOR INTERIOR FINISHING.
1. Before installing the insulation on the ceiling, it is necessary to install supports for fixing drywall to the ceiling. It is allowed not to fasten the edges of the sheathing sheets along the perimeter of the walls, while the drywall sheets installed on the ceiling must rest on the sheathing sheets installed on the wall. In practice, it is difficult to cut the sheets in such a way that they adjoin it everywhere along the perimeter of the wall without gaps. I believe that it is better to install supports where they are not and fix the sheathing around the perimeter of the ceiling, and if a gap forms between the wall and the ceiling, then it can be easily puttied.
2. If the frame of walls and ceilings are assembled in accordance and the deflection of the boards satisfies the requirements, then the correct installation of the inner sheathing sheets will not cause any difficulties. All defects found in the frame must be corrected. If the distance between the racks or beams of the frame floors is greater than required for a given thickness of plasterboard panels, then it is necessary to install slats across the frame according to the data in Table A.3. It is best to cut the sheets to the required dimensions when they are leaning against the wall in a stack. You can perform this operation with a knife, making a cut along the chalk line, beaten off on the front surface of the sheet. The size of the workpiece should be 5 - 10 mm less than the required finishing size of the wall or ceiling plane covered by the sheet. The sheet is pressed against the plane and, with the help of nails or screws, is attached to the frame elements. The sheet must be fastened from the center of the sheet to its edges. If sheets are fastened with screws, then an electric screwdriver is required for work. Table C gives the size of the screws or nails in the wooden parts of the frame.
4. Drywall sheets should be installed so that small sheet inserts are not used over window and door openings. The joint of the sheets should be above the opening, but not on the frame posts that form the opening.
6. For some partitions and ceilings, it is necessary to install a double layer of drywall (for example, fireproof partitions).7. Drywall joints must be patched as described (see above). Internal corners must be glued with a “sickle” or paper tape without fail. At the outer corners, a metal mesh corner is installed, which is puttied in at least two layers, the first with a width of at least 75 mm, the second - 100 mm.8. Ceiling sheathing on the attic floor can be installed directly on the elements of the trusses and the truss system, which can be slightly deformed under the action of snow load on the roof. For proper fastening of the sheathing, it is necessary to install additional spacers between trusses or floor beams. The sheets are fastened so that they do not break when the floor beams are deformed.
STAIRS INSIDE THE HOUSE. An important communication element of an individual house, which has two or three levels, is the internal staircase. Depending on the number of marches, stairs can be one-, two- and three-flight. Intermediate platforms are usually arranged when the flights of stairs turn. According to the standards, the width of the flight of stairs must be at least 900 mm. When installing a single flight of stairs between two walls, its width must be at least 1100 mm. The number of steps in the flight of stairs must be at least three, since the ascent or descent, consisting of one or two steps, is poorly perceived visually and unsafe. When choosing the height and width of the steps, the following rule should be followed. The sum of the tread and rise (width and height) of the steps must be within 450 mm. So, for a staircase with a maximum allowable slope of 1: 1.25 (not steeper than 40 degrees), the height of the step will be 200 mm, and the width will be 250 mm. The width of the step can be increased due to the overlap of the tread by at least 25 mm. The width of the winder steps in the middle must be at least the width of the march steps, and at the narrow end of the step - at least 80 mm. The height between the platforms should be no more than 3.7m. The opening in the ceiling must provide a vertical distance from the nearest ceiling element to the stairs of at least 1.95 mm.
In an individual house built using a wooden frame, it is better if the internal stairs are assembled from wooden parts. The stringers (strings) serve as a support for the steps. If they are attached to the wall or reinforced with additional overlays, then boards for them can be taken with a thickness of 25 mm, in all other cases their thickness should be 38 mm. must be less than 90 mm. The steps must be made of boards with a thickness of at least 25 mm, if risers are installed under them and at least 38 mm without them, while the maximum distance between the stringers, additionally without step reinforcement, should not exceed 750 mm.
Using a square, it is easy to mark the string for the stairs, having previously calculated the height and width of the steps.