Do-it-yourself concrete steps on a steep slope. Ideal stairs for home and porch
Many gardens have at least one place where you need to go up or down from one level to another - for example, when moving from a path to a patio or from a lawn to a driveway. The first thing that comes to mind when it becomes necessary to somehow formalize such a transition is stairs. However, it is worth considering whether it is better to make a flat concrete ramp: it may not look so beautiful, but it will certainly simplify your life if you have to transport a heavy lawn mower from one level to another.
And yet, in most cases, they prefer to build not a ramp, but stairs. There are two main types stairs. embedded stairs make it easier - its steps are cut into the slope, and they rest on the ground. free stairs adjoins a vertical wall and leads from one horizontal level to another. the simplest stairs an amateur can fold, but construction difficult stairs brick is better to entrust to professionals.
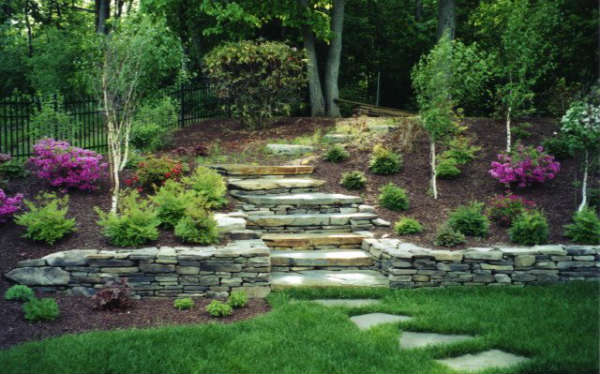
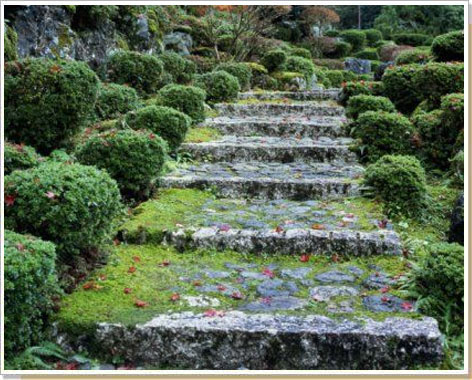
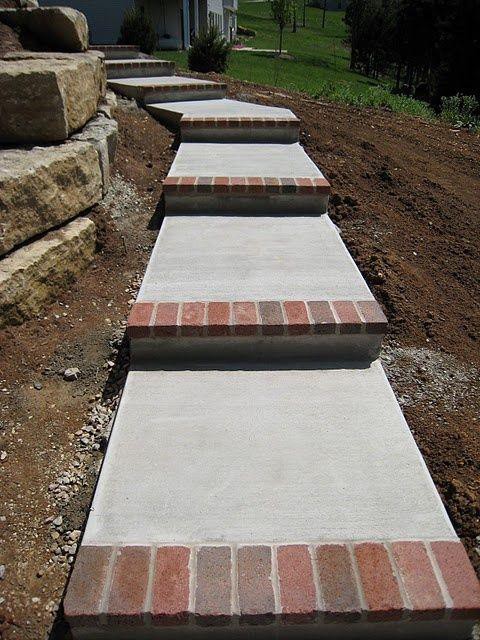
The choice of building materials is extremely wide. Bricks and blocks are most commonly used for risers, but stone, logs, and railway sleepers are also used. The favorite material for treads today are slabs, but they are also made from gravel, brick, natural stone, bark, paving blocks and wood. Whatever material you choose, remember that stairs should be safe, comfortable and beautiful. Safety first. Most gardening accidents requiring hospital treatment involve falls from stairs. All risers must be of the same height, and the treads of the same width - their dimensions must not exceed those indicated in the figure. Also, treads should never be slippery - never make them out of smooth concrete or smooth slabs. Use only paving bricks and don't forget to clean stairs from algae and mosses.
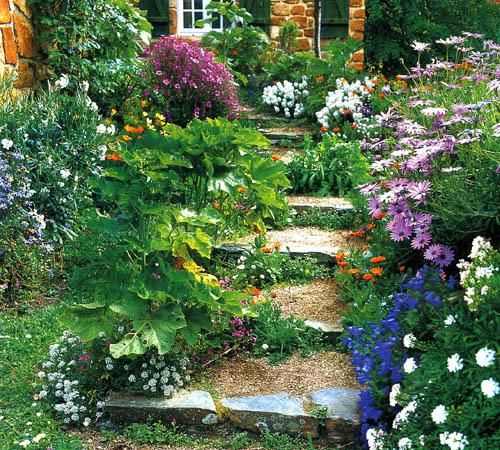
Stairs should be comfortable. Make the steps strong and wide enough to walk on them and carry garden tools without problems. Appearance stairs- a matter of taste, but there are several general rules. For example, curved stairs are considered more attractive than direct ones; the material from which it is made stairs, should organically fit into the environment and be combined with the material of adjacent paths, patios and walls.
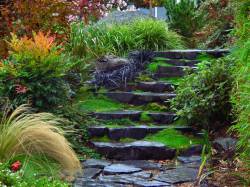
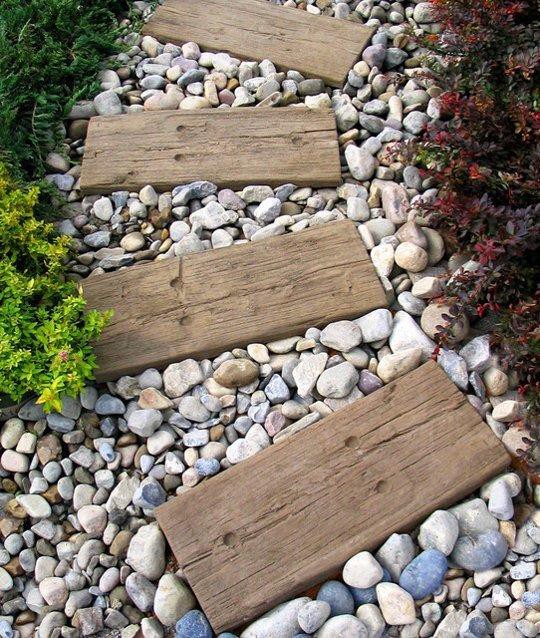
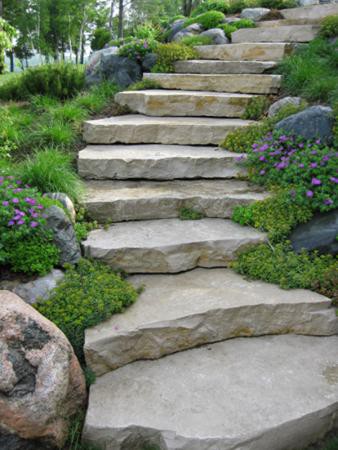
Treads do not have to be rectangular - in some conditions it will look spectacular stairs with round or hexagonal steps. In a semi-wild garden stairs from logs and bark can successfully replace the popular brick and slab construction.
And the last caveat. Before you start ladder device, carefully design it and make steps so wide that whole slabs or sleepers can be used, since cutting them to size is extremely laborious.
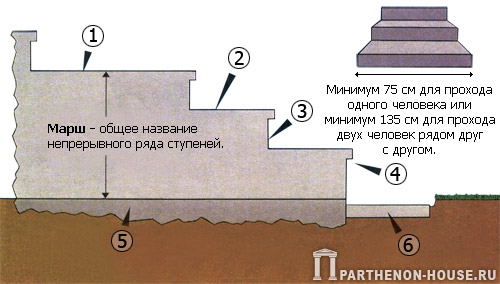 |
: 1. Landing- wide tread between marches; 2. Tread - that part of the step that is stepped on with the foot. Treads are made 30-45 cm wide. So that rainwater does not accumulate on the stairs, tread slightly, by 1-1.5 cm, tilt to the base stairs; 3. Riser - the vertical part of the step that separates one tread from another. Riser height - 10-18 cm; 4. Step protrusion - the tread from the slab should hang over the riser by about 2.5 cm. This will stairs more beautiful and reduce the risk of stumbling; 5. Foundation. The slope itself serves as the basis for the embedded staircase (see below). For free stairs, if it has no more than five steps, you need a strip concrete foundation under the side walls, and at a height stairs in five or more steps - a solid concrete foundation; 6. Staircase plate necessary if stairs goes directly to the lawn. |
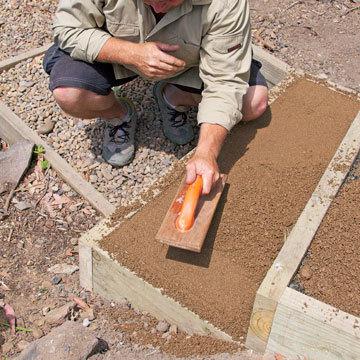
Stage 1. Mark the steps of the stairs in the slope
Accurately measure the height of the slope and calculate the number of steps stairs. Remove the soil as shown in the picture. Please note that under the stair slab there should be a layer of crushed stone 7-8 cm thick and the same layer of concrete. Tamp the ground.
Stage 2. Lay the stair slab and the first riser
When the concrete has hardened, place the stair slab on a thin layer of mortar and lay out the first riser with blocks or paving bricks.
Stage 3. Lay the first tread
Lay the first tread. Fill the space behind the first riser with rubble and tamp it down properly. The surface of the gravel should be flush with the riser. Apply the mortar and lay the first tread slabs.
Stage 4. Complete the construction of the stairs
Continue laying risers, filling the space behind them with rubble, and laying treads on the mortar until you get to the top of the slope. Pour the rest on the sides and at the base stairs stairs plants and/or large stones.
Stage 1. Prepare the base of the stairs
Dig a shallow trench along the entire length of the slope. Pack the bottom of the trench with a roller, rammer, or feet.
Stage 2. Drive in the first pegs
As shown in the figure, drive two pointed pegs into the ground, on which the first log will rest.
Stage 3. Lay the first log
Saw logs for risers, soak them for several days in an antiseptic. Put the log close to the pegs and fill the space behind it with ballast, tamp and level the surface. The ballast layer should be about 5 cm below the top of the log.
Stage 4. Lay the rest of the logs
Repeat steps 2 and 3 until you get to the top of the slope.
Stage 5. Complete the construction of the stairs
On each step, make a tread of gravel or crushed bark. Compact and level the tread material. Fill in the rest on the sides stairs earth ditches. Finish the edges stairs plants and/or rocks.
There are suburban areas that have a very uneven terrain. Leveling the ground on a slope can be very difficult. But this is by no means a drawback, if you connect a little imagination. Did you get a plot with a slope? Do not despair! My friends, today we will talk about how to make steps and stairs in the garden.
On my site, I also planned steps, because. he is with us. Full of ideas! Oh, turn around!!! In this article I will tell you what material steps are made of, how to calculate the size of the steps and much more!
By themselves stairs and steps bear in the garden, of course, an important functional load - they connect the multi-level zones of the site. The dimensions used in the construction of stairs inside and outside the house are somewhat different from those used for garden stairs.
Width of stairs in the garden usually depends on the width of the tracks that it links together. However, it is worth noting that in the garden it is better to have wide, gentle stairs, since a steep and narrow approach can pretty much spoil your walk in the garden.

Garden stairs should not be very long. If the slope is quite steep, it is better to build a structure with several "rest areas". This will make climbing (walking) easier and add charm to the landscape of the garden.
Materials for garden stairs the most diverse are selected: natural stone, brick, concrete blocks or monolithic concrete, wood. Or a combination of these materials. But the determining factor should be the overall style of the house or garden. Suppose a wide granite staircase leading to a modest wooden house looks, to put it mildly, ridiculous. Remember this!
For those who prefer modern design, it is better to choose concrete: artificial concrete slabs are now produced in a variety of colors.

Availability and security- the main points that should be paid attention to when building stairs. They must be reliable in any weather. In areas that tend to be shady and damp, make stairs out of stone or concrete slabs with a special rough surface. Here are my boys, like any other kids, of course, they love to run up the stairs. So, those who have children should take this into account especially.
Building a garden staircase.
- First you need to calculate how many steps the stairs will have, calculate their height and length. Let's figure it out! The step length of a person is approximately 62-64 cm, and a comfortable leg lift is 30-32 cm. Based on this, the tread and rise are determined as follows: 2a + b = 64 cm or a + 6 = 47 cm, where a is the height of the step , b - step width.
- On the slope, you need to designate the contours of the steps. This can be done with any bulk material, for example, cereals, flour. Then you need to remove the top layer of the earth. It is important not to forget about a slight slope to drain rainwater flows.
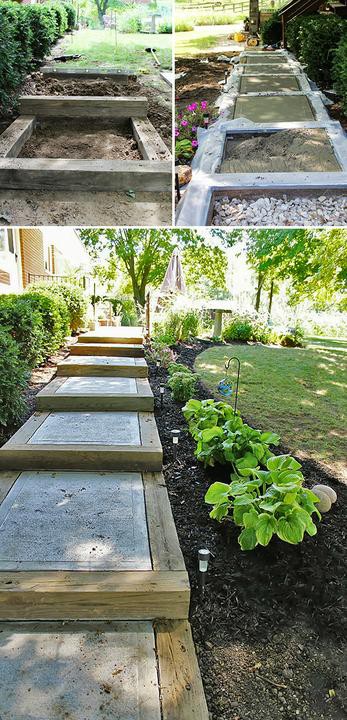
- We construct a formwork from boards that follows the contours of the future stairs, according to the available calculations and measurements. Having installed the boards, you need to drive them a little into the ground by tapping on them with a hammer. Do not forget to check the correct location of the formwork using the building level.
- A bar should be placed along the front edge of each step so that it can be seen how to make stairs in the garden. Then the ground under the future steps must be well tamped, crushed stone or bricks can be covered.
- Then a cement mortar is made (one part of cement plus four parts of sand) is thoroughly mixed, with the gradual addition of water until a homogeneous mass is obtained. Then crushed stone is added to the mass, and everything is again thoroughly mixed.
- When the solution is ready, the base of the steps needs to be moistened. After filling the solution, it must be bayoneted, so to speak, with a shovel so that no voids remain. Then you need to level the mixture with a rail with smooth edges (rule).
- Leave the structure for a day until completely solidified. The formwork can be removed, and the edges of the stairs can be decorated with stone or wood.
As you can see, making a staircase in the garden on your own is not at all difficult.
The stairs are ready! You can decorate it, giving it a slightly “aged look”, so that it merges into a single whole with the landscape of the site. Harmony is everywhere!
Flowering steps on the site.
Having built the steps, it is necessary to give them a finished look so that they finally, so to speak, fit into the landscape of the garden. Let's look at a few ways to help decorate your wonderful staircase.
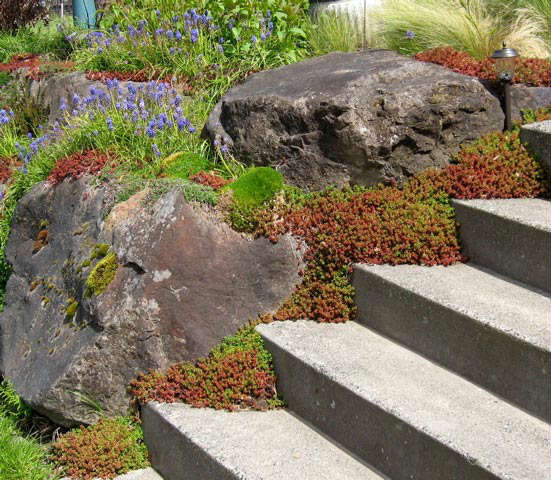
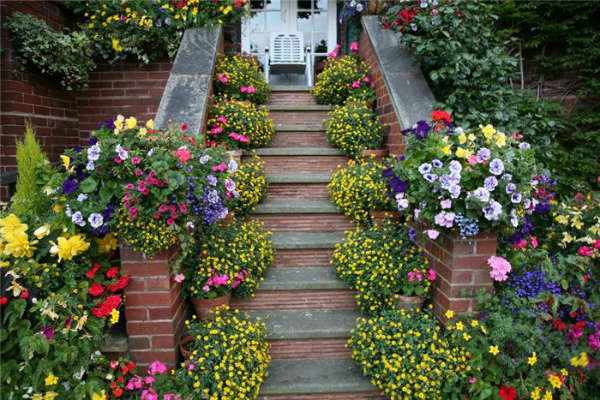
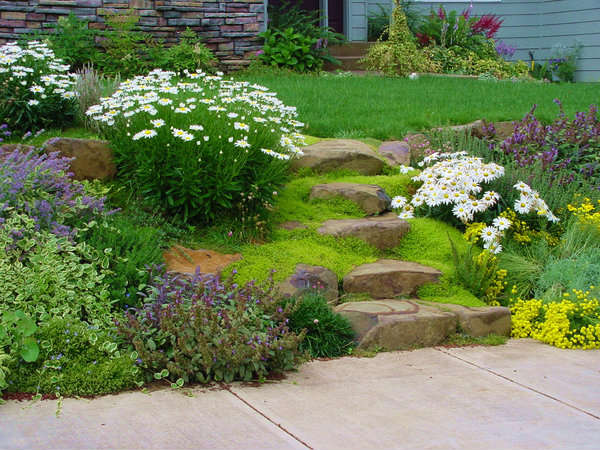
1. For example, you can decorate the gaps between the steps (risers) with plants. Skillful use of this technique will help not only fit them into any landscape, but also make such stairs the best decorative elements of the garden. The range of plants used in our conditions is not very wide, but if you wish, you can pick up something. Here, for example, several types of sedum are suitable. And of course, friends, we need to make adjustments for local conditions operation.

It is clear that you can not blindly copy what is shown in the photo. The design of steps for Russia with its snowy winters should be somewhat different. But we are talking about general principles!
2. Plant plants along the edges of the steps: creeping veronica, different kinds and varieties of primroses, felt sapling, seaside armeria, mountain gerbil, obrieta, Carpathian bell, various carnations, three-lobed liverwort, saxifrage, awl-shaped phlox - this is only a short list of undersized flowers. Heathers and lavender (dwarf) look amazing on the steps.


Different varieties of cereals will look great. You can plant low-growing shrubs such as boxwood, lingonberries, honeysuckle, etc. Let's not forget about the beautiful host!

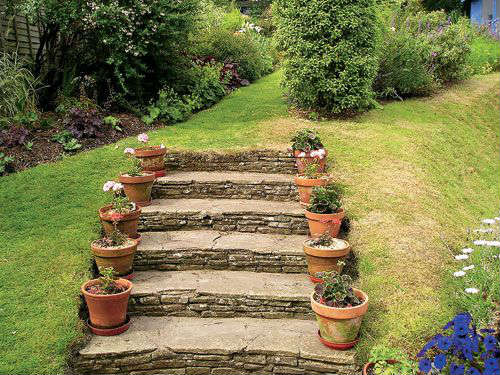
3. Place various animal figurines, clay pots, again with flowers or small pebbles, jugs nearby. Of course, all this should not interfere with walking up the stairs.


4. Decorate recreation areas with small architectural forms (statues, mini fountains). Put a bench or chair and "forget" them in a secluded place.
STAIRS IN THE GARDENDesign.
Steps and stairs in the garden carry a rather important functional load. They connect the zones of the site of different levels. But they can be considered not only from the functional side. Skillful design can turn them into decorative elements that will largely determine the overall look of the garden.
Unfortunately, not all areas are flat. There are also areas with very uneven terrain. Of course, it is very difficult to completely level the site, which is located on the slope. And only by connecting your rich imagination, you can turn this disadvantage into a virtue. And the ladder will help in this, which is necessary primarily on land with a fairly steep elevation difference, since it provides an easy and safe approach to hard-to-reach areas or places.
In some gardens there is at least one place where you often need to go down or up from one level to another. Two or three steps are just enough for such a transition to another part of the garden, for an "elevated approach" to an arbor, bench or sculpture. In addition, if the house or courtyard is at different levels, then in this case you will need steps.
But not only in multi-level areas come in handy steps - even on level ground, stairs or individual steps will not be superfluous. The flat relief looks rather monotonous and boring, which cannot be said about different descents and ascents, even just one or two steps, which will bring a certain dynamics into the space surrounding you and, undoubtedly, change the appearance of the garden.
In any case, a miniature ladder, through which you can climb higher and survey your possessions, will not hurt.

The architectural style, as well as the engineering solution of stairs, largely depends on where they are supposed to be placed. It is important to correctly determine the dimensions and proportions of not only the entire staircase, but also its individual steps.
Steps must be made commensurate with the width and steepness of the rise. Naturally, all steps must have the same height, which in turn will avoid possible injuries. Also keep in mind such a detail as the slope of the steps, which is advisable to make so that the water after the rain does not stagnate on the steps, but flows to the ground. The slope is best done at about one to two percent of the depth of the tread.
The width of the stairs usually depends on the width of the paths that it connects to each other. In the garden, it is best to build wide, gentle stairs, since a steep and narrow approach can ruin a walk quite a lot. In addition, a wide staircase looks much more beautiful than a narrow one. On the wide steps, you can place small trees or beautifully flowering and pleasantly smelling flowers in pots. But at the same time, the part of the stairs left for the passage should not be less than sixty centimeters - this is the minimum that is necessary for the passage of one person.
In addition, garden stairs should not be made too long. In such areas, which are located on steep slopes, several spans will have to be built, on which recreation areas will be located.
The question may also arise: what is the best number of steps for a staircase? However, there is simply no single answer to this question. Some believe that there should be at least three or four, because one or two steps are simply not perceived as a full-fledged staircase and are sometimes not noticed. Someone, on the contrary, prefer gentle slopes, not wanting to have high terraces, because they require the construction of retaining walls. In any case, stairs with more than fifteen steps must be separated by a wide landing. And if their height is more than seventy centimeters, then they must be equipped with railings. In general, it is desirable to equip any staircase on a steep slope with a railing, at least even on one side.
Availability and security.
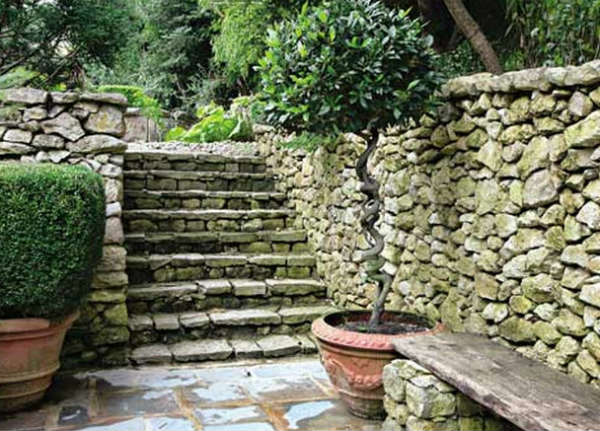
The materials for the stairs are selected very different: it can be natural stone, and concrete blocks, and brick, wood, monolithic concrete, and so on. A combination of materials is also possible. But the main determining factor is still the overall style of the house or garden. For example, a wide staircase made of granite and which leads to a modest wooden house, looks a little ridiculous, exactly, as well as vice versa - a simple staircase leading to a luxurious house. For romance, slabs of natural stone or a tree. It will look more beautiful if the paths and recreation areas are covered with the same material. Most often, the front surface of the step is made of slabs, and the base is made of concrete. The tree must be impregnated with an antiseptic. The effect of naturalness emphasizes the lateral displacement of the steps relative to each other.

The main points that you should pay close attention to when building stairs are accessibility and safety. The ladder must be reliable in any weather, so it is better not to make steps made of wood or clinker in dark places where it is difficult to see them - in rainy weather you can easily slip on them. In addition, it is undesirable to make the steps absolutely smooth: in wet weather, you can also easily slip on them. In damp corners, a stone with a rough texture is best suited for stairs. It can be concrete slabs with a treated, rough surface.
Of considerable importance is the lighting of the stairs, especially if it will be used more actively at night. At this time of day, each step of the stairs should be clearly visible. Therefore, it is necessary to carefully build a lighting system, as well as laying an electrical cable. Most often, the lamps are directed down to the ground. They will not blind the passer-by and at the same time give enough light so that you can confidently walk up the stairs.
Separately, it is worth talking about the design of the stairs. After all, how many gardens, so many stairs. Design options are countless - from combinations of materials, stone colors to complex paving patterns. One of the possible design options could be this: bushes and climbing or creeping plants are planted between the steps, which will soften the hard lines.
Compatibility with the style of the house is also an important detail. Wooden staircase will fit into the garden without any problems rustic style. Stairs from monolithic concrete, which are decorated with brick or tile, are most suitable for a Victorian-style garden. Wrought iron railings will also be in place.
If you have tastefully equipped your staircase, supplemented it with beautiful flowerpots, flowers in pots, well thought out lighting or lighting, then your staircase will undoubtedly become one of the important elements of your garden, but you can consider yourself a professional. And the ascents and descents will give your garden that unusual charm that will give your garden its individuality and originality.
Not everyone can boast of a perfectly flat summer cottage without differences in height. And sometimes gardeners make multi-level gardens intentionally to make the landscape more interesting and the garden more picturesque. In this case, it is quite difficult to do without steps that will help you move between tiers. Such steps can perform not only a practical, but also a decorative function. If you decide to organize steps in your garden, we offer you a selection of ideas that will help you fulfill your plan.
Consider the first option for steps, which are suitable for large gentle slopes, since each step is quite wide.
![]()
The frame of the stairs is made of large wooden beams, which are assembled into a single structure using appropriate fasteners. The voids inside the wooden formwork can be filled with pebbles or crushed stone.
Such steps look original, water does not accumulate on their surface, as it seeps through the backfill. The disadvantages include the need to periodically add crushed stone, as it can spill over the sides.
If you liked the technology described above, but you need a more compact and simpler staircase, the bars can be replaced with boards, and the length of the steps can be reduced. A ladder made using this technology can be made more easily curved.
If you want to approach the construction of stairs in the garden thoroughly, pay attention to stronger and more durable materials, brick and concrete.
There are several approaches here. So, for example, the outer walls of the steps can be made of brick, the cavities can be filled with crushed stone, and concrete slabs can be laid on top.

There is another option. The steps are poured out of concrete, and the front edge is laid out with bricks. In this case, formwork will have to be used. It makes sense to use this approach if each step is long enough.
If you want to be original, you can use railway sleepers to make steps. With the help of sleepers, you can also pave the garden path. Fill the gaps between them with mortar or fill with large gravel. It turns out quite interesting.
Sleepers can also be used instead of formwork for pouring concrete steps. The option is not much different from the first, but such steps will look more original, especially if the sleepers are old.
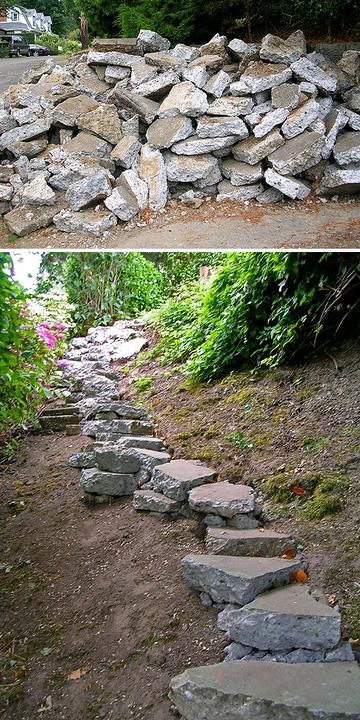
Recently, gardeners are abandoning concrete-filled garden paths in favor of paving slabs. When dismantling old paths, you may be left with many large pieces of concrete, which can also be used to create original garden steps.
If money is not a problem, steps can be made from stone slabs. True, for this you need to have good skills in construction, or use the services of professional builders with the appropriate equipment.
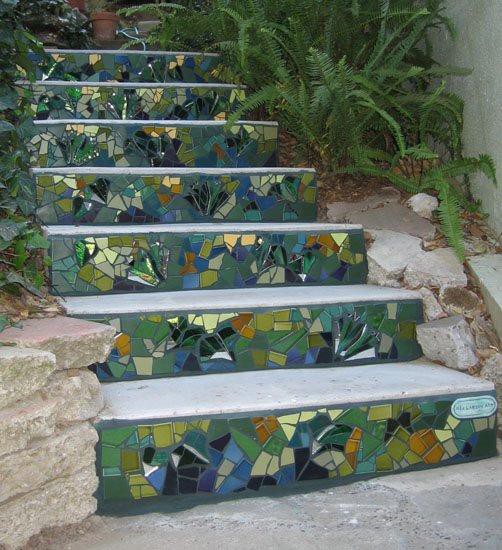
You can decorate ordinary concrete steps with fragments of ceramic tiles. Such a staircase will look more fun and interesting.
Remember that steps do not have to be geometrically perfect. Here is an example of how you can do interesting staircase with the help of randomly laid concrete blocks.

Sometimes there is a natural elevation difference in the summer cottage. As a rule, the owners of the site are trying to ennoble such a hillock. And the best option is the construction of stairs. It is much more convenient to walk around the site, and another opportunity is provided to break beautiful flower borders.
Such a ladder can be adapted to any area where there is at least a small slide.
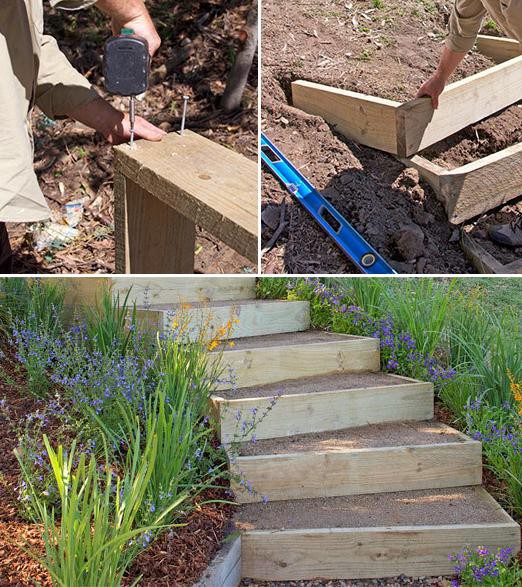
You will need:
· Boards in the size 200 x 50 mm. Can you get a new one construction material, but disassembled pallets or pallets can be used with the same success. In principle, you can take any boards that have already been in use.
Large gravel, stones, brick fragments.
· Slag.
· Metal fasteners.
· Screws and nails.
In addition, you will need the following tool:
shovel;
· screwdriver;
· building level;
· saw.
Please note that the proposed staircase construction option excludes the concreting stage. And it greatly reduces the cost and simplifies the whole process.
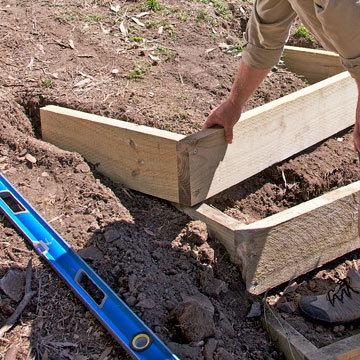
Step #1
The photo (see above) shows a staircase with a step width of 1.2 m. The length of the sides will vary depending on the depth of the bend of the stairs. In this case, the length of the outer edge will always be greater than the inner one.
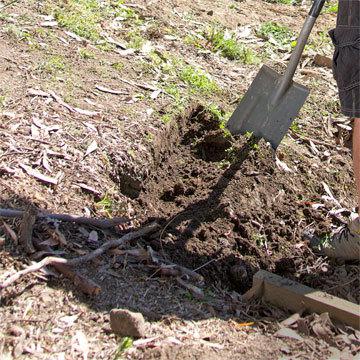
We will not need a foundation here, but the excavation stage is not excluded. So, let's begin. It is necessary to remove the layer of earth at the site of the first step, forming a flat area.
Step #2
Now you can start assembling the form for the step. Here you only need to decide on the size. Do not forget that the depth (step) of the step and its length for all blanks must be the same. AT otherwise the stairs will look sloppy.
Only the opposite sides of the step blank will be different - internal and external. Since it is they who form the beautiful bend of the stairs.
Do not forget to carry out preventive treatment of wooden step boxes from decay. Here you can buy specialized preparations or paint, or you can use improvised means, in particular, drying oil or used engine oil (at least inside the box).
Step #3
Now you can start assembling the stairs. The lower step is set first. It should have a slight slope so that rainwater does not accumulate on the steps.
You can control this stage of work using the building level.
We continue to work, digging out foundations-niches in the ground for each step individually (see photo). Thus, you will take into account the slope of the site and be able to create the necessary curvature.
But in no case do not change the height of the step, because in this case it will be inconvenient to walk up the stairs.
Step #4
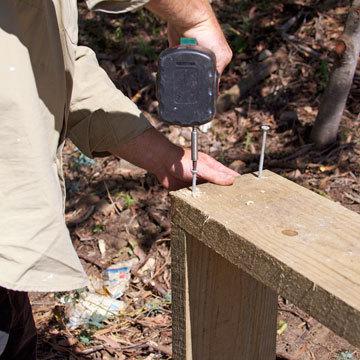
After all the steps are set, they must be fixed. To do this, fix the frame of each step at the points of contact with each other by cutting the board (inside the ladder boxes).

You need to fasten the board in four places (in all corners) to ensure maximum rigidity.
Step #5
To ensure that the ladder does not move during operation, it must be well fixed.
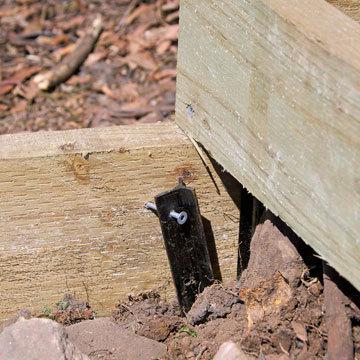
Long metal plates with a hole for fasteners (see photo) need to be hammered deep into the ground. We fix the upper part with a screw.
We use such fastening in several places for each box-step.
Step #6
Now that the frame of the stairs is assembled and fixed, you can begin to fill it.

Laid out first large stones(you can take a brick). It is desirable that they are firm and not crumble.
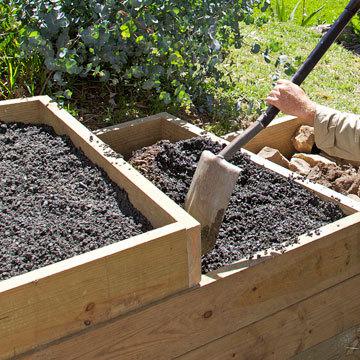
Boxes are not completely filled. Leave a few centimeters of free space on top.
Step #8
Now the slag layer needs to be well compacted.

You can use a hand roller if available. And you can build a device - a "crush" as in the photo.
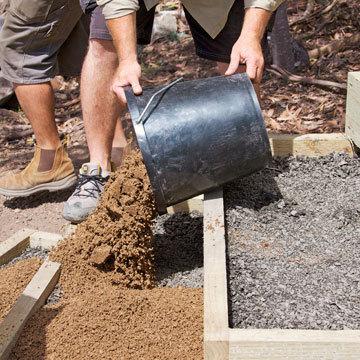
Step #9
Now we fill the degree form to the end, using granite chips, coarse sand, you can add a little clay to it.
We level the layer with a spatula and at the end we spill the steps with water using a sprinkler.