How to properly install the valve on the ventilation. Check valve for ventilation - what is it
2 Types, differences and prices
There are several types of such products. They are grouped according to the principle of operation, the method of stopping and other similar indicators.
According to the installation method, the valve for ventilation can be:
- vertical;
- Horizontal.
Vertical samples are mounted in a suspended state, when air moves through the system from the bottom up. The horizontal ones include a wall ventilation valve, samples for arrangement in longitudinal shafts and exit models.
According to the type of drive they are divided into:
- manual;
- With electric drive.
If you intend to buy a check valve for ventilation, then be sure to pay attention to this indicator.
Manual valves need to be adjusted independently, but they are very cheap. Their price is 5-10 dollars. This refers to models with small dimensions. But an electric air valve will already cost from $ 15 for a similar sample.
By type of design, valves are:
- throttle;
- In the form of a butterfly;
- Bladed.
In fact, there are a great many varieties of this product, but it makes no sense to describe them all. It will be much more practical to point to the most popular models.
2.1 How the vent valve works - video
The throttle valve for ventilation is more of a control valve than a backstop system. Although, it all depends on its features. It is a round or rectangular tube in which a solid disk or plate with an axis in the center is installed.
With the help of a manual drive, the disk can be rotated as you need it. The adjustment limits are very thin. You can either slightly open the valve by 5 mm, or completely free the air passage. The price depends on its size and the presence of an electric drive.
For such products, the possibility of remote control is very desirable, since the very design and principle of operation imply the need for constant adjustment. You can buy a choke valve for $7-15 if a hand sample is meant. And for 25-30 dollars, if we choose a model with the possibility of electronic control.
Butterfly and paddle systems work in a similar way. Only in the first case, the locking element is a double plate on a spring, and in the second, several parallel blades are used, as in ventilation grilles.
Their price is 5-9 dollars for a small valve. Well, large samples cost from $ 25 apiece. The larger the valve and the better its design, the more impressive the price.
There are also ventilation valves on plastic windows. You can call them a separate type of such equipment, but they are too specific and narrowly focused to be considered as the main representatives. These parts are installed in modern double-glazed windows in order to be able to ventilate the room through the windows.

Another type of such equipment are. Their task is to block possible events that are associated with unauthorized ignition indoors. The fact is that the main spreader of fire in the house is air. Air feeds the fire and spreads it through drafts or hot currents.
The installation of fire models helps to get rid of this problem, since the valve at the right time can close and block the entire system. Thus, he will not only contribute to the possibility of extinguishing the fire, but also eliminate the possibility of its active spread. A quality fire damper sells for as low as $20.
If you are going to pick up a ventilation air valve for yourself, then here you need to turn to logic and elementary calculations. First of all, evaluate your ventilation system, its type and features. It is important to choose a device with the correct cross section, dimensions and shape.
Then you can already delve into more subtle characteristics. First, select the type of construction. If you need the ability to fine-tune the system, then buy a motorized vent throttle valve. However, manual models are also suitable. If the device should simply not allow air masses to pass outside the room, then a butterfly or bladed sample will suffice.
![]()
The presence of the drive also plays a role. An electric air valve is much more expensive. But he is comfortable. Especially in situations where it is mounted in hard-to-reach places. You will not be every time you need to reconfigure the device, climb into the ventilation or disassemble the pipe.
Manual samples are very reliable, almost do not break and cost almost 2 times cheaper. They are recommended to buy for systems that do not need to be configured.
It should be understood that the motorized ventilation valve may also have an automatic heating system. And this, it should be noted, is a very interesting and useful function of it. The fact is that in winter such equipment can freeze and quite quickly. With the presence of heating elements, you will not encounter such problems.
We also recommend that you pay attention to a few specific samples. First of all, we mean the AVU air valve and the HL900N ventilation valve. The AVK model is intended for arrangement in large ventilation systems, is distinguished by its quality characteristics and is sold for $25-30.
The price of the HL900N vent valve is $37-45 and it is quite justified. After all, this device has additional protection against insects, a high-quality mechanism for blocking the flow of air and is intended for installation in sewer systems of any type.
2.3 Operation of the ventilation valve and its installation - video
What is the essence of the ventilation system in the room? Its main task is to eliminate unpleasant odors, moist air, smoke and steam from cooking, and replace it with a clean one. In old houses it used to prevail natural ventilation, but the fashion for metal-plastic windows, stretch ceilings and plasterboard walls reduced its effectiveness to "no".
Exhaust fan with non-return valve provides full air circulation
Without an additional ventilation system, in such conditions, damp corners with mold colonies appear, always misted windows. Smoke, odors and steam remain in the room, and there is no full air circulation. In this case, it is necessary to attend to the device of an exhaust fan with a check valve.
The principle of operation of the check valve
There are fans with a check valve, duct, supply, exhaust. All of them are used to smoothly replace the stale air in the room with fresh air. The main difference between any ventilation and air conditioning is that the latter work with already existing air masses. Hoods, on the other hand, guarantee the replacement of air with fluff, bacteria, midges and various allergens with fresh air if a supply and exhaust valve is installed on the fan.
This type of exhaust fan is very popular among residents of apartment buildings and private houses. This type of hood is used:
- for bathroom and toilet;
- in kitchens;
- in the steam room;
- in smoking rooms;
- in cellars and cellars;
- in laundries;
- in offices and shops;
- in sanitary compartments, etc.
The hood with a valve has a fairly simple device, but the principle of its operation is rarely described. Despite this, the buyer needs to know that they are divided into three types:
- spring or self-closing;
- controlled by electricity or manually;
- passive - the lid closes and opens under the influence of air flows (direct and reverse).
For an illustrative example, let's analyze a spring or gravity household fan installed in a bathroom, kitchen or steam room. While the motor is running, the lid is in the open position. When there is no need for ventilation, the blades of the device stop and the cover slams shut under the influence of a spring. Do not expect absolute sealing from it, but it prevents the ingress of odors from the ventilation shaft (especially important for houses with garbage bins).

Exhaust system with non-return valve suitable for large offices
An electrically controlled extractor hood with a non-return valve is used primarily for organizing automated exhaust system. This type is suitable for workshops, warehouses, factory premises, shopping centers and large offices. Such ventilation prevents the appearance of mold, moisture, condensation, mustiness on the walls and objects inside.
Passive ventilation systems the least popular. They can be used for kitchen hoods, but quite rarely.
It is worth mentioning that the anti-return valve for the hood can be heated (prevents the accumulation of condensate and the formation of frost on the lid in winter) and without heating. The first option is more appropriate to install if the fan goes outside. The second option is suitable exclusively for indoor installation (apartment building).
Choosing a fan for your home
Exhaust fans for bathrooms and toilets, kitchens and cellars are sold in different sizes and modifications, with blades of different shapes. Some have an inertial grill that, like shutters, closes as soon as the engine shuts down. Economical models with a built-in timer are also sold. It allows you to set the operating time of the device.
When choosing, it is recommended to pay attention to the ability to adjust the power of the hood and manually turn off the power. A steam room, a small-sized shower room, a bathroom with a jacuzzi - for such premises, experts advise choosing models with a humidity controller. The fan turns on automatically if the steam level in the room reaches the mark set in the device.
If you have decided on the ventilation configuration, it is important to consider three factors directly when buying:
- the area of the ventilated room;
- type of room (performance depends on it);
- the number of people living in the house.
The device must have sufficient power to meet all the requirements of the ventilated room.
Exhaust fan for kitchen
Do you need a non-return valve for a kitchen hood? On the hob, the magic of cooking happens every day: something is fried, boiled, stewed, baked, jams and pickles are rolled up. In the process of creating another culinary masterpiece, fat, steam, soot and smoke rise to the ceiling. All this remains on the walls, curtains, whitewash, and the natural ventilation grate, which has not been working for a long time, is gradually overgrown with “moss”. To avoid frank damage to your own property, get rid of excess odors and moisture, you need to install a hood in the kitchen with an anti-return valve.
The easiest way is to put it above the stove in the opening of the mine for natural ventilation. If the windows are old, with a wooden frame, you can install the fan directly into the window. If work is carried out in a private house, the output is street, through the wall.
An important parameter for a kitchen hood (as for any other) was and is performance. That is, the volume of air processed in one hour. To choose the right device, you need to calculate the cubic capacity of the kitchen: the height of the ceilings multiplied by the area. According to sanitary standards, the air exchange rate (the number of cycles of complete air renewal) is set for each room. For the kitchen, this figure is 8-12. For multi-family buildings, it is also necessary to take into account the minimum safety factor (compensation for losses during venting due to a number of problems with shafts). The average coefficient is 1.3. To get the performance of a fan with a check valve or just a kitchen hood, we multiply the cubic capacity, the air exchange rate and the mentioned coefficient.

Anti-return valve prevents dirty and cold air from entering
Important! The anti-return valve in the ventilation does not allow cold or dirty air to enter the room, but only removes the exhaust from it. With the ventilation turned on, it is important to create an air flow into the kitchen.
The second important point is the noise level. It is measured in decibels. The noise is generated by a running fan motor that drives the blades. The device is better, the less noise it produces.
And don't forget power. The higher the indicator, the better the intake of exhaust air, and the anti-return valve will not allow "aromas" to return to the kitchen. But it should be understood that a powerful fan costs an order of magnitude more expensive, sometimes compared in price with a middle-class hood.
Do-it-yourself ventilation with a valve
Are you looking for non-return valve bathroom fans, but the price is too high for you? Do not despair, because the design of the device is not so complicated. If you study the principle of operation in advance and make a little effort, you can make a full-fledged non-return valve for ventilation with your own hands.
More often, an axial anti-return valve is installed on the fans. It can be in the form of a "butterfly", a square cover or a round flap disc, a grille of blinds. The sizes for household hoods vary from 100 to 315 mm. But not everyone can do this with their own hands. We will consider a simpler option.
To make a fan with a check valve, you must:
- a piece of textolite or dense plastic with a thickness of not more than 4 mm;
- ideally smooth dense polyethylene with a thickness of 0.1 mm;
- rubber pads;
- self-adhesive thin foam;
- self-tapping screws and bolts;
- stationery knife;
- adhesive tape on a fabric basis.

To create ventilation with a valve, fabric-based adhesive tape is required
Let's get to work:
- A plate is cut out of plastic. The required size slightly overlaps the outlet of the natural exhaust channel. Holes are drilled at the corners of the plate for fastening to the wall.
- In the center of the plate, a hole is marked corresponding to the diameter of the fan. It should be with a grid (the larger the cells, the denser the shield material). Cut out an opening with a grate for air intake.
- Around the finished air intake, you need to make 4 holes for fasteners, with which your workpiece will connect to the fan.
- To prevent small debris and insects from entering the apartment or house through ventilation, a fine mesh or nylon is pulled over the grate. The latter is easy to replace if necessary.
- We connect the base with the fan using bolts and shock absorbers, having previously laid a rubber gasket between the elements. This will prevent the "walk" of the air.
- Impeccably smooth polyethylene is glued to the base with adhesive tape and only then cut out. You need to use a sharp clerical knife. Check the condition of the film. If the slightest waviness or folds appear, it should be replaced. An uneven surface leads to depressurization of the valve and reverse draft from the ventilation shaft to the room.
- When the canvas of the valves is cut, it is cut in half. This must be done at the very end so that the film remains intact and immovable for as long as possible.
- When installing a homemade fan with a non-return valve in a steam room, in a kitchen or in a bathroom, be sure to lay self-adhesive foam rubber between the wall and the plastic shield to better seal the device.
Your fan with an anti-return valve should be periodically cleaned and the plastic mesh changed, especially if it is installed in a steam room. In this case, it will last for many years, and you will save on the purchase.
Now you know how to protect your home from dampness, soot, unpleasant odors inside and out. Install a household exhaust fan with a non-return valve in the kitchen, in the toilet, in the steam room, in the office or in the store and you will be provided with clean air.
Eugene
Good afternoon, Ilya. Thank you very much for your attention to our resource.
To the point of your question:
Option number 1
Instead of the ventilation grill of your choice, put two, with a standard corrugated outlet.
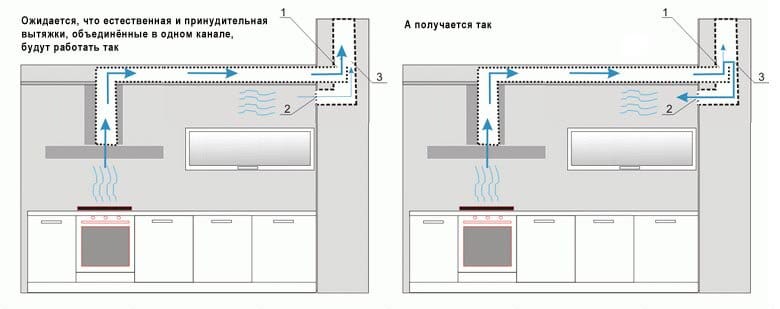
Connect an exhaust hood to the upper outlet by means of a corrugation, and install a check valve on the second outlet (lower). 
The operation of ventilation, in this case, will look like this: when the hood is turned on, the air will go above the valve. Some of the airflow will cause the flapper of the check valve to close. When the hood is turned off, the damper flap will open. With this solution, you can use not only corrugation to connect the kitchen umbrella, but also rectangular ventilation pipes that have best design and aerodynamic characteristics than corrugated duct. True, you will have to use an adapter from a round section to a rectangular one. 
The movement of air flows and the operation of the check valve can be clearly seen in the figure. 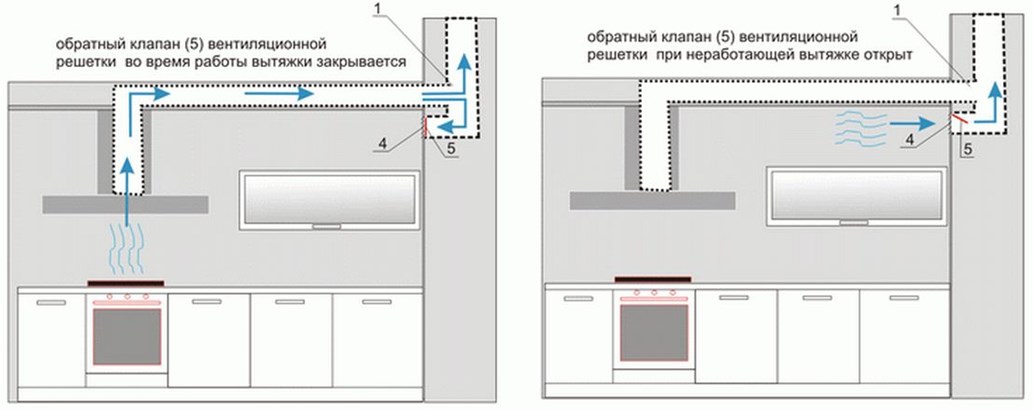
Option number 2
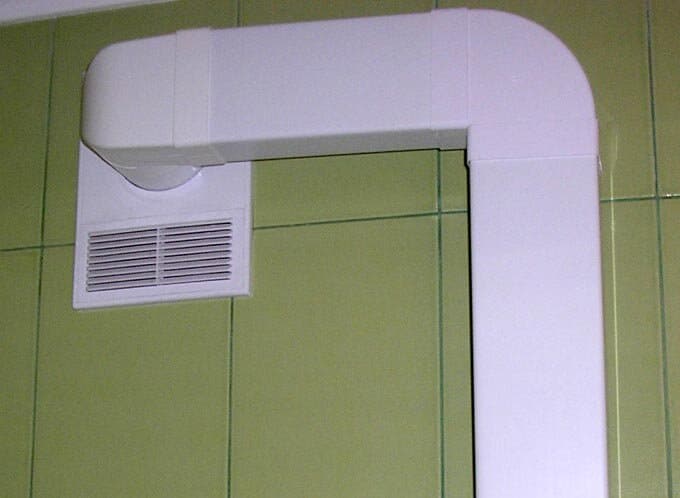
Put one standard outlet and connect a plastic tee to it with one side. To the outlet, which is located in the middle of the tee, connect the corrugation of the exhaust hood. Install a check valve in the end of the tee. For more clarity, pay attention to the photo below. 
The principle of operation of the ventilation system will be the same as in the first example. The hood turns on - the non-return valve blocks the air outlet to the kitchen. The hood turns off - the valve opens for natural circulation air masses.
One of the main requirements for the quality operation of a natural ventilation system is the presence of sufficient air flow.
We hope that we were able to provide a solution to your problem. Sincerely, site administration
Everyone knows that good ventilation in the kitchen integral element healthy microclimate of an apartment or a private house. In addition to the traditional natural ventilation duct located under the ceiling, it is now common to install a kitchen hood over the stove and / or a kitchen exhaust fan duct hole. However, not everyone understands that an illiterate forced exhaust can not only not give the desired effect, but also significantly worsen the functioning of the natural ventilation system. Consider how to make the hood in the kitchen in an apartment or house efficient and safe.
During the cooking process, various harmful substances are released into the air. They can be divided into two groups: deadly and just very harmful.
Comfortable ventilation in the apartment as a whole and in the kitchen in particular is a guarantee of cleanliness and well-being
Dangerous "kitchen" pollution
- Carbon monoxide (carbon monoxide, CO) is a poisonous substance that, in high concentrations, first leads to poisoning, then to death. The owners of electric stoves have nothing to worry about, such appliances are not a source of CO.
Carbon monoxide is produced by burning natural or biogas, cooking in a traditional wood-fired oven. Carbon monoxide is especially dangerous, and because it has no smell, a person may not feel its presence and accumulation in the room. Carbon monoxide is not absorbed by charcoal filters, the hood turned on in air filtering mode is useless in combating CO.

Carbon monoxide poisoning is very dangerous. More people die from it in their homes than from the fire of fires, tsunamis, floods and earthquakes combined
- Each time you turn on a gas burner or water heater, a small amount of unburned natural gas enters the room. A normally functioning natural ventilation system is designed for this level of gas emission and copes well with it.
Another thing is if there is a leak from gas equipment or pipelines. Myself household gas It has no smell, but a “stinky” fragrance is added to it - ethyl mercaptan. Feeling the "smell of gas", you must immediately open the windows and call the emergency service.
The installation of gas leakage and CO sensors will help to significantly increase the safety of people when using gas equipment. In case of danger, sensors can emit a shrill signal, or control a servo that automatically turns off the flow of gas from the main and notifies the emergency service of the problem.
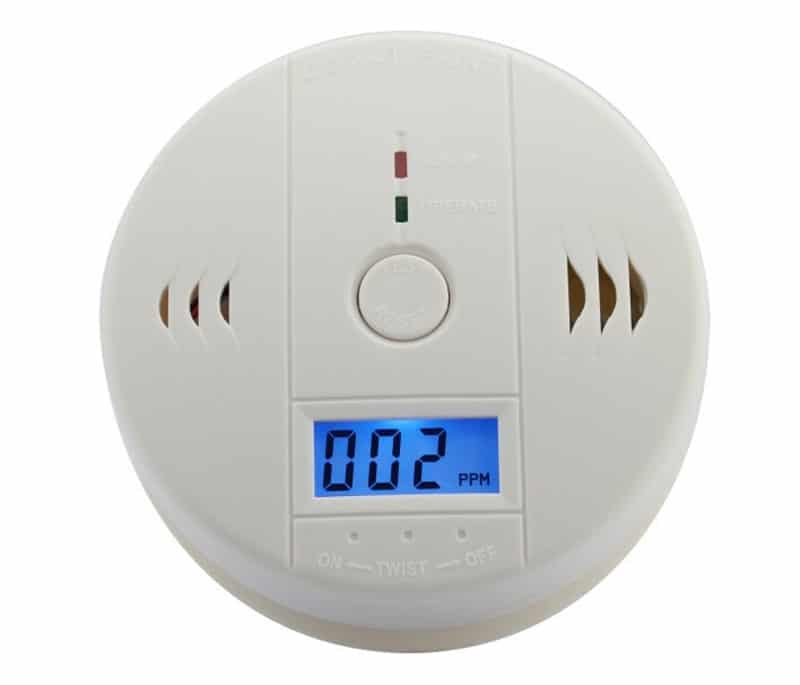
The gas leak sensor is able to timely detect a dangerous concentration of natural gas, propane or butane in the air and signal this
Harmful pollution in the kitchen
- Kitchen fumes released when food is fried. It is airborne volatile particles, mainly oils and fats. After strong heating in a frying pan, harmless food substances acquire properties that are harmful to humans, up to carcinogenic. At best, dirt and soot settles on the walls, furniture and dishes, at worst - in our lungs.
- Water vapor is also generated during cooking. It is, of course, practically harmless compared to other types of pollution. But there is no benefit from evaporation, excessive moisture does not improve the microclimate in the room.
Vapors generated during cooking are not beneficial to the body
From the above, we can conclude that efficient, constantly functioning kitchen ventilation is extremely important. If for owners of electric stoves this is a matter of hygiene and cleanliness in the room, then for those who use a gas stove (stove, wood-burning oven) for cooking indoors, this is a safety issue.
Owners of gas stoves should pay close attention to the performance of the ventilation system, periodically check the presence of draft in the ventilation duct. If in the kitchen, in addition to the stove, geyser or a heating boiler, the normal functioning of natural exhaust ventilation becomes even more important.
Kitchen ventilation systems: natural or forced
Many consumers are wondering: which hood in the kitchen is better, natural or forced? Answer: both are better. Natural and forced drafts, although they serve a common purpose, do not replace one another. Mandatory for a kitchen in an apartment or a private house is a natural ventilation system. We repeat, the presence and performance of a natural ventilation system is of particular importance for a room with gas appliances.
Forced exhaust ventilation for the kitchen, a good thing, even very much. But optional. It can be argued that natural ventilation provides more safety, and forced ventilation provides comfort.

Ventilation in the kitchen with an extractor hood is an element common system ventilation in an apartment or house
Let's take a closer look at the possibilities different types ventilation, their device, advantages and disadvantages.
Natural ventilation in the kitchen
The natural ventilation system is well known to all apartment owners through the channels in the wall of the kitchen and bathroom, going to the roof of the house. Harmful gases and polluted air are removed through the ventilation duct, fresh air enters through cracks in the windows or special ventilation valves in the walls or window frames. Warm air heated on the stove, due to its lower density, naturally tends to escape from the room up to the street, where the temperature is lower.

Natural ventilation in a private house in the kitchen, bathroom, furnace removes polluted air through vertical channels to the roof. Fresh comes from the street through windows or valves in the walls
Properly arranged ventilation with natural draft removes a relatively small amount of air per unit time, but it does it all the time. The ventilation duct, located under the ceiling, is able to cope with even a small leak of natural gas, which is lighter than air and rises to the ceiling.
Carbon monoxide, which is formed in relatively small quantities from the working burners of a gas stove, is also quite successfully removed by natural ventilation. Somewhat worse, natural ventilation removes kitchen odors and excess moisture when cooking at moderate intensity.
It is necessary to periodically, at least once a month, check the presence of sufficient draft in the ventilation duct. You can check this without special devices: if a sheet of paper “sticks” to the hole, there is traction.
What is good and what is bad in such a system:
Advantages of a natural ventilation system
- Ventilation with natural draft functions constantly with rare exceptions (see below, in the "cons").
- Provides general ventilation of the dwelling in combination with ventilation ducts in the bathrooms.
- Copes with the main types of hazardous contaminants emitted during cooking. Provides safety in the event of a small gas leak. Natural ventilation acceptably removes kitchen odors and excess moisture when cooking at moderate intensity.
- Natural ventilation is "free". In an apartment or a private house built in accordance with building codes, it is available by default. There is no equipment that would require repair. Electricity is not required.
- Silent operation.
Disadvantages of natural ventilation
- In hot weather and in the off-season, with a sudden warming of the outside air after prolonged cold weather, the efficiency of the natural ventilation system drops sharply. Under adverse circumstances, a reverse movement of air may occur: it will begin to flow through the channel from the street into the room. For a kitchen with a gas stove installed, this can be very dangerous, especially if there is gas water heater. In the heat and during a sudden thaw, it is recommended to ventilate the room through open windows.
- Natural ventilation removes a relatively small volume of air per unit time. If the owners decide to fry a full frying pan of cracklings, the ventilation system will not cope and the persistent kitchen “aroma” will instantly spread throughout all the rooms.
- Ventilation works normally only if there is sufficient air flow from outside. Modern plastic windows, adjusted "for the winter", are practically airtight when fully closed. To ensure the outflow of air into the channel, it is necessary to slightly open the windows during cooking, at least in the micro ventilation mode.
- The ventilation duct may be clogged with snow, debris. Selfish and technically illiterate neighbors from above can block the ventilation of the lower tenants by arranging a niche for a refrigerator in their kitchen by removing the ventilation shaft or part of it.
- It is necessary to regularly check the draft and, if necessary, clean the ventilation ducts.
How to make natural ventilation in the kitchen
There is ventilation for the kitchen in an apartment built in accordance with the standards, you just need to check its performance. But how to make natural ventilation in a private house? Ventilation ducts should be located in "dirty" rooms: kitchen, toilet, bathroom, furnace, utility room, bath. In order to ventilate the whole house, and not just the kitchen, air must be supplied from “clean” rooms: living room, dining room, bedrooms.
Designing ventilation, if everything is done in accordance with building and hygiene standards, involves the calculation of many system parameters. When determining the section of ventilation ducts, the type of installed equipment, the volume of premises, the structure of the building, and the climatic conditions of the area are taken into account.
The calculation is difficult for a non-specialist, those who wish to delve into the topic can study SP 60.13330.2012, 54.13330.2011, 62.13330.2012, 131.13330.2012, 7.13130.2011 and SanPiN 2.1.2.2645-10. We will give only the main recommendations, which, in our opinion, are sufficient for the installation of natural ventilation in most private houses:
- If there are four hotplates, the volume of air to be removed must be at least 90 m3/h. To do this, it is enough to bring a vertical exhaust duct with a cross section of at least 0.02 m2 to the roof. This corresponds to a circular channel with a diameter of 16 cm or a square one with a size of 14x14 cm (in half a brick). More is possible, less is not.
- The entrance to the channel should be located on the wall at a distance of 15-30 cm from the ceiling or on the ceiling itself. The last option can be implemented in a private house.
- In order for the natural draft to be sufficiently stable, the channel must be relatively high. Optimum traction is provided with a channel height of at least 5 meters. In addition, it should not be cold. In a channel located outside the building and not insulated, in the cold season, the draft will be weak or not at all. In a private house, ventilation ducts are best placed in the center of the house, closer to the ridge.
Forced exhaust ventilation
The ventilation system, where polluted air is removed by means of a fan, is called forced ventilation. Kitchen exhaust fans can be installed different ways:
- Mount directly on the existing vertical natural exhaust ventilation duct going to the roof.
- Make a hole in the outer wall where the exhaust fan will throw polluted air directly from the room.
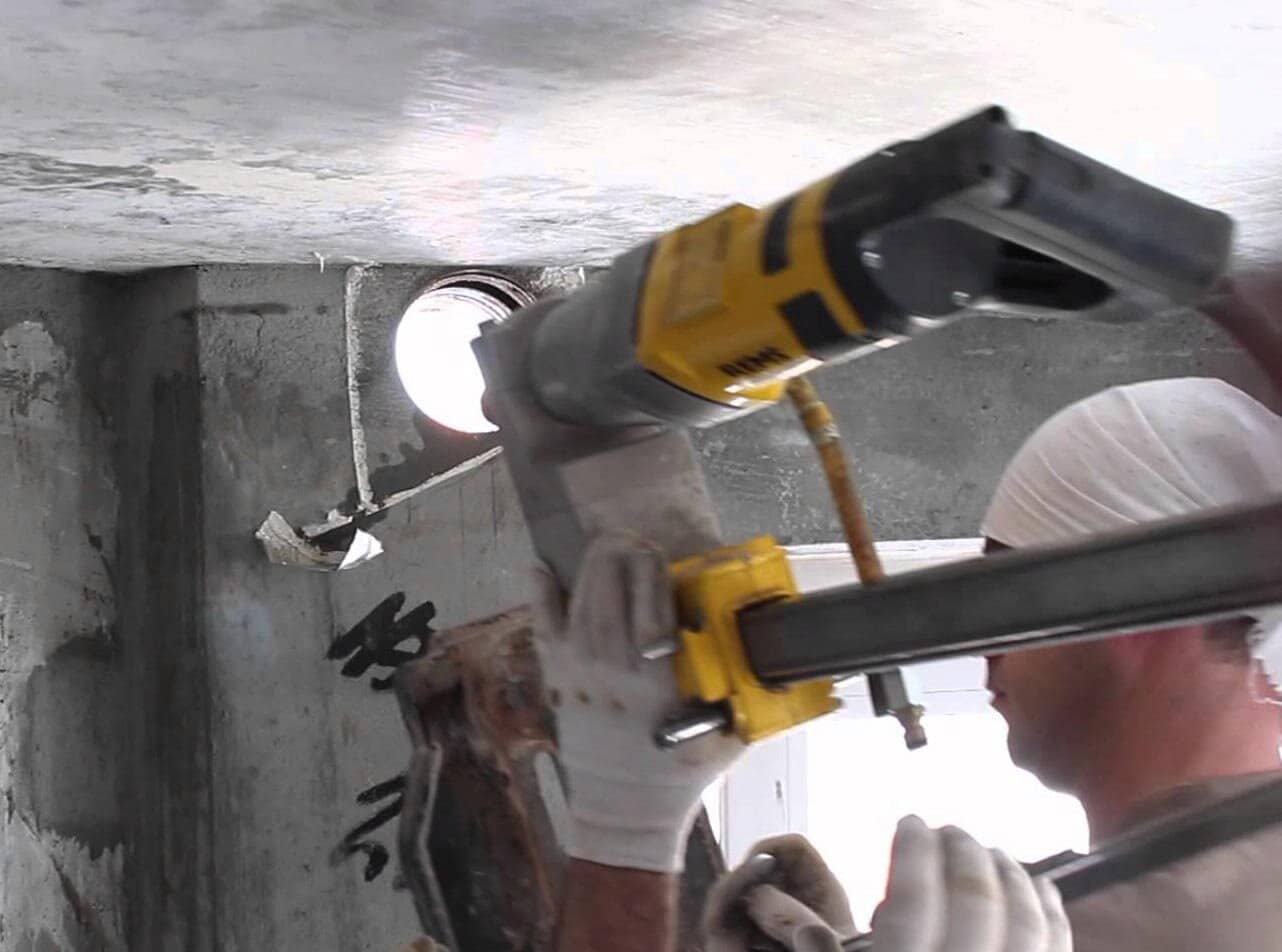
Modern equipment allows you to drill holes of the desired section in the outer walls quickly and without dust
- You can hang a wall-mounted kitchen hood with a built-in fan above the stove. Bring the air duct from the hood into the existing ventilation duct or into an additional hole in the wall.
- Insert a fan into the “Soviet-style” window vent, you get a simple and cheap window hood.
Advantages and disadvantages of forced ventilation
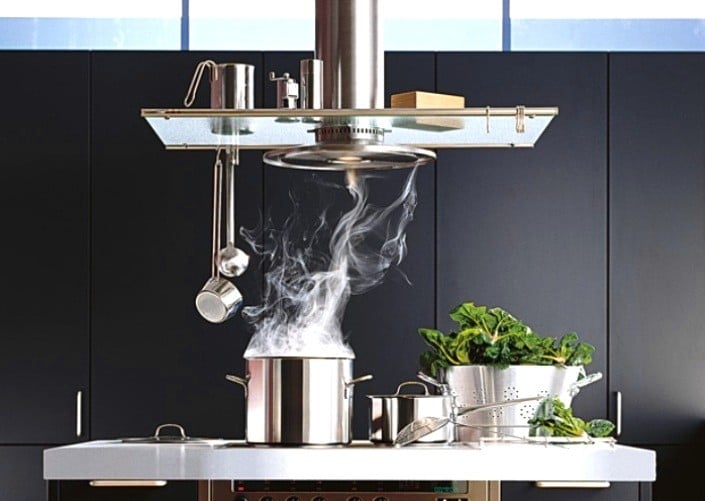
- Forced draft ventilation, when properly designed, has a high performance and is potentially capable of quickly removing significant volumes of polluted air during intensive cooking.
- A kitchen hood installed directly above the stove will remove most of the dirt before it enters the room. As a result, cleaning the kitchen will become much easier.
- Polluted air is removed only while the extractor fan in the kitchen is running.
- A forced system costs money: a kitchen fan or extractor hood with a fan, their maintenance and the electricity spent have their price.
How to properly install an exhaust fan on a natural ventilation duct
When installing a fan, the following points must be considered:
- If the kitchen exhaust fan has a non-return valve that prevents air from the duct from entering the room when the fan is not running, this valve must be removed. IN otherwise the work of natural exhaust will be disrupted.
- An ordinary cheap household axial fan is not designed to remove air from a vertical duct. The performance indicated in the passport (the volume of air removed per unit of time) will be realized only if the fan removes air from a horizontal channel, and even then it is not very long.
When connected to natural exhaust inexpensive fan it will be difficult to overcome the resistance of friction and the air column, its performance will noticeably drop in comparison with the declared one. The higher the channel, the greater the drop.

Axial fan is structurally simple and cheap
- There are special household centrifugal fans designed to operate in vertical ducts. The drop in performance depending on the channel height is not as great as that of axial ones. The actual performance when working in a vertical channel will be close to the declared one.
Centrifugal exhaust fans for the kitchen can be built-in or overhead. Disadvantages of centrifugal fans: high price (they are five times more expensive than axial fans) and relatively large dimensions.

The centrifugal extractor fan in the kitchen has more complex structure than in the axial version. An axially-rotated impeller with multiple blades is capable of creating a significant air pressure, which makes it possible to overcome resistance with little loss of performance when air is removed into a high vertical channel. The maximum performance of centrifugal fans is lower than that of axial fans with a motor of the same power. But in difficult working conditions, their capabilities are more fully realized.
So, an axial fan is cheap, but it is of little use when installed on a natural ventilation channel. Centrifugal is efficient, but expensive. A suitable alternative is to install the fan in a horizontal duct leading through outer wall. In this case, you can use a cheap axial exhaust fan without compromising its performance.
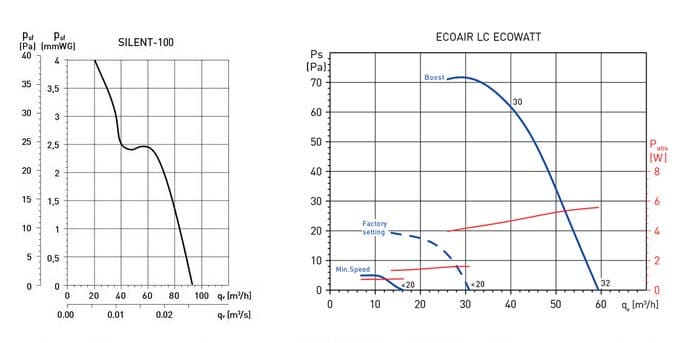
Graph of the performance of domestic fans with motors of similar power depending on the pressure (height of the vertical channel). Left - axial, right - centrifugal fan. As can be seen from the graphs, when overcoming a pressure of 40 Pa (approximately corresponds to a channel 25 m high), the performance of an axial fan will drop by 80%, and that of a centrifugal fan by only 20%. That is, in these specific conditions (the second floor of the "nine-story building"), the "centrifugal" is four times superior to the "axial" in terms of efficiency
When the channel is led through the wall, it is obligatory to install a non-return valve at the outlet from the outside. Unfortunately, it is not always possible to drill a hole in the wall when it comes to a city apartment. But this is not a problem in a private house.
Features of installing a kitchen hood
We will not talk about how to mount a kitchen hood, this should be described in detail in the instructions for it. We only recall that it is necessary to strictly observe the indicated height of its placement relative to the countertop. We also note that the use of the hood in recirculation mode (without air removal), coupled with a carbon filter, will purify the air only from a part of aerosol particles, mainly fats. The products of gas combustion will remain in the room. In addition, the carbon filter, which costs some money, clogs up quite quickly and needs to be replaced.
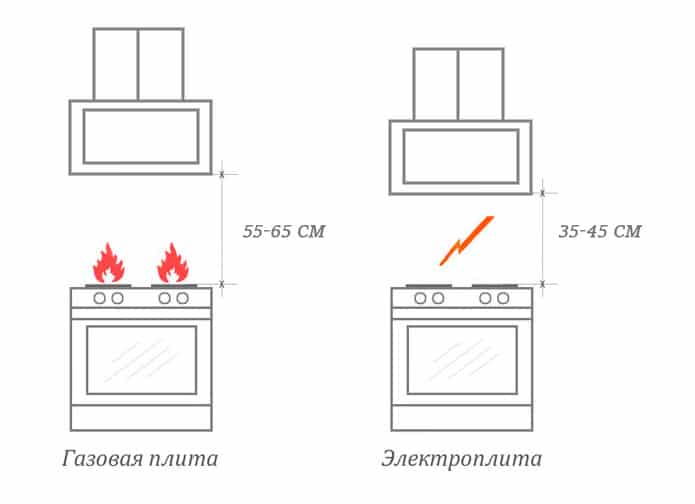
Above the gas stove, the hood should be located higher than above the electric
Let's name the main features that should be considered when choosing and connecting a kitchen hood:
- A kitchen exhaust fan, like a household fan installed on a duct, can also have an axial or centrifugal design. Expensive hoods that use centrifugal fans do a good job of removing air through a vertical channel, the loss in performance is tolerable.
In cheap hoods, axial fans are often installed; when connected to a vertical channel, they are ineffective. Full operation of the hood with an axial fan is only achieved when the air is removed through a short horizontal duct through the outer wall.
- When connecting the hood to a vertical channel of natural ventilation, it is recommended to remove the non-return valve on it, if any. In a horizontal duct, a valve is obligatory at the outlet to the outside. It is better to leave it on the hood.
- The cross section of the ventilation duct must not be less than the cross section of the outlet from the hood. Can switch from round pipes into rectangular ones, the main thing is not to narrow the section.
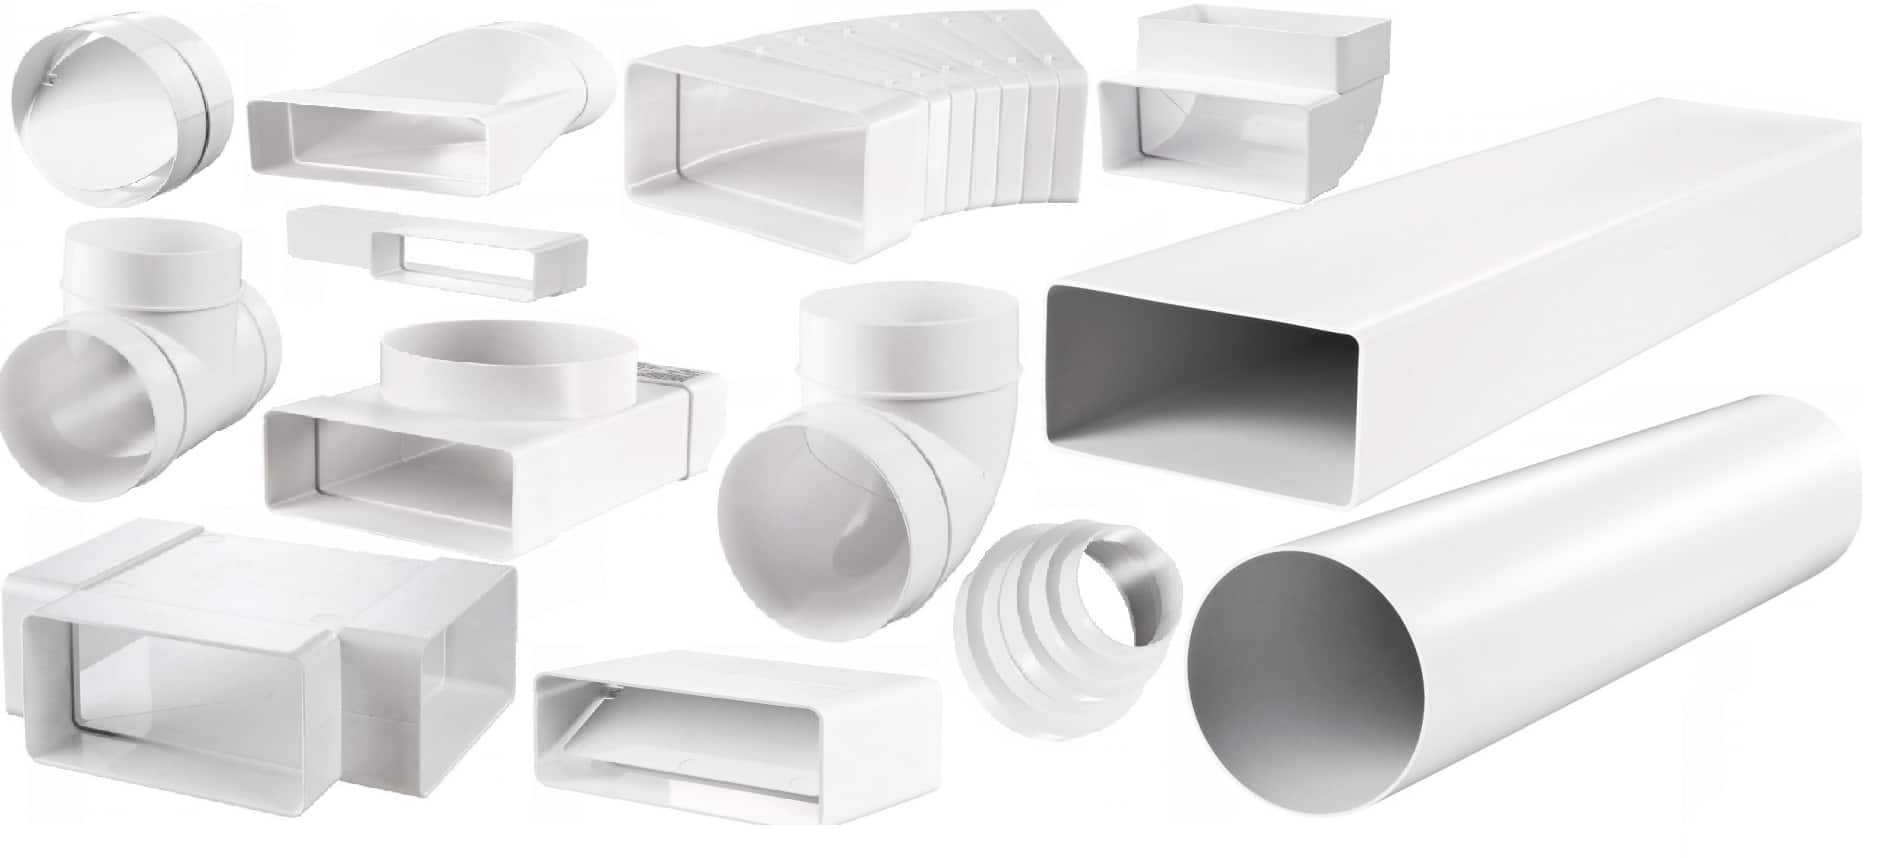
It does not matter what shape the air ducts will have to connect the hood, the main thing is not to reduce the cross section of the channel
- When connecting the hood to a vertical duct, it should not interfere with the normal operation of natural ventilation. By the way, many people do not take this requirement into account, and, unfortunately, most of the hoods in our homes are installed incorrectly. We will devote the next section to the question of how to properly connect the hood to the ventilation in the kitchen.
How to connect the pipe from the kitchen hood to the natural ventilation channel
From the outlet of the kitchen hood, we need to stretch a pipe of the appropriate section and insert it into the hole in the wall leading to the vertical channel of the natural ventilation system. In practice, this is done in different ways:
Sometimes only a pipe supplying air from the hood is connected to the vertical channel, completely closing the hole from the room. It is absolutely impossible to do this, because the work of natural ventilation will be disrupted.

An example of how in no case should you connect a kitchen hood: a room with a gas stove is deprived of normal natural ventilation. Even if the hood did not forget to remove the check valve, the natural suction of air above the stove will be weakened due to the additional resistance to air movement that has arisen. In addition, harmful gases that accumulate near the ceiling will not be removed at all.
Many sellers of building materials and finishers recommend connecting the hood to a natural ventilation system through a two-hole adapter plate. One of them is designed to connect the hood, the second opens from the channel into the room. It seems that the hood was provided and natural ventilation was preserved. Actually it is not. Firstly, during the operation of the hood, almost all of the removed air is returned back to the room. It is much easier for him to exit back through the nearby opening than to climb the channel.
Frequently used connection of the air duct from the hood (1) to the natural ventilation duct (3) through an adapter with two holes. While the hood is not working, the outflow of air from the room is carried out through the second hole (2). But when the extractor turns on, most of the air removed by it is returned to the room
Secondly, the cross section of the hole for natural exhaust is reduced, unless it is specially expanded. Connection via a two-hole adapter is widely used, but we consider it incorrect due to its very low efficiency.
Widespread, but inefficient design for connecting the hood to the channel of the natural ventilation system
In order for both natural and forced ventilation from the hood to function fully, two requirements must be met:
- While the hood is operating, the second opening must be closed so that the exhaust air is not thrown back into the room.
- The total cross section of the grate openings for natural ventilation should not be less than the cross section of the vertical channel.
This can be achieved by increasing the area of the natural ventilation grille and installing a non-return valve behind it so that it closes after the hood is turned on. The valve must be installed in such a way that the supporting air flow from the hood closes it, and when the hood is turned off, the valve opens automatically.
A non-return valve (5) was installed on the hole in the wall in the natural ventilation channel (4), which is open with a slight movement of air, but closes from a noticeable air flow. When the hood is turned on, it blocks the exit of air back into the room and it has to climb up the vertical channel to the roof
How to choose and install an air check valve when connecting the hood to the channel
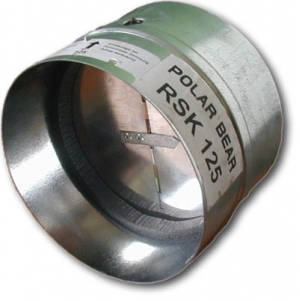
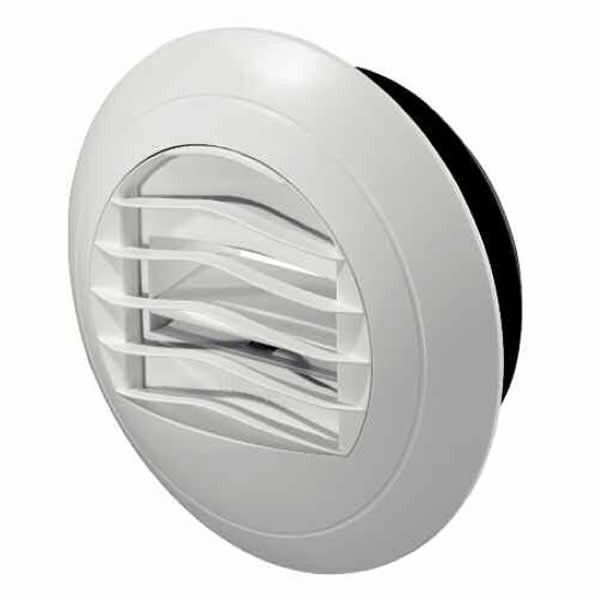
For our purposes, of the many types of ventilation valves, only one is suitable - without a drive, without a spring, with a damper that is not divided into segments and its axis of rotation is shifted relative to the center of symmetry.

Of the three air valves shown, only the one on the left is suitable for our purposes.
After we have chosen and purchased the valve, we will have to tinker with installing it in the right position. In normal mode, the air valve should work like this: there is no air movement - the damper is closed, the air flow opens it. We need to get the opposite result: while the hood is not working, the valve should be fully open. When the hood is turned on, the air supply from inside the channel should close it. The relatively weak natural movement of air from the room into the duct should not affect the operation of the valve.

The principle of operation of the check valve when connecting the hood to the natural ventilation channel. The illustration shows a spring-loaded valve with a two-piece damper. Theoretically, this type of valve can be used for our purposes, but in practice it is not easy to choose it in such a way that the closing force and air pressure coincide.
In the normal position, such a valve in a horizontal channel is positioned in such a way that the damper mounting axis is placed horizontally, and the larger (and heavier) segment of the curtain “looks” down. In this case, the valve, if there is no air pressure, will be closed. We need to achieve the opposite, the valve must be open. This can be achieved in two ways:
- Install the damper strictly horizontally so that the mounting axis is turned at an angle of 5-60º to the vertical, while the damper sector with the largest area should be at the top. The angle of inclination at which the damper will be fully open when the hood is not working will have to be selected empirically. The force to pull the damper and close the valve must be sufficient, a low-power hood may not provide it.

Installation option air valve with inclination of the axis of rotation of the damper
When the valve is installed and adjusted, the vent can be covered with a grate
- Position the axis of the valve strictly vertically, but tilt the valve itself slightly (by about 5º) towards the entrance to the natural ventilation channel. The larger segment of the shutter should "look" towards the channel. In this case, it will outweigh and the damper will open under its own weight, as crookedly hung doors open by themselves. The required effort to close the valve will be small, you can use the hood of any power.

The axis of rotation of the air valve is set strictly vertically, but it is slightly inclined towards the channel. Note how the valve was hidden in a cabinet for a built-in hood. The air in the locker will come from the hole in the top shelf
In the following video, you will learn how to connect a kitchen hood to an existing vertical duct using a non-return air valve, ensuring its maximum performance and without interfering with natural ventilation:
Centralized forced ventilation systems
It is worth mentioning the centralized ventilation systems. In office buildings and hotel complexes, a single ventilation system is often arranged that serves all the premises of the building. In housing, as a rule, ventilation is combined within an apartment or a private house.
Centralized forced ventilation can be exhaust, supply and exhaust and supply and exhaust with heat recovery. We are convinced that only the latter option is suitable for the domestic cold climate.
The supply and exhaust system with heat recovery is not cheap, but it gives a real return in the form of savings in heating costs and a favorable microclimate. Options without recovery at lower cost in our cold climate are ineffective.
In the supply and exhaust system, air is removed from the "dirty" rooms and supplied to the "clean" rooms through a system of ventilation ducts. The exhaust and fresh air "meet" in the heat exchanger, where the heat energy from the removed heated air is transferred to the cold air coming from the street. In this case, the air flows do not mix.

The principle of operation of the ventilation unit with a plate heat exchanger. Warm exhaust air and cold fresh air flow in opposite directions through a heat exchanger consisting of many plates made of a material with good heat transfer. Warm air, not in direct contact with cold air, gives it thermal energy
A properly designed and installed ventilation system with heat recovery ensures the transfer of up to 90% of thermal energy from warm air to cold air, which can significantly reduce heating costs and supply air at a comfortable temperature to the premises.
Supply and exhaust recuperative ventilation systems are best suited for modern energy-saving houses. In the Scandinavian countries, this type of ventilation has been mandatory for buildings under construction for more than a year, replacing natural exhaust.
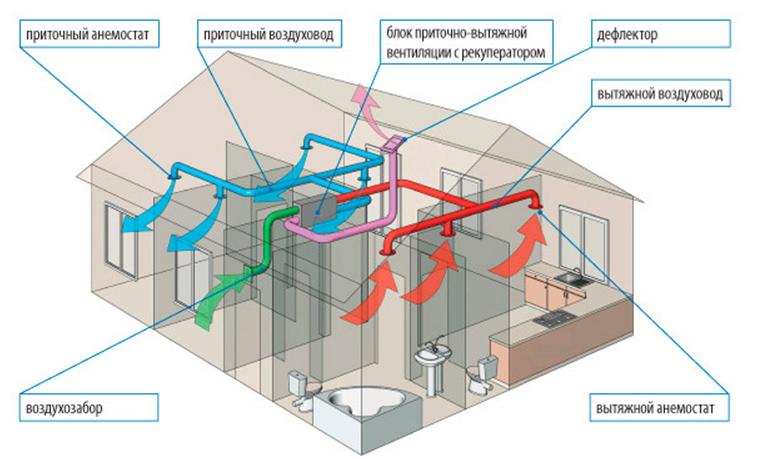
The device of a centralized supply and exhaust ventilation system with heat recovery. The removed air is collected in the "dirty" rooms, fresh air heated in the heat exchanger is supplied to the "clean" rooms.
It is problematic to combine centralized ventilation systems with gas stoves. For a gas stove, you still have to do natural ventilation from the room or install complex emergency automation. It is difficult to adequately combine two different ventilation systems (with an exhaust hood - three) in one room. The electric stove does not create such problems.
Local forced ventilation devices (room ventilators)
Worthy of mention are local ventilation devices with heat recovery (room ventilator). Their operating principle is similar to central systems: The outgoing air heats the incoming air. The ventilator provides ventilation in one separate room.

Some models resemble the internal blocks of split air conditioners in shape and dimensions. The illustration shows a Mitsubishi Electric Lossnay room ventilator. The circulation fan is located on the right side of the case, the paper heat exchanger is on the left. For its installation in the outer wall, it is necessary to drill two holes with a diameter of 8 cm.
Equip a house or apartment with a local forced ventilation with heat recovery is many times cheaper than installing a centralized system. And the level of comfort received is not much lower.
Local ventilation with recuperation is very good for living rooms. The ventilator in the kitchen will not interfere either, but still, natural ventilation and a powerful exhaust hood, brought out horizontally into the wall, will be more useful. When choosing local ventilation devices Preference should be given to those models in which the volume of supplied air exceeds the volume of removed air.
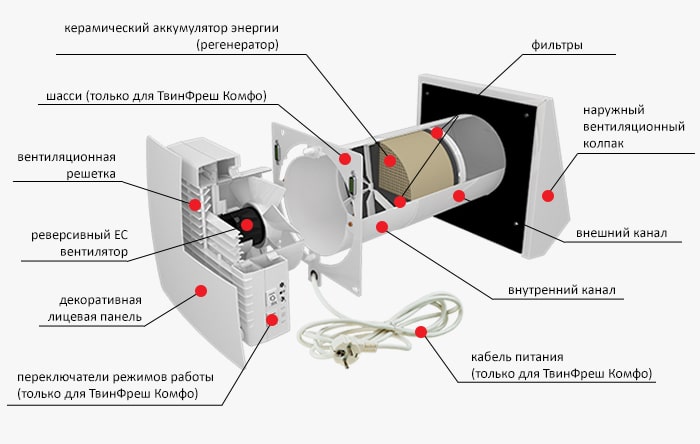
A popular and relatively inexpensive "breathing" room ventilator, where air is removed and supplied alternately through one channel. The ceramic heat exchanger accumulates heat while warm air passes through it and then releases it to cold air.
The procedure for changing the ventilation cycles of the "breathing" ventilator. Such a device is well suited for living rooms, but not for the kitchen.
What type of ventilation to choose for the kitchen in the house and apartment
For those who build a solid Vacation home or equips an elite apartment, erects an energy-saving building using the “passive house” technology, you should pay attention to an expensive, but comfortable and economical system of forced supply and exhaust ventilation with heat recovery. In the kitchen, you should install a powerful hood with an output to the wall, it is better (and healthier) to use an electric stove. If the house has a gas boiler, the room where it is installed must be equipped with a natural exhaust and autonomous air supply.
For those who build their own house more modestly and on a limited budget, we advise you to definitely provide vertical channels of natural ventilation in the kitchen, bathrooms, furnace, bathhouse, utility room and hallway, if clothes are dried there.
Ventilation in a private house in the kitchen should be supplemented by a hood over the stove with a separate air duct. It is best to bring the channel for removing air from the hood not to the roof, but through the outer wall to the street. Outside, a check valve should be installed to prevent the penetration of cold air inside. A fan on the natural ventilation channel should be placed in the toilet and bathroom; in the kitchen, if there is an extractor hood, this is not particularly necessary.
The duct from the hood is best taken outside through the outer wall
For an apartment, we recommend a similar option: natural ventilation (available by default), a good hood over the stove, a fan in the bathroom. It is advisable to bring the hood through the wall, if it doesn’t work out, follow the scheme described above with a check valve. An additional kitchen fan, in our opinion, is not needed.
Finally, we remind you once again that a properly selected and installed hood and kitchen fan will add comfort, but will not replace the natural ventilation system. And an incorrect connection of the hood can not only not improve, but also significantly worsen the ventilation. We recommend that you pay special attention to the issues of ventilation of premises, entrust its design and installation, connection of the hood only to competent craftsmen.
The air valve plays a key role in the ventilation of the apartment. If the ventilation installed in the apartment does not function well, then part of the air flow returns from the common house channel back to the living quarters. Accordingly, an unpleasant smell is clearly felt in the apartment. This phenomenon is typical for bathrooms, bathrooms and kitchens. You can solve the problem by installing a check valve in the ventilation system. You can purchase a factory product or make a design with your own hands.
What is a check valve
A device that is installed in the ventilation system to prevent the return of air flow is called a check valve. In other words, reverse thrust is eliminated. In addition, this design prevents insects from entering the apartment, protects living quarters from dust and drafts. Regardless of the type and design features, the check valve operates in automatic mode and does not require additional settings.
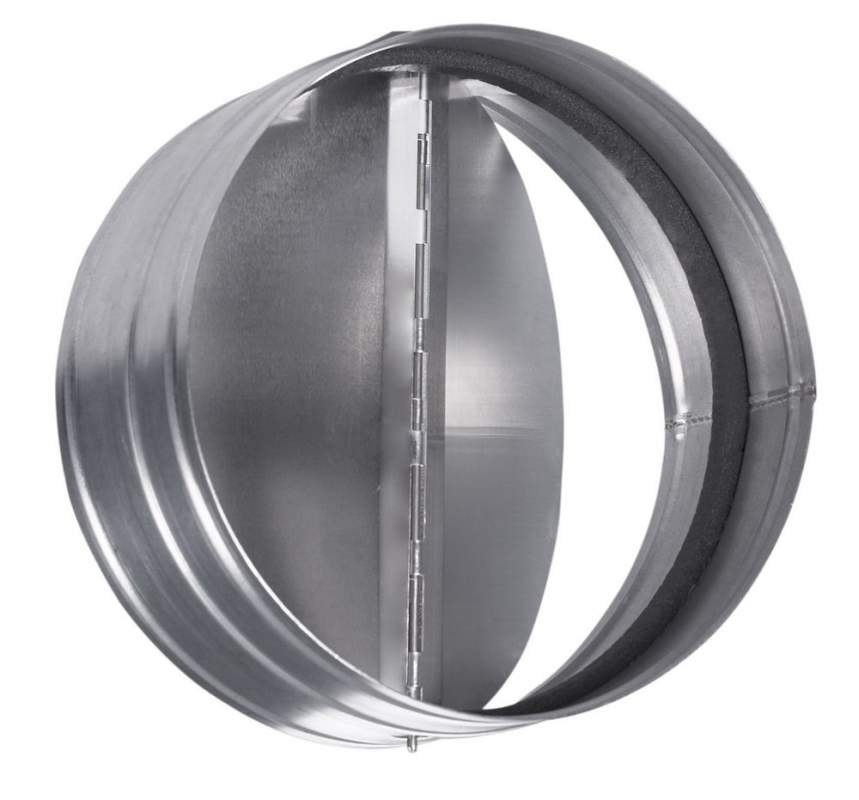
The principle of operation of such devices is quite simple. In the center of the valve is an axis on which the damper is mounted. When the hood is operating, the damper opens slightly, and the air flow from the apartment goes into the common house ventilation shaft. When the fan is turned off, the damper closes the duct flow by gravity, preventing backdraft. IN apartment buildings check valves in the form of a "butterfly" are widely used. This double-leaf design can be from 100 to 315 millimeters in diameter.
Varieties
These devices may differ in shape, principle of operation and method of installation. Let's look at each type in more detail.
- Installation. The air damper can be installed both vertically and horizontally. It depends on the location of the duct. For example, if the duct is vertical, a horizontal check valve must be installed. This will provide more efficient work devices.

- The form. Valves can be round or rectangular. Recommended throughput such a device can vary from 4 to 6 m / s. The design can be purchased separately or paired with a hood.

- Operating principle. The damper plays a key role in the operation of the check valve. It can be of two types: spool or disk. The first type is designed to work with liquids, so it is not suitable for ventilation. We are more interested in the second option - a disk or plate to prevent reverse thrust.

The non-return valve for ventilation can have a heating function. This option prevents ice and condensation. The effectiveness of this design in apartment buildings is questionable.
The ventilation in the apartments does not come into contact with the outside air, so you are unlikely to need heating. In addition, such devices are more expensive and more difficult to install with your own hands. Therefore, do not succumb to the persuasion of sellers and purchase regular models.
How to choose the right check valve
The functionality of the entire ventilation system will depend on the choice of the check valve. Therefore, the choice of these devices must be approached very responsibly. The first thing you should pay attention to is the mobility of the damper. It should rotate freely on the transverse axis. Thus, the non-return valve will operate even from a slight movement of air.
The second parameter worthy of attention is the cost of the product. Usually the price consists of the following points:
- Valve size and section type;
- Material;
- manufacturer popularity.
Almost 30% of the price depends on the last parameter. It is worth considering that valves made by eminent manufacturers differ in workmanship. Therefore, saving when choosing is not worth it. In addition, more expensive models usually come with an exhaust fan.
The efficiency of the check valve depends on the fan power. If the draft of the air flow is insufficient, the check valve will perform the function of a conventional damper. The power of the hood should be commensurate with the internal volume of the room. For example, an exhaust fan with a power factor of 10 is suitable for the kitchen, and “sevens” can be used for the bathroom and toilet.
We make a non-return valve with our own hands
If you do not have the desire to spend money on purchasing a check valve, you can do it yourself. It’s worth clarifying right away that you won’t be able to completely avoid costs, you still have to buy an exhaust fan. So, the check valve manufacturing scheme is as follows:
- For the base, you will need durable material. You can use thick plastic or textolite. A plate is cut out of this material, which fits in size to the ventilation hole. The thickness of the plate can vary from 3 to 5 millimeters.
- Holes are drilled at the corners of the base for attaching the plate to the wall. In addition, you will need four more holes for mounting the exhaust fan. Holes are drilled in the center through which air will flow. The number of these holes and their size are up to you. It is worth noting that the more cells there are, the higher the ventilation throughput.
- The fan is attached to the main plate. To make the structure airtight, it is recommended to install a rubber gasket at the junction. In addition, small rubber pads can be installed under the mounting bolts. This will reduce noise and vibration when the fan is running.
- Now you can start installing the shutters. To do this, you can use a thick plastic film (at least 0.1 mm) or thin plastic. The film is glued to the base in such a way that it completely covers the ventilation holes. Plastic sashes are installed on the base with a solid square. Dividing the square into two equal halves is necessary only after the completion of all work. If you are using plastic wrap, it must be absolutely smooth. Any fold will lead to a violation of the tightness of the structure, respectively, there will be no sense from such an air valve.
- The finished structure is installed in the air duct, and attached to the wall with self-tapping screws or dowel-nails. The gaps between the valve and the wall are sealed with sealant. After installation, the plastic film is cut into two equal parts, these will be the flaps of the check valve. To make the cut perfectly even, you can use a mounting knife.
Thus, we have a home-made membrane with a check valve function. The structure works like this:
- With natural circulation, under the influence of the air flow, the flaps open slightly. Thus, the air from the apartment freely enters the ventilation shaft.
- When the effect of reverse thrust occurs, the sashes are hermetically slammed shut without letting air from the general house ventilation into the apartment.
- For forced ventilation of the room, the fan is turned on.
Such a design can last for several years, not inferior in performance to factory models.
It is worth noting that not only unpleasant odors, but also small insects can penetrate into the apartment from the ventilation. To prevent this phenomenon, it is recommended to glue a fine-mesh plastic mesh or a piece of nylon before installing the sashes. The latter option is preferable. Capron is easier to clean and easier to replace if necessary.
In fact, it is not so important which version of the check valve you install: purchased or homemade. The main thing is that it provides reliable protection of the apartment from unpleasant odors.
1 , average rating: 5,00 out of 5)