Frame walls and partitions. Sheathing the internal walls of a wooden house with plasterboard. Where does the interior decoration of a frame house begin?
- Home |
- House, plot, garden |
- Building, finishing, repair |
- Eng. systems |
- Interior design |
- Forum, blogs, communication |
- ads

Project J-206-1S
Technology 27-12-2010, 17:07Interior decoration
TO interior decoration it is necessary to proceed after the completion of general construction work, laying of internal engineering networks and their verification, installation of insulation and its vapor barrier. Ultimately quality interior decoration, together with exterior finish, determines the appearance of the house, the convenience of living in it, a healthy climate.An important role, especially for builders, is played by the achievement of high labor productivity in interior decoration. When using wood frame and drywall technology for interior wall and ceiling cladding, high quality finishes are easily achieved, as well as high speed work.
In this section, we will consider the installation of drywall interior cladding, its preparation for fine interior finishing of ceilings and walls in various rooms, as well as installation rules inside apartment stairs.
Other sheet materials can also be used for cladding, but currently the most environmentally friendly, affordable and cheapest material is drywall. It is produced in our country in sufficient quantities and has been used in construction for many decades. In addition, drywall is a difficult-to-combust material, which is important for the fire safety of a residential building.
When using wood frame technology, the sequence of work for interior decoration will be as follows:
ceiling lining;
wall covering;
preparation of facing for final finishing;
final finishing of ceilings and walls (painting or applying wallpaper);
clean floor installation.
Separately, work is carried out on the installation of internal stairs and internal doors. The position of these works in the sequence of interior decoration depends on the method of their manufacture and installation.
MAIN PROVISIONS IN DESIGN AND CONSTRUCTION.
1. The frame parts must provide, when installing the inner lining on them, a flat surface of the walls and ceiling.
2. In some cases, to reduce the required distance between the supports of the sheets, it is possible to install additional support rails across the racks or beams of the frame. They can also be used to align the front faces of the frame elements. The dimensions of the rails that can be used for supports are given in the table.
3. Plasterboard sheets are a gypsum core, all planes of which, except for the end edges, are lined during manufacture with cardboard, the adhesion of which to the core is ensured by the use of adhesives. According to the shape of the cross-section of the longitudinal edges (hereinafter we will call them working edges), sheets are produced in two types: UK - with edges thinned on the front side and PC - with straight edges. To achieve good quality interior finishes in residential premises, it is better to use UK sheets. For bathrooms and toilets, waterproof drywall sheets must be used. Along with ordinary plasterboard sheets, special fire-resistant sheets are produced, which must be used in rooms with an increased fire hazard (a room for placing heaters, a garage, etc.). The minimum thickness of drywall that supports the insulation (on the attic floor and external walls ah), 12.7mm.
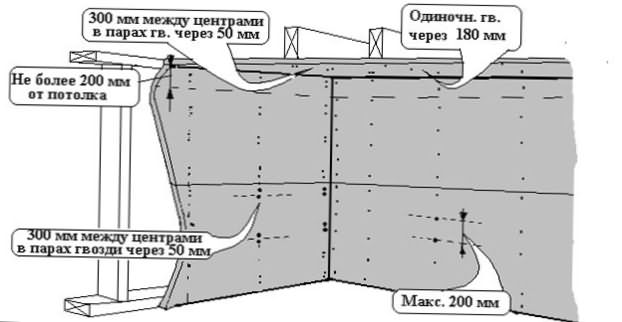
4. Drywall sheets can be placed lengthwise, across or along the frame or support rails. The end edges of the sheets must be supported by their edges on the frame or support rails. The working edges (having a bevel and glued with cardboard) can be placed across the frame, observing the norms specified in the table. In any case, it is necessary to strive to arrange the sheets so that on the surface to be coated they are connected to each other by working edges. At the intersection of the walls with the ceiling, and the walls between themselves, the sheets can be connected by any edges. Between the lower edge of the sheet and the black surface there should be a gap of 20 - 30 mm, covered with a plinth.
5. Galvanized nails with a wide head, countersunk screws or self-tapping screws can be used to fasten the sheets to the frame. It is better if the nails have a “ruff” type notch on the leg. Nails and screws should be located no closer than 10 mm from the edge of the sheet. The distance between hammered nails on the surface should be no more than 180 mm, on the walls no more than 200 mm. Nails can be driven in pairs, in a pair the distance is not more than 50 mm, between pairs of nails on the ceiling and walls is not more than 300 mm. Nails must be hammered in at a slight angle relative to each other. Drywall sheets on the ceiling can be supported along the perimeter of the walls by drywall sheets nailed to the walls. At the same time, sheets nailed to the walls must be fastened no further than 200 mm from the ceiling surface. If screws are used for fastening, the distance between them can be no more than 300 mm for the ceiling. On the walls, the screws should be spaced at least 400 mm apart, where the studs of the frame are located at a distance of no more than 400 mm. If the distance between wall studs is more than 400mm, the distance between screws should not be more than 300mm. Heads of nails, after driving them, and screws should not protrude above the surface of the sheet, while a complete breakthrough of the paper layer of the drywall sheet is not allowed.
6. The seams between the fixed sheets are sealed with three layers of putty. On the first layer, immediately after its application, it is necessary to glue a paper strip or "sickle". To achieve a good quality finish, the following conditions must be met: the temperature in the room where the finish is made is at least 10 degrees C and the holding time after each layer is at least 48 hours. Each layer must be sanded after drying. In addition to the seams, it is necessary to putty places where nails or screws are hammered.
7. To cover the frame of premises with high humidity, it is necessary to use a special waterproof drywall. In addition, the walls adjacent to the shower and bath should be covered with a water-repellent coating. Currently, the best water-repellent coating is ceramic tile. With reliable sealing of the seams, it can be glued, with a waterproof adhesive, directly onto drywall. The height of the water-repellent surface in the shower, from the stand is not less than 1.8 m, from the edge of the bathtub is not less than 1.2 m.
8. The final finish of the floor must be smooth, clean and wrinkle-free. In rooms where water can get on the floor, it is necessary to use waterproof materials for finishing the floor (ceramics, linoleum, concrete screed, etc.). In the bathroom, laundry room and other areas or places where plumbing fixtures are installed, it is necessary to lay a waterproofing layer under the final floor finish. The concrete screed must be 19 to 38 mm thick and the wooden parts of the frame adjacent to it must be waterproofed.9. If during the assembly of the floor frame, a coating of non-grooved boards or sheet material(plywood, etc.) without resting all the edges on the frame elements, then, before installing the final floor covering from linoleum, tiles, parquet, carpet, it is necessary to install an additional panel covering on the black floor. For this, plywood, chipboard and fibreboard. The thickness of the panel covering must be at least 6 mm. Sheets of this additional coating are punched along the edge through a distance of at least 150 mm, and on the sheet area itself along the grid, where the side of each square is at least 200 mm. The nails used for this, whether screw or knurled, must be at least 19 mm long for resurfacing panels 6 to 7.9 mm thick, and 22 mm for thicker panels. Joints of sheets of additional coating and subfloor panels must be at least 200 mm apart.
10. When using long wooden tongue-and-groove boards for finishing the floor, in any case, there is no need to install additional panels if the boards are placed across the beams of the floor frame. Outside the residential part of the house, for example, on a veranda or porch, it is possible to install a finishing coating directly on the frame of floor beams, while using non-grooved boards. The required sizes of boards for finishing the floor, and nails for their installation are given in the table.
11. When installing ceramic tiles, the base must be made, as shown in the figure:
PRACTICAL ADVICE FOR DESIGN
1. For interior decoration, it is necessary to select environmentally friendly building materials.
2. When designing interior decoration, it may make sense to move away from many traditional elements of the interior space of the house. For example, when using effective system air heating and window blocks with high resistance to heat transfer, you can abandon the window sill in the traditional sense. The absence of this cumbersome design will save money, time for the production of work and modern interior. It is also possible to refuse platbands of windows and doors.
3. In bathrooms and toilets, it is necessary to provide for good waterproofing of the wooden parts of the frame of the house.
4. When designing the height of ceilings in rooms, it is necessary to take into account the dimensions of the wall sheathing panels, while achieving the minimum number of their scraps that cannot be used.
5. The thickness of drywall for wall and ceiling sheathing should correspond to the distance between the frame posts and the floor beams (see table B).
PRACTICAL ADVICE FOR INTERIOR FINISHING.
1. Before installing the insulation on the ceiling, it is necessary to install supports for fixing drywall to the ceiling. It is allowed not to fasten the edges of the sheathing sheets along the perimeter of the walls, while the drywall sheets installed on the ceiling must rest on the sheathing sheets installed on the wall. In practice, it is difficult to cut the sheets in such a way that they adjoin it everywhere along the perimeter of the wall without gaps. I believe that it is better to install supports where they are not and fix the sheathing around the perimeter of the ceiling, and if a gap forms between the wall and the ceiling, then it can be easily puttied.
2. If the frame of walls and ceilings are assembled in accordance and the deflection of the boards satisfies the requirements, then correct installation sheets of inner lining will not cause any difficulties. All defects found in the frame must be corrected. If the distance between the racks or beams of the frame floors is greater than required for a given thickness of plasterboard panels, then it is necessary to install slats across the frame according to the data in Table A.3. It is best to cut the sheets to the required dimensions when they are leaning against the wall in a stack. You can perform this operation with a knife, making a cut along the chalk line, beaten off on the front surface of the sheet. The size of the workpiece should be 5 - 10 mm less than the required finishing size of the wall or ceiling plane covered by the sheet. The sheet is pressed against the plane and, with the help of nails or screws, is attached to the frame elements. The sheet must be fastened from the center of the sheet to its edges. If sheets are fastened with screws, then an electric screwdriver is required for work. Table C gives the size of the screws or nails in the wooden parts of the frame.
4. Drywall sheets should be installed so that small sheet inserts are not used over window and door openings. The joint of the sheets should be above the opening, but not on the frame posts that form the opening.
6. For some partitions and ceilings, it is necessary to install a double layer of drywall (for example, fireproof partitions).7. Drywall joints must be patched as described (see above). Internal corners must be glued with a “sickle” or paper tape without fail. At the outer corners, a metal mesh corner is installed, which is puttied in at least two layers, the first with a width of at least 75 mm, the second - 100 mm.8. Ceiling sheathing on the attic floor can be installed directly on the truss elements and truss system, which can be slightly deformed under the action of a snow load on the roof. For proper fastening of the sheathing, it is necessary to install additional spacers between trusses or floor beams. The sheets are fastened so that they do not break when the floor beams are deformed.
STAIRS INSIDE THE HOUSE. An important communication element of an individual house, which has two or three levels, is the internal staircase. Depending on the number of marches, stairs can be one-, two- and three-flight. Intermediate platforms are usually arranged when the flights of stairs turn. According to the standards, the width of the flight of stairs must be at least 900 mm. When installing a single flight of stairs between two walls, its width must be at least 1100 mm. The number of steps in the flight of stairs must be at least three, since the ascent or descent, consisting of one or two steps, is poorly perceived visually and unsafe. When choosing the height and width of the steps, the following rule should be followed. The sum of the tread and rise (width and height) of the steps must be within 450 mm. So, for a staircase with a maximum allowable slope of 1: 1.25 (not steeper than 40 degrees), the height of the step will be 200 mm, and the width will be 250 mm. The width of the step can be increased due to the overlap of the tread by at least 25 mm. The width of the winder steps in the middle must be at least the width of the march steps, and at the narrow end of the step - at least 80 mm. The height between the platforms should be no more than 3.7m. The opening in the ceiling must provide a vertical distance from the nearest ceiling element to the stairs of at least 1.95 mm.
In an individual house built using a wooden frame, it is better if the internal stairs are assembled from wooden parts. The stringers (strings) serve as a support for the steps. If they are attached to the wall or reinforced with additional overlays, then boards for them can be taken with a thickness of 25 mm, in all other cases their thickness should be 38 mm. must be less than 90 mm. The steps must be made of boards with a thickness of at least 25 mm, if risers are installed under them and at least 38 mm without them, while the maximum distance between the stringers, additionally without step reinforcement, should not exceed 750 mm.
Using a square, it is easy to mark the string for the stairs, having previously calculated the height and width of the steps.
Foreword
You can cope with the installation on your own, without resorting to the help of specialists, and the weight of modern materials is so low that it does not often allow you to turn to the help of third-party people.
Required Tools and materials
 barNailsNail pullerGKLplaned boardDrillTile groutPencilMetal cornerknifeHacksawvapor barrierPerforatorTiletile cutterHangers for gclProfile for hlRouletteself-tapping screwsConstruction staplerLaddersquareExtensionLevelinsulationPutty knifescrewdriver
Content
Sheathing of walls and ceiling of a frame house is carried out for heat and sound insulation of the building. You can cope with the installation on your own, without resorting to the help of specialists, and the weight of modern materials is so low that it does not often allow you to turn to the help of third-party people.
Below you will receive instructions for external and inner lining walls and ceiling of a frame house, find out which insulation is preferable for a frame house and get a lot of other useful information.
Material for cladding external and internal walls
Manufacturers offer the widest palette of materials, and the sheathing technology depends on which one the owner prefers. The order of work may also be different. For example, if OSB boards are chosen, then the walls of the house are sheathed in a special way.
At the same time, there is no difference in what sequence the work will be carried out: first from the outside, then from the inside, or vice versa.
As experience suggests, the choice of the optimal material for cladding external and internal walls not so great.

![]()
So, for interior wall cladding wooden house it is best to use drywall panels (GKL, GKLV, GKLO, GKLVO). Siding is perfect for the exterior wall cladding of a frame house. These materials are relatively inexpensive and are perfect for a variety of climatic conditions, they have proven themselves over many years of use.
Installation techniques for drywall and siding are simple and accessible to anyone who knows how to hold a hammer and a screwdriver in their hands. The dimensions and weight of parts made of these materials allow the master to work independently, only occasionally involving an assistant.
The order of wall cladding when using gypsum boards and siding is as follows: first, the internal wall cladding is made with gypsum board, then the insulation is laid, and, finally, the siding panels are mounted.
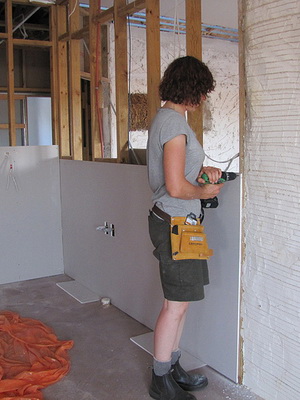
Sheathing the internal walls of a wooden house with plasterboard
Sheathing of internal walls begins with the installation of a film vapor barrier membrane. The film is fastened with a construction stapler over the entire area of the walls of the house.
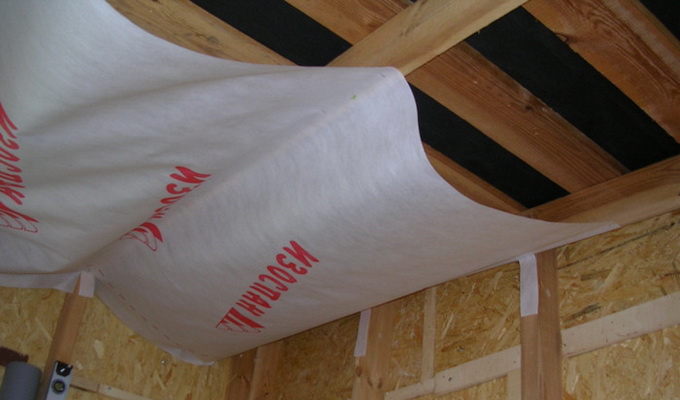
One of the most common brands of steam and moisture protective membranes is Izospan. This material is produced with various indicators of strength and moisture resistance: from a single-layer membrane that can withstand open UV radiation (sunlight) for only 3-4 months, to a heavy-duty multilayer vapor, moisture and reflective membrane. These materials vary in quality and, accordingly, in price.
On top of the insulating film, it is desirable (but not necessary) to stuff thin wooden planks 3-4 mm thick to form an air gap between the film and drywall.


Sheets (panels) of wallboard 12.5 mm thick are mounted on top of the planks using a simple and well-known set of tools and fasteners for the home craftsman.
This set consists of a metal tape measure, a marker, a knife, squares, a building level, a perforated aluminum corner (installed on external corners formed by drywall sheets), a screwdriver and self-tapping screws.
Consider the procedure for sheathing the internal walls of a wooden house with plasterboard, the types of plasterboard sheets and the technical methods of working with them in more detail.
Sheet sizes are usually 1200 × 2500 or 1200 × 3000 mm, thickness - from 6.5 to 12.5 mm.
According to the properties of cardboard sheets can be:
- conventional - GKL;
- moisture resistant - GKLV;
- fire-resistant - GKLO;
- moisture and fire resistant - GKLVO.
There are several types and according to the profile of the section of the working edge (the longitudinal edge of the sheet on the front side). The most widespread in our country is drywall with working edges of two types: PC and UK.
![]()
When sheathing the internal walls with drywall, the sheets along the length are placed both along and across the frame racks. It is important to ensure that they are joined to each other by working edges. Between the lower edge of the sheets and the floor, a gap of 15 to 35 mm must be left.
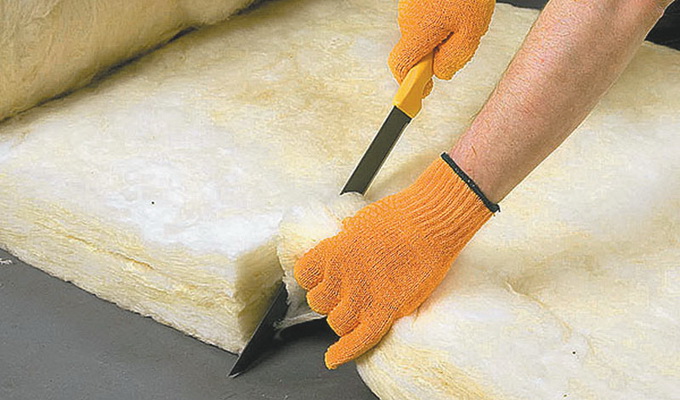
Drywall is cut with a knife along the mark made with a pencil, marker or chalk on the front side. After the incision, they break in the intended place.
Such a blank should be 5-7 mm smaller than the dimensions of the plane on which it will be mounted. When installing, it should be fastened with self-tapping screws or nails with a wide hat and deep notches on the leg using a cordless screwdriver, starting from the center of the sheet and gradually moving to the edges.
During installation, do not use small fragments of drywall over windows and doors. If, nevertheless, the joint of the sheets falls above the opening, it cannot be placed on the frame rack that forms the opening.
The distance between self-tapping screws screwed into the wall frame should be no more than 20 cm, into the ceiling - 15-18 cm. Nails are hammered in pairs at a distance of 5 cm from each other and with a pair step of 30 cm.

After installing drywall, the seams between the sheets and the installation sites of the self-tapping screws are puttied. Usually, at least three layers of putty are applied to the seams. This is done in several stages, since each layer must be dried well.
Sheathing the ceiling of a frame house with plasterboard
The technique for sheathing the ceiling of a plasterboard frame house is similar.
The frame is the floor beams and additional wooden slats-supports installed between them. After completing the ceiling sheathing in wooden house seams and places for screwing screws are puttied.

It should be noted that when sheathing the frame of the premises in which the bathroom, bathroom, kitchen will be located, it is imperative to use moisture-resistant drywall - GKLV. Usually the front side of such sheets is pasted over with green cardboard.

Upon completion of work on the interior wall and ceiling cladding, the premises are ready for fine finishing.

If it is decided to decorate rooms with high humidity with ceramic tiles, then it can be glued by applying water-repellent adhesives directly to moisture-resistant drywall.
What is the best insulation for the walls of a frame house?
The most important task in the construction of a frame house is the right choice of insulation. Some are insulated with mounting foam in one layer, and then covered with mineral wool.

It is best to fill the frame of the house with basalt slabs in two layers: first - with a low density, and on top - with a higher one.
But such experiments are permissible in the construction of summer houses or outbuildings. The choice of insulation for the walls of a frame house intended for permanent year-round use should be approached with more seriousness.
According to SNiP 23-02-2003 "Thermal protection of buildings", the recommended thickness of the insulation of the outer walls of houses for year-round living in the Central region of Russia is in the range of 120-140 mm, depending on the properties of thermal insulation materials.
Modern heaters are produced with a thickness of 50, 100, 150 and 200 mm. For frame houses, being built in the Moscow region, a layer of insulation of 150 mm is enough.
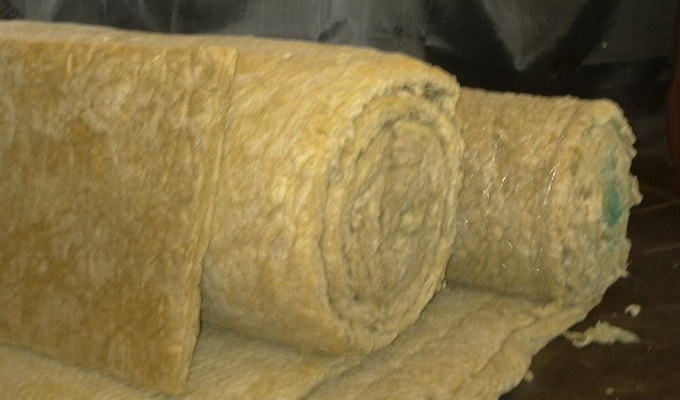
The best insulation for frame houses is mineral wool, it fully meets all the basic quality requirements: fireproof, environmentally friendly, excellent thermal insulation, but at the same time vapor permeable, and, finally, durable. In addition, it is completely unsuitable for rodent nests.

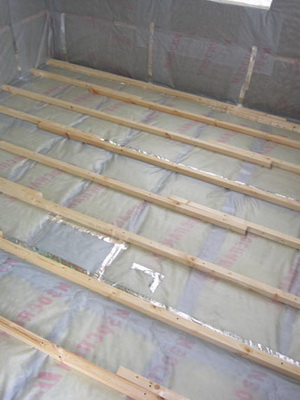
Mineral wool is produced in rolls with a layer thickness of 50-100 mm or slabs with dimensions of 1000 × 1000, 500 × 1000 mm and a thickness that is a multiple of 50.
Whatever insulation is chosen, it is very important that its thickness be less than the thickness of the frame racks: the crumpled material does not insulate well and does not allow air to pass through.
Laying insulation in a wooden frame house
All work on laying insulation in a frame house must be carried out in tight clothes with long sleeves, glasses and a respirator - they will protect the skin and respiratory tract.
Mineral wool is cut with an ordinary sharp knife or scissors, rolling a roll on the floor.

The standard thickness of the insulation is 100 mm. It can be laid both in one layer and in two, laying the second overlapping the first, overlapping the seams. It is necessary to ensure that the material fits snugly against the racks of the frame and there are no gaps.
The method of fixing the insulation depends on the material chosen: some have a special adhesive layer on the inner surface, you can also use adhesive mastic.

A layer of windproof film is laid on top of mineral wool (glass wool), which not only additionally insulates, but also protects the insulation itself from destruction (removal of fibers) and protects it from dampness and accumulation of condensate.
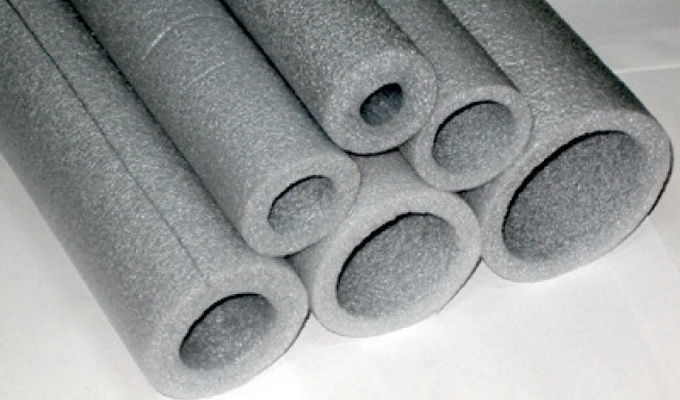
For thermal insulation of pipelines located in the inter-wall space of a frame house, special "sleeves" made of high-density insulation are used.
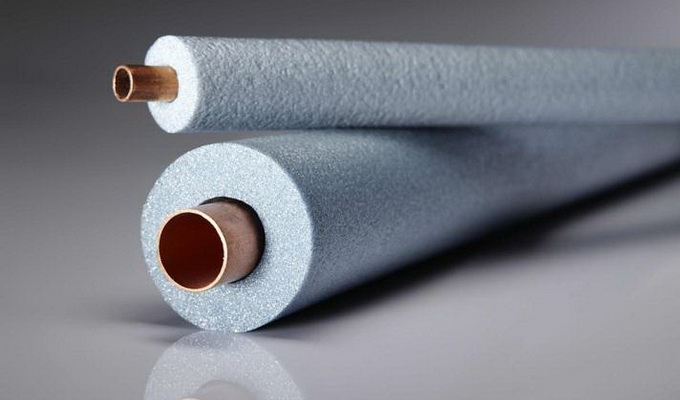
This material is produced in measured lengths of 2000 mm and with different inner diameters. During installation, the insulation is put on the pipes of communications, trying not to leave gaps and not to crush the insulating material.
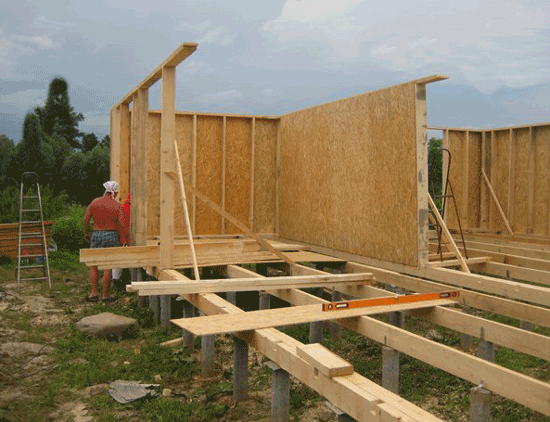
Exterior wall cladding of a wooden frame house
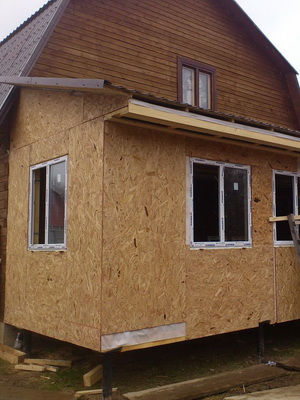 For external wall cladding, OSB boards with a thickness of 9 mm or more are installed over the entire surface. Instead of OSB boards you can take sheets of moisture-resistant plywood, QSB boards. The methods of fastening these materials are similar. For fastening to the frame, nails or wood screws are used.
The plates are mounted either vertically - parallel to the racks of the frame, or horizontally - across the racks. The second method is more economical, but it is complicated by the need to arrange them in a checkerboard pattern.
An indispensable condition for any method of laying panels is fastening with gaps at the joints of 2-3 mm, so that the plates can move with thermal expansion.
The next prerequisite is that self-tapping screws or nails must enter the frame racks by 4-5 cm. When installing the outer skin panels, the number of screwed screws, as well as hammered nails, is several thousand. Even when using a cordless screwdriver, this work is one of the longest and most monotonous. You need to be patient or purchase a special pneumatic hammer and learn how to use it. With it, the speed of driving nails will increase several times.
After sheathing the outer walls of the frame, the house is ready for the final stage of fine finishing.
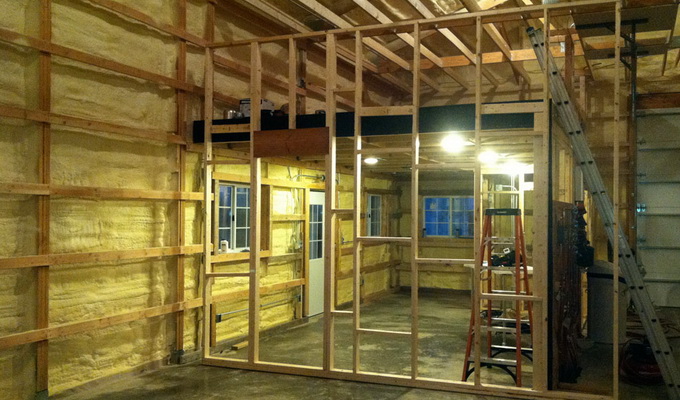
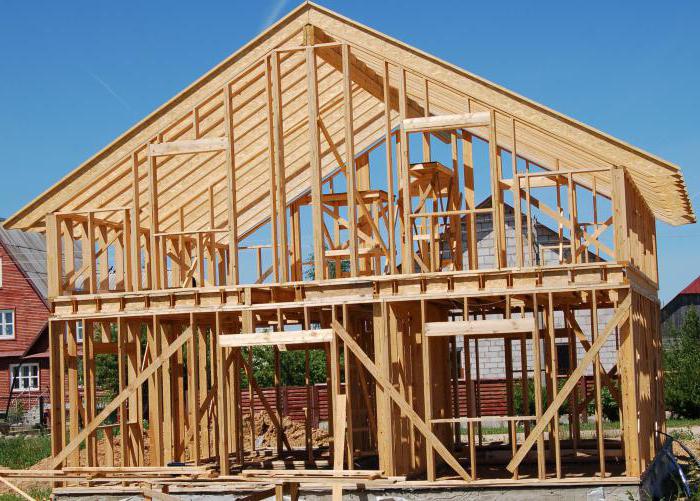
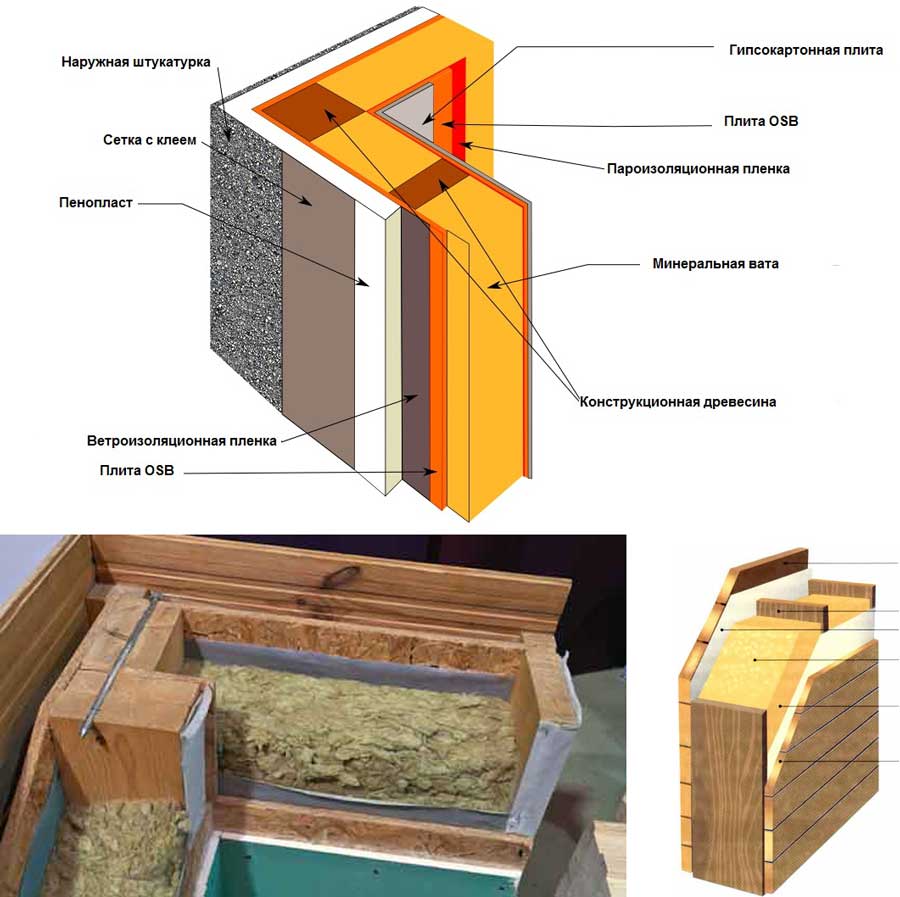
The walls of a frame house are a multilayer structure, the features of which are fully known only to professionals. However, the home master will be able to master such technology in order to carry out the work without outside professional help.
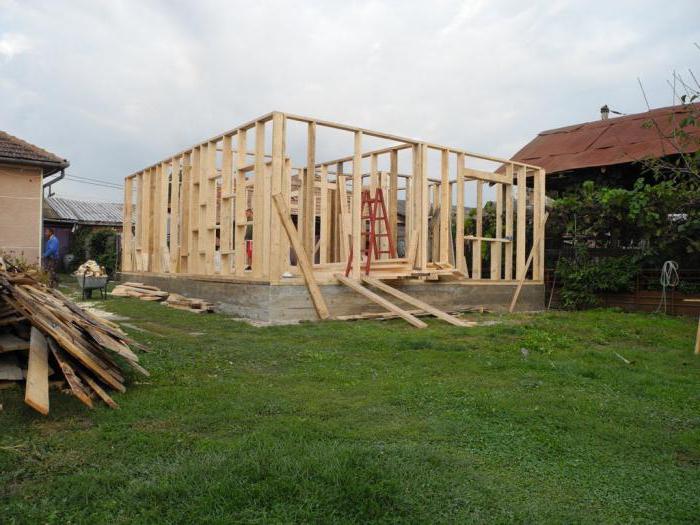
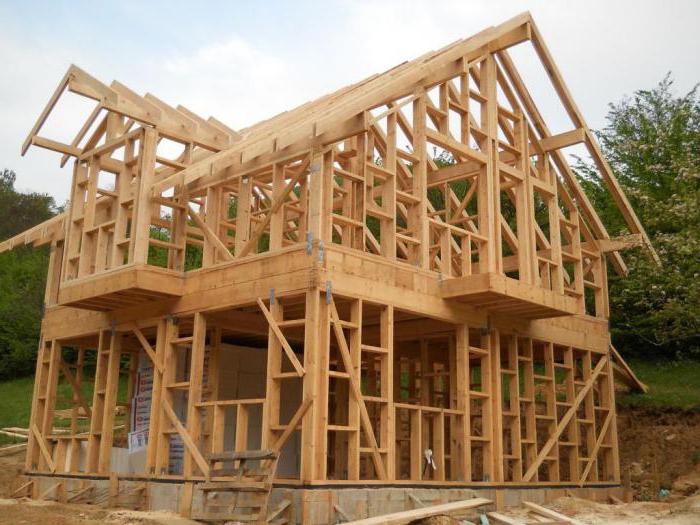
The device of frame walls
The device of the walls of a frame house provides for several layers. This technology, according to which such construction is carried out, has found its wide distribution, today it has become clear even to a private developer. It is important to decide before starting work which materials to use, as well as in what order to arrange them. In this case, one cannot do without a frame, because it was such a scheme that gave the name to the technology.
You will need a vapor barrier layer, crate, finishing materials, OSB, mineral insulation, which may look like mats. Having these materials, you can create the right "pie" out of them. The formation of a multilayer wall begins with the construction of a frame, which is made of timber. Between the racks, a layer of thermal insulation should be placed, and then move towards the facade. There will be a 15 mm oriented strand board, and then vertical and horizontal battens, between which the membrane is located. The last is decorative material. The membrane will act as a windscreen. The device of the walls inside will be somewhat simpler, for this you need to use a vapor barrier and sheathing.
For reference
In order to prevent stagnation of indoor air, it will be necessary to install forced ventilation. After all, oriented strand board is a material that does not pass air well.

If you will be installing the walls of a frame house, then it is important at the first stage to determine whether the building will be residential and in the cold season or it is supposed to be used as a summer residence. This affects if we are talking about a summer suburban building, you can save on racks that will have a smaller cross section. But with a house for year-round use, the situation is different. In addition, cheaper finishing materials can be used for a country house, because to appearance buildings are not so serious requirements.
When the walls of a frame house are being installed, of course, heat and vapor barrier are also selected. In this case, a lot depends on the region where you are going to build. If we are talking about the northern part of the country, then the emphasis should be on energy saving, the design should have two layers of insulation. However, if outside the window most years of heat and high humidity, then you should additionally use a vapor barrier, which is laid on the outside of the insulation, while for cold regions such a "pie" scheme is contraindicated.
Description of frame walls: pros and cons
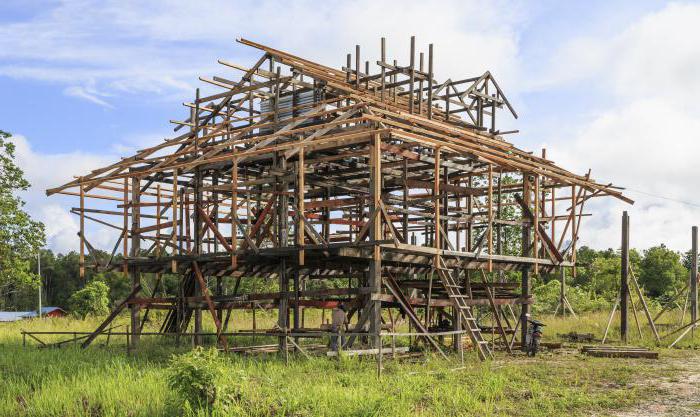
The device of the walls of a frame house with your own hands can be quite carried out. But before that, it is recommended to consider all the pros and cons of such buildings. The main advantage is speed, because the house can be assembled in a few months, which ensures that there is no shrinkage, which in other cases requires waiting for the moment until the walls take their final position. Among other things, the above method is relatively inexpensive.
Thanks to modern materials, it is possible to realize an arbitrarily bold fantasy in a few months, and the house will turn out to be durable and reliable. But attention should be paid to weak spots. Undoubtedly, today there are many tools that are used to improve the fire safety of materials. But with all this, insects and rodents can still start in the wood. Therefore, before starting construction, it is necessary to carry out measures to combat these pests.
Construction of frame walls
The device of the frame house was described above, now you can move on to the practical part of the issue. At the first stage, preparation is carried out, while it is necessary to determine the number building material. It is important to prepare certain tools, among them:
- drill;
- plumb;
- construction line;
- hammer;
- screwdriver;
- level;
- square;
- metal scissors;
- jigsaw.
Among other things, do not forget about the purchase of antiseptic agents with which the treatment is performed. wooden elements to give them fire resistance and protect against pests. The thickness of the walls will depend on the purpose of the building, this parameter is affected by the section of the racks. Therefore, the support area should be equal to 50 cm 2. First you need to install the lower trim, which is laid on the waterproofing layer of the foundation. After that, lags are installed in the grooves. All corners must be right, among other things, the elements are aligned horizontally. To simplify the work, it should be maintained which will be equivalent to the thickness of the thermal insulation. All elements are treated with antiseptic agents. After that, you can begin to install the corner posts. They are fixed with the upper harness, only after the master can mount the intermediate bars. Experts advise at each stage to check whether the vertical and horizontal are observed, because the final result will depend on this.
Work on the corners, the top overlap. Carrying out finishing
The arrangement of the walls of a frame house in detail, which is described in the article, will allow you to eliminate errors. Thus, the next step will be the processing of corners, which include window and door openings. Fixation is carried out with metal corners, which are reinforced with screws. At the next stage, floor logs are mounted, the technology will be similar to that used when laying floor elements. However, in this case, their length should be somewhat larger. Racks are fixed with jibs.
It was mentioned above that the frame walls There is a mineral wool insulation. However, you can choose any suitable thermal insulation. If you want your house to be warm enough even in a frosty winter, a layer of thermal insulation must be strengthened between the frame posts. At the next stage, waterproofing is laid, while it is necessary to ensure that each subsequent layer overlaps the previous one. Laying is carried out in the direction from the bottom up. Experts recommend stuffing thin bars on top, with the help of which a ventilation gap is formed. At the final stage, external finishing materials are laid.
Internal work
The walls of the frame house, the device and the main elements of which are described in the article, must also be finished from the inside. In this case, fewer layers are used, only a vapor barrier needs to be applied and finishing material. The role of the latter can be chipboard or plywood, and, if desired, drywall. If the room is planned to be made residential, then attention should be paid to the environmental friendliness of the finish coating. If it contains harmful substances, it can have a negative impact on human health. For example, some types of chipboard are unsuitable for such use.
Arrangement of internal walls
The device of the internal walls of a frame house can be carried out using bars, the cross section of which can be equal to 40x60 or 30x50 mm. You can assemble the frame on self-tapping screws or nails, mounting plates are less commonly used. The frame wall can be made from a conventional drywall profile. You can create a frame with stiffeners, sheet material is sewn on top of it.
Construction of frame houses
The device of a frame house from the foundation to the roof provides for the creation of a cheap foundation at the first stage (possibly a strip foundation). The building can be fastened to the foundation with bolts, crutches with ligaments-anchors or a wedge. The erection of load-bearing walls was described above, but after completing this stage, you can do the roofing. For this, they are used with a square section, the side of which is 150 mm. At the corners, permanent wind ties are installed flush with the uprights. A board with a section of 150x50 mm is laid on them. The roof frame is reinforced with ties, the step between the rafters should be equal to twice the distance between the frame posts.
Currently, most developers prefer to build frame houses. This method allows you to solve housing problems in rural areas and quickly build up suburban areas.
In addition, the frame walls of these houses make your home safe, warm, environmentally friendly and quiet.

The first frame fechwerk houses
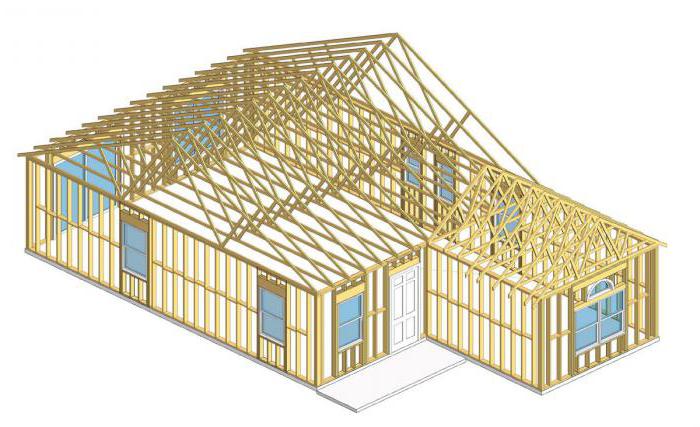
A frame house is a lightweight pre-fabricated structure consisting of a rigid frame sheathed with special panels or wood.
The construction of frame houses began more than half a century ago. This method of construction came to us from Europe, because it is there that the largest part of all residential buildings is equipped with a frame method. You can read in detail about the ancient half-timbered houses - l)
Well-known and inexpensive technology for building a house
This type of construction received particular popularity and fame for the possibility of using more economical material.
When erecting and installing on frame walls, it takes several times less wood than for block and log walls. Thanks to this feature, their weight is reduced and the house can be installed on.
Another of the positive aspects during construction is the quick installation of wall partitions. The technology of building frame houses allows you to build a residential facility in just a couple of months. During construction and installation, it should be noted that wooden frame walls do not shrink, and this greatly facilitates further work. Due to the simplified design of the frame walls, you can realize the complicated layout of your home and its exclusive details.
The walls of the frame house perfectly hide the main communications. That is why during construction there will be no need for additional installation special boxes or other similar communication elements.
Disadvantages of frame walls
When choosing the construction of a frame house, consider their main drawback with inept installation - the accumulation of moisture in the cavities of the frame. This problem occurs in the thickness of the insulation and can cause the formation of water vapor and that appear in winter when the room is heated. It is also possible that there are leaks in the outer skin through which wet snow or rain enters.
If moisture appears inside the structure, this can lead to the destruction of the entire structure. Since the insulation is wet, it deteriorates and. And wet material is a favorable environment for the appearance of mold and fungi that affect wooden structure and its elements.
Wall vapor barrier
To avoid such a problem, during the construction of a frame house and the installation of frame walls, additional and waterproofing is laid. Outer skin houses should have vertical and horizontal overlapping joints, protruding wall elements and details, and mandatory drains.
Frame wall construction
External frame walls consist of the following main parts:
- External cladding;
- Bearing part with thermal insulation;
- Interior cladding with vapor barrier.
Each part of the wall has its own specific functions:
- Vapor barrier prevents moisture from entering the interior to the thermal insulation.
- The load-bearing part gives strength and stability to the entire wall.
- Built-in thermal insulation keeps the accumulated heat in the room.
The outer skin provides protection to the walls of the frame room from moisture.
Wall frame device
The main types of frame walls
According to their designs, the walls of frame houses are divided into:
- walls, the manufacture of which takes place directly at the construction site;
— double external wall frame partitions;
- modular wall partitions;
- Walls consisting of small-sized panels.
During the construction and installation of external walls made on the job site, it may turn out that the thickness of the thermal insulation will be slightly greater than the internal cavity of the timber frame wall. In such cases, it is customary to use an additional wooden frame or slab, which is placed under the exterior cladding of the house.
Of course, the block can also be installed with outer side wooden frame. Regardless of which option you choose, all layers must be rigidly fixed with plastic sleeves to prevent deformation of the insulating board. Racks of a wooden frame should be located no more than 600 mm from each other.

Advantages of double wall framing
If the insulation thickness is higher than 200 mm, it is customary to use a double frame. This allows you to reduce the load on the frame wall from the weight of the installed materials. All parts of the wall are interconnected by special metal fasteners or hard fiber boards.
Modular wall blocks are complex three-layer structures that have excellent mechanical and heat-saving characteristics. The outer layers of the panel are made of oriented strand board (OSB).
For the inside of the block, special polyurethane is used, or. The thermal insulation characteristics of these materials are very high. This ensures less heat loss during space heating. Merge all layers monolithic panel using polyurethane adhesive. Holes for doors or windows in such blocks can be cut out at the construction site.
In terms of their design features, frame walls made of small-sized panels do not differ in any way from the features of standard wall partitions. The only difference is that when installing a vapor barrier, the panels are laid in a single piece, and their joints are reinforced with a special silicone mass. For a strong grip and fixation of individual parts and elements with a lower beam, the fastening is fixed strictly along the seams and the inside of the assembled frame wall.
Installing the walls of a frame house
![]()
Installing a wall alone
The installation and installation of frame walls begin with the bottom strapping. For this, wooden bars are also prepared. The lower harness is laid in a strictly horizontal position. All splicing joints at the joints and in the corners, if necessary, can be made in half a tree. During installation, be sure to control the squareness of all lined contours through measurements of the lower diagonals. Fasten the lower harness with twists to the anchors embedded in the foundation.
Install racks with a minimum step of 600 mm.
The distance between the racks for and doors can be determined by the size of the box of these elements. If necessary, their number is increased by adding window and overhead racks.
For the strength and rigidity of the supporting structure in places where the wall partition is adjacent to frame house, install a special additional support, which is reinforced with struts.
On top of the racks, the upper harness is laid, connecting them to each other in half a tree. When building up the strapping, its fastening is carried out strictly above the racks. The resulting frame wall structure, as a rule, is sheathed with wood or other selected materials with mandatory vapor barrier and waterproofing.
order office partitions from us