How are frame houses assembled? New house on modern technology - frame house
Among the existing construction technologies, frame technology is noticeably moving forward. It is optimal in terms of the ratio of the quality of the house and the funds spent on construction. Most of all construction in the US (about 90%) and 80% country houses in the countries of Western Europe built exactly wireframe. And this is no coincidence: thrifty Europeans have long understood all the advantages of this type of construction of houses. Possibility to build frame house do-it-yourself allows you to save up to 25% Money, which, in general, could be spent on the work.
Having your own home is a necessity that is dictated to us by the conditions of a comfortable life, self-realization. Sooner or later, many people think about building housing with their own hands. After all, we all get tired of the frantic pace of life, and so we want comfort, peace and independence from our neighbors. Of course, you can buy a ready-made house. But in this case, you limit yourself in many ways, because you have to choose from what the real estate market offers. The ideal option is to build a house with your own hands. And in order to build the house of your dreams yourself, you need to think through every step, understand the issue to the smallest detail.
A frame house is practically the most acceptable construction option for today from those that are suitable for building with your own hands. They do not require a massive foundation, they have a relatively small weight (several times lighter brick house), which leads to a reduction in time, labor costs and, most importantly, cost, simplifies construction. Building such a structure with your own hands is not difficult: the house is assembled from already prepared materials like a designer. And the largest catalog of frame houses will help you choose the project you like, which contains various layouts and design options for such buildings.
Relatives and friends are often involved in the construction of such a house. Construction work does not last very long: with the proper approach, the house can be ready in 3 or even 2 months of hard work. Now there is no lack of information and you can read about all the nuances of this type of work on the Internet, find examples of a building plan, drawings, a detailed photo report on how to build a house, consult with experts and those who have already built a house with their own hands.
Where to begin
Where to start building a house? From finding a site or choosing a project you plan to implement, to calculating costs? Everything requires a fairly accurate assessment so that your construction does not turn into a long-term construction.Well, if you already have a site prepared for construction. If not, then you have to choose a place that is suitable for the main criteria that you consider important for yourself. At this stage, it is necessary to take into account specifications plot allocated for construction.
Before starting the first work on preparing the site, it is necessary to put the documentation in order and obtain a building permit from the relevant authorities.
House project: start
So, you have firmly decided to build a frame house with your own hands. The main stage is the project of the future house. If all issues are not resolved before starting to build a building, then it may be too late and the consequences of ill-conceived actions will lead to unnecessary costs, and this, in turn, may delay the completion of construction.
![]()
You may not order a complete documentation package: you can find everything yourself necessary materials. But the estimate must be present. It is desirable that you have a qualified consultant who will explain to you all the nuances that, if not taken into account, can lead to unpleasant moments.
With a limited budget, you will have to delve into all the subtleties of building a frame house with your own hands and perform the functions of an architect, builder and foreman yourself.
Let's start construction
After all the preparatory issues have been resolved and documents and permits have been received, an estimate has been drawn up for the project you have chosen, you can begin to build a frame house. The first thing to think about is the arrival at the site. Construction materials, sand, concrete, gravel and other necessary materials will be delivered to the site along this check-in with the help of trucks, so the issue of its construction must be approached thoroughly. In order to minimize the possibility of theft of materials and other property from the construction site, the site must be fenced off.
Communications and life support
 Decide on a detailed site plan. There may be elements on it that cannot be removed or you want to leave them untouched: electric poles, trees, and others. Draw a house on the diagram, mark where the doors and windows will be. Specify the point at which the water supply pipeline will enter the building and sewerage will be discharged.
 The location of the septic tank in a private house is regulated by the rules. So, it should be located no closer than 5 meters from the house, the pipe should be at least half a meter underground with a centimeter slope for each meter of pipeline 110 mm in diameter. From the calculation it turns out that the entrance to the septic tank should be at a distance of about 70 cm underground. This should be considered at the planning stage.
A separate stage is a thorough study of the location of the electrical wiring. How electricity will be supplied to the house, in what place it will be carried out - all this must be taken into account in the construction plan.
It would be nice to interview the neighbors and find out some questions, namely, how deep do the ground water whether the site is flooded with water in the spring, during the melting of snow or heavy rains, how their sewage system is organized and what is better to arrange, a well or a well, how the foundation is organized.
Field work
So, all the preparatory issues are resolved, and you are ready to build a house. Before pouring the foundation, markup must be done. Take out to the site of the axis of the building, mark the point of water supply. Mark the sewer exit from the house and its trajectory to the intended installation site of the septic tank.Now you need to dig trenches for laying water pipes in thermal insulation and pipes sewers into heaters, taking into account the recommended depth. Only after carrying out these works, you can proceed to the construction of the foundation of the house, from organizing the pillow to the final pouring with concrete.
Foundation device
 The foundation is the main and most important part of the construction work. frame houses. It can be organized as a monolithic structure, with poles, tape, screw piles without strapping or with strapping. Frame houses allow you to arrange a foundation of any type.
 After the foundation is poured, it is necessary to wait about four weeks: during this time, the concrete gains strength. After 2 weeks, it is already possible to remove the formwork, and for the last 2 weeks, in order not to waste time, you can start building a septic tank or a well.
Where to put the excess land?
After a place for a septic tank is organized, you will have more than three cubic meters of land, in most cases, not fertile, mixed with clay, sand, and stones. If a well is assumed, then this amount increases to 10 cubic meters. The question arises, where can you put almost 2 trucks of this substance?No need to take it all to a landfill, you can use such land in your construction site. Your foundation will come in handy for this, unless it is made of monolithic slab and you have not organized a basement under the house.
Dump all this mass under the frame house and level it well. Thus, we will raise the ground level, which will prevent stagnant water under the house. Another such layer will prevent subsidence of the soil over time.
Completion of the frame
After carrying out all the above works, you can proceed to the final stage of the construction of the frame. It is necessary to build walls, organize the floors of the house.For the construction of walls, a wooden frame serves as the basis. It is sheathed with OSB boards. Walls in frame houses are very economical. To organize such walls, several times less wood is needed than for houses of block or log type, and with proper use of thermal insulation, they save heat perfectly. Outside, the walls of the house must be equipped with a windproof membrane.
Interior partitions and ceilings are filled with insulation. This will reduce noise, reduce heat loss and eliminate drafts.
Next, you need to build the roof, then organize the windows and the front door. During the installation of the roof, it must be remembered that there must be an air gap in the space under the roof. This ensures that excess moisture and condensate are removed by natural ventilation. Everything, we can assume that you did the main work on the construction of a frame house with your own hands.
If you need to get a passport at home, then it's time to carry out such work after the construction of the frame. These include:
- wall and floor insulation from inside the room;
- installation of floors;
- organization of electrical wiring;
- withdrawal of sewerage and water pipes;
- rough finish of the ceiling and walls.
Finishing outside
 The outer walls of a frame house can be finished with clapboard, siding, block house or painted. It's diversity finishing materials allows you to implement almost any of your design ideas.
 The choice of materials for insulation and roofing depends on your personal preferences and financial capabilities. On the market building materials the choice is quite wide: it is a flexible tile, ondulin, roofing material, metal tile, slate, profiled sheet and other materials.
If you are not constrained in funds and can allocate a sufficient amount for the construction of an elite country frame house, you can find a good general contractor and transfer all the work to him, removing the hassle of building a frame.
Advantages of a frame house
The numerous advantages of the frame type of construction of houses have led to the great popularity of such houses. The biggest plus is the cost. At the final cost, a frame house significantly wins in comparison with any other type of houses. More and more people, having weighed all the pros and cons, can afford to build a frame house with their own hands, thereby providing themselves and their families with reliable and high-quality housing.The speed of construction is also of no small importance. A group of three people is quite capable of building a frame house in 4 weeks. If we take into account the construction of the foundation and finishing work, then in 2 months.
The thermal conductivity of frame-type house structures is quite low. Due to this, the cost of heating the building in winter is reduced, and in summer it has a comfortable cool temperature. At the same time, the low heat capacity of the structure allows relatively a short time warm the house in winter if you have built a house in which permanent residence is not planned.
Using special soundproofing materials, you can achieve a sufficiently high degree of sound insulation and make your stay in the house even more comfortable.
The possibility of using a lightweight foundation allows you to save a lot of time for construction, reduces labor and financial costs.
In frame houses, communications can be laid inside the walls: electrical wiring, heating pipes, water supply, ventilation shafts. This allows you to hide structural elements that are not intended to be used as part of the interior. In addition, the accessibility of communication elements is ensured and, if necessary, you can easily get to the node you are interested in for repair or inspection.
A house built on the basis of a frame type has no shrinkage. This significantly reduces the speed of building a house, because you do not have to wait several months for shrinkage to occur, but you can immediately proceed to finishing work and move in immediately after all work is completed.
It should also be noted that for the construction of frame-type houses, materials that have been tested for environmental safety. All of them do not pose any threat to people living in the house.
Frame-type houses have good resistance to seismic vibrations. It is because of this property that they are so common in Japan. Such a house can withstand a load of up to 9 points.
Study interior decoration Do-it-yourself frame house is a pleasure. It has flat walls and ceiling, which means that they do not need to be leveled, plastered or further processed. Putty the joints of the plates and the places where the fasteners are located - and that's it, the walls are ready for wallpapering.
Due to the fact that the design of such a house is prefabricated, there is no need for the presence of heavy construction equipment on the site. In addition, the delivery of materials also does not take large investments. All elements are compact and can be delivered to the site with minimal cost.
It is possible after some time to disassemble the structure of the house, transport it to another site and re-assemble the house with your own hands. Such a possibility must be foreseen in advance and adjustments made in the design before constructing a building.
Another plus that the construction of a frame house has is the absence of the so-called wet cycle. This makes the construction independent of the availability of water sources and does not impose restrictions on the temperature of the external environment.
Availability of all positive sides of such construction convinces many that building a frame house with their own hands is the best way out for those who are thinking about their own reliable, but inexpensive housing. It is much easier to build such a house than, for example, a wooden one, and it will serve for many years.
erection wooden houses frame construction has gained popularity in our area relatively recently, only in recent decades. And such a rapid growth in the number of supporters of such buildings is due to the very rapid process of their construction and the possibility of using environmentally friendly materials.
The first frame buildings appeared during the development of the territories of America and Canada, then they became widespread in European countries. This type of building is good not only because the house rises quickly, but also because it requires much less cost and physical effort. In addition, if the facade of the house is finished with one of the modern materials that imitate brick, wood or stone, then its walls cannot be distinguished from the main ones.
Interestingly, the construction of a frame house with your own hands is quite possible even alone. Of course, the process will take much longer, but you won’t have to pay for the work of the whole team. If you decide to carry out the construction yourself and complete during the warm and dry summer period, then you still need to start in early spring. If the house is not completely finished until late autumn, you need to try to bring the construction site at least to the truss structure and to the flooring of the roofing material, since the building cannot be allowed to stand uncovered until next spring.
If considered in general, then the frame structure of the house consists of a lower and upper harness, which fastens vertically installed racks that form the frame of external and internal walls. The base for the floors and the attic floor consists of load-bearing beams made of timber. The rafter system is also built from beams, and the roofing is laid on it. It is desirable that it does not differ in too large a mass.
A heater is installed and laid between the elements of the frame. Its thickness is chosen depending on the region and climatic conditions. In any case, the thickness of the frame racks must correspond to this value. Most often, one of the varieties of mineral wool, ecowool, expanded polystyrene or polyurethane foam is chosen as thermal insulation materials. Expanded clay is also used to insulate floors and attic floors.
On the pages of our portal there are a lot of materials that tell in detail.
After installing the insulation, the structure is sheathed with moisture-resistant materials - this can be OSB board, moisture resistant plywood or cement-bonded particle board (DSP).
Compared to solid wood, block or brick buildings, the frame structure is light and does not require a massive foundation. A columnar or pile-screw base is suitable for it, and if it is planned to arrange basements in the house, then in this case it is best to choose a strip foundation. The frame structure must be raised high enough above the ground, so the basement must have a height of at least 500 mm. This is necessary so that the moisture from soil, from rain water or snowdrifts as little as possible affected wooden elements frame house.
Foundation for frame structure
Any construction starts with a foundation, and, as stated above, you can choose any of its types (except, perhaps, a monolithic "floating" plate - there is no need for it).
Marking of future construction and earthworks
Before proceeding with digging trenches under the foundation or screwing in piles, it is necessary to carefully mark the area. This work should not be considered secondary, since the straightness of future walls, and the total amount of work, will depend on it. So How Not have to make excessive efforts to remake the foundation if its exact coordinates and dimensions are initially determined.
- Marking is carried out using a tape measure, a square, and other simple geodetic instruments. Usually it consists in installing wooden stakes with stretched cords, which visually show the size of the building and its location on the ground.
On this kind of “drawing”, all the bearing walls of the building are determined in the event that a tape type of foundation is selected. If you plan a columnar version or a pile-screw, then you need to mark the exact location of each of the pillars (supports).
- Trenches can be dug manually or, if you need to carry out this process quickly, you can attract special construction equipment, with which the whole operation will take place in one day.
- For digging holes for a columnar foundation, in addition to shovels, an ordinary hand drill or motor drill is used, which will allow you to drill holes of the desired diameter to the required depth much faster.
These methods are the most affordable, because if you invite large-sized equipment, then for it it is necessary, firstly, to have additional space on the site and free access to the place of work, and secondly, the cost of such drilling will cost many times more.
- At the stage of digging a pit, a sewer runoff is carried out. For laying pipes, trenches are dug below the level of soil freezing in a given region. Then pipes are laid to the place inside the pit, where, according to the plan, a bathroom or a ventilated sewer riser should be located.
If a columnar foundation is being arranged, then the pipe section passing from the ground level to the exit in the house must be carefully insulated. It is recommended to build brick walls around it, and fill the space between the pipe and them with insulation.
Of course, this work can be carried out after construction is completed, but in this case it will be inconvenient to do it - you will have to cut holes in the floor or cut through the foundation wall.
Foundation construction
In order to specifically dwell on one of the types of foundation, you need to understand what they are.
Strip foundation
This type of foundation is a concrete monolithic strip, which has a reinforcing lattice in its design. The height of the basement part can be different, but if there is a basement in the construction plan of the house, then the foundation walls are raised by 600 ÷ 800 mm, in which case they will require insulation. When preparing the formwork, one should not forget about the ventilation holes that will not allow moisture to accumulate under the structure.
"Classic" strip foundation
If you immediately provide for measures to combat rodents, of which there are always a lot outside the city, then it is recommended to make a backfill of fine-grained expanded clay around the foundation and inside it.
Column Foundation
1 - foundation pillar;
2 - strapping beams;
3 - floor beams;
4 - logs of the subfloor.
A columnar foundation is a set of concrete, brick or combined pillars arranged in the correct order, according to the markup. The supports are deepened depending on the types and location of the soil layers in the area and on the massiveness of the future structure.
The pile-screw design is good in that the supports can be screwed in so that they protrude to different heights. This allows you to install the house not only on a flat area, but also on a rugged site, with a height difference - then it will not be difficult to bring the piles to one horizontal level. to one height.
You won’t be able to screw the screw piles on your own - you will either have to invite several assistants, or use the services of a team of craftsmen “armed” with special equipment.
Frame erection
Whatever foundation is chosen, it must be on top waterproof- the platform (grillage, mounting plates or the upper edge of the posts or tape), on which the lower strapping beam will be installed, is covered with roofing material, which will create a moisture-proof gasket.
The roofing material spreads in several layers, preferably in a “hot” way on the tar mastic, and it must be 150 ÷ 200 mm more than the width of the foundation, since it must protrude from both sides.
Bottom trim
The strapping is made of a bar with a size of 150 × 150 or 200 × 150 mm. At the corners, the elements are connected “in half a tree”, the bars are securely twisted together and fixed on the supports (tape) of the foundation with the help of studs or anchor fasteners, depending on what type of base is chosen and what material it is built from.
Additionally, the strapping beams are fastened together with corners or other metal elements, for example, plates. The same parts can be used to attach the strapping to the foundation.
At the end of these works, a rigid strapping belt should be obtained that can withstand the main structure of the frame. In the case when the beam used does not have the proper size in cross section, two, and sometimes three parts are stacked one on top of the other.
And, the top beam of the strapping is mounted on the bottom beam so that the possible butt joints, if any, do not fall one above the other.
If the wooden strapping is mounted on a strip foundation, then it may not be too thick, but it is very important that its width matches the width of the concrete base.
Basement beams and flooring
Basement beams
The strength qualities of the frame to the maximum extent depend on the quality and cross-section of the strapping beams and floor beams. It is clear that they are trying to select first-class material. But the cross section depends on the length of the spans, and on the step of the location of the parts. To correctly determine the size, you can use the following table:
Cross-section table of beams of floor beams for a frame building:
The section of the used lumber of the 1st grade span length (mm) 3000 3500 4000 4500 5000 5500 6000 Attic floor Board 160×50 1200 900 650 500 420 - - 200×50 1850 1350 1050 800 650 550 450 180×80 2400 1750 1350 1050 850 700 600 bar Distance between adjacent beams (mm) 140×180 - - - 1800 1480 1200 1050 150×200 - - - 2400 2000 1650 1400 160×220 - - - - 2500 2000 1750 Basement and interfloor ceilings Board Distance between adjacent beams (mm) 160×50 800 600 450 - - - - 200×50 1250 900 700 550 450 - - 180×80 1200 1200 900 700 650 450 - bar Distance between adjacent beams (mm) 140×180 - - 1550 1200 1300 800 700 150×200 - - - 1650 1700 1000 900 160×220 - - - 2000 1900 1400 1100
- The next step is to fix the basement beams. They, as a rule, have the same cross-sectional size as the strapping bars. The connection of the floor beams with the strapping belt is carried out “in half a tree”, for which gashes are made in both elements.
The beams must give the structure of the future floor rigidity and reliability. Therefore, if the area of \u200b\u200bthe building is large enough, then often the basement beams are laid on the strapping belt for each of the rooms separately.
- After the installation of the basement beams is completed, for further work flooring is required. And here, many masters themselves prefer and advise beginners to immediately arrange floors, both rough and “white” (of course, not counting the finishing decorative coating). However, with this option of work, it is necessary to provide that the entire floor area will need to be covered daily with a solid sheet of dense polyethylene film until the entire building is protected from precipitation by the roof and walls.
- All parts of the lower belt are covered with antiseptic and water-repellent impregnation - this measure will extend the life of the building.
- At the same stage, it is necessary to raise the sewer pipe above the floor surface by 100 ÷ 150 mm. To do this, in each layer of the floor covering, it is necessary to make holes through which the sewer pipe will be passed.
subfloor flooring
- To lay the subfloor, cranial bars are screwed onto the lower parts of the floor beams, on which boards or plywood sheets will be fixed.
- Next is the laying and fixing of the boards. For this, it is not at all necessary to purchase first-class material, but it must be well dried. It is recommended to install the boards close to each other - this will add insulation to the floor, since the structure will be less blown through.
Installation of the insulating "pie" of the floor
- At the next stage, the subfloor and floor beams are covered with a waterproofing membrane, which is used as dense polyethylene. It is usually attached with staples.
- Further, insulation mats are laid on the waterproofing or expanded clay is poured, which is no less effective than other materials. If it is planned to make several layers of insulation, then the first of them is recommended to use fine-grained expanded clay.
- A layer of vapor barrier film is laid on top of the insulation, and then either a floorboard or sheet material is fixed to the beams. For this, plywood or OSB is often used.
Recently, instead of plywood, cement-bonded particle boards are often used, which can be used not only for flooring, but also for walls and ceilings. The material has good technical and operational characteristics, is not inferior, but in some ways even surpasses its “competitors”.
The table below shows comparative estimates indicators of some sheet materials that They will give you a rough idea of them and help you make a choice.
Characteristics Evaluation of the material on a 5-point system Average score 2.9 3 3.3 3.6 4.1 MDF Chipboard Plywood OSB DSP Strength 2 3 4 4 4 Resistance to external aggressive influences 1 2 3 5 5 Dimensional stability 2 3 3 3 4 Weight 2 2 3 3 2 Manufacturability of machining 3 4 4 5 5 Manufacturability of coloring 5 3 3 2 4 Defects: knots, delamination, delamination, etc. 5 4 3 5 5 Sheets of material covering the floor are screwed with self-tapping screws to the floor beams. If the insulation is provided in two layers, then logs are nailed on top of the beams, between which the second layer of insulation is laid. Then everything is the same - a vapor barrier is laid, and plywood or another coating is already fixed on the logs.
It should be noted that instead of the last vapor barrier layer, roofing material sheets are often overlapped by 150 ÷ 200 mm, which are fastened together with mastic in a “hot” way.
The erection of the wall frame, the upper trim
After you have finished with the lower belt, you can proceed to the construction of the frame of the walls. First of all, it is necessary to install the corner posts, which usually have a larger cross section than the intermediate ones.
- Racks must be fixed according to pre-made markings, at a distance of 600 mm from each other - this is the standard width of insulation mats, but if necessary, they can be placed with a different step, for example, 400 mm. You can fix the intermediate racks, just like the corner ones, different ways:
- Racks can first be fixed using metal corners, and then jumpers can be installed between them, which will create structural rigidity.
- Another option would be to install the racks on the strapping belt at the time when the floor is already installed, or before it is installed.
- If fastening is carried out after the floor is laid, then grooves are cut near the floor beams. Racks are installed in them and fixed to the beam and strapping with self-tapping screws.
- In the event that the racks are attached before the installation of the floor, then this can be done with the help of an additional part - a piece of timber, which is screwed with self-tapping screws to inside racks and strapping beams.
- The third option is the installation of racks with diagonal supports (slopes), which are installed on both sides and screwed with screws or nailed.
- The fourth way of fastening the racks can be complete or incomplete cutting of the rack into a strapping or into an additional reinforcing bar nailed perpendicular to the floor beams.
- When installing racks, you can not forget about window and door openings. They are designated by transverse bars, which, for rigidity, are supported from above and below by additional reinforcing racks. Spacer bars will give the structure additional rigidity.
- Each of the racks with the greatest care is aligned vertically in two planes using a building level. Then they are all fastened together with temporary jumper rails that will fix them in the correct position.
- When the racks stand rigid enough, they must be combined with an upper harness, which is nailed to the ends of the racks, and then additionally fixed with corners or spacer slopes, fixed diagonally.
- The top rail beams must be the same width as the uprights. Special attention is paid to their reliable fastening, since it is they who will become the basis for the beams of the attic floor and, therefore, the entire truss system generally.
- In order for the construction of the wall frame to be strong, after installing the top trim, it is recommended to immediately sheathe the outside with plywood or other selected sheet material. Sheets are mounted on self-tapping screws to vertical racks.
Video - The worst mistakes in the construction of a frame house
Attic beams and roof structure
After the strength and stability of the wall frame is no longer a concern, it is possible to install attic floor beams.
- They are fixed exactly above the racks of the wall frame. If boards are prepared as a material for this, then they are installed on the end, having previously made cuts in them for 1/3 of the width of the board, and the depth of the cut should be equal to the width of the beam or board of the upper trim.
Fastening is carried out using a metal corner, which is screwed to the strapping on one side, and on the beam with the other. Fasteners are installed on both sides of the beam.
- Next, you can proceed to the installation of the truss system. True, it is advisable to immediately install at least a temporary flooring on the beams of the attic floor, along which it will be possible to move in the process of work.
If the installation of the truss system will be carried out alone, then each part will have to be lifted and installed separately. In the same case, when the installation is carried out with assistants, then it is possible to pre-assemble the elements of the truss system (truss pairs) on the ground and lift them up in finished form. In this case, it will only be necessary to set them evenly and fix them on the upper trim or on the floor beams.
- Fastening can be done in different ways, depending on the angle of the roof slope.
- In some cases, the ends of the rafters are cut at a certain angle and installed on the top trim, and then fixed using special corners.
- In other design options, grooves are cut out in the rafter legs, on which they are also installed and fixed on the strapping.
- Another option - the rafter legs will be screwed onto the floor beams. The rafters are also cut at the right angle, and the beams should extend beyond the walls by 300 ÷ 500 mm.
- On the ridge, the rafters can be fastened together using a metal or wooden lining, bolts with wide washers. Another option is that they are all screwed to a common ridge board.
- The rafter system can have only one tightening, which will give the structure rigidity and strength. For large slopes, side racks, midheads, struts and other elements are installed that will make the roof structure more reliable. Which elements to choose depends on how thick the remaining structural details are selected and on the weight of the roofing.
- Further, it is possible to sheathe the gable parts of the roof with plywood or clapboard, but usually this work is carried out after the roofing material has been laid.
Roofing
Approximate diagram of a ventilated roof
- The film is shot with brackets to the rafter legs, and on top of it a counter is fixed to the rafters, which will help create a ventilation gap between the film and the roofing material. The counter rail should have a size of 30 × 50 mm.
- Next, follows the main crate, on which the roofing material will be attached. It can be solid, for example, from sheets of plywood (OSB) or tightly fitted boards, if it will fit soft roof, or located with a certain base will be ready, a roofing is mounted on it. Installation of all its rows always begins on one side of the roof slope, starting from the eaves. The sheets are overlapped by one or two waves vertically, and from 150 to 250 mm horizontally, depending on the slope angle of the slope.
Video - 11 important rules for the rigidity of a frame house
Insulation and finishing works
After To to the roof over the house is erected, it is necessary to install external windows and doors. This process is carried out before insulation work in order to be able to simultaneously close all the cracks and gaps that may be formed during the installation of window and door blocks. After that, you can proceed to the insulation of walls, attic floors and roofs.
Walls can be insulated both inside and outside. For this, thermal insulation materials are used, which have already been mentioned in our publication.
- In the event that the walls are sheathed on the outside with plywood, then a heater is installed between the racks from the inside, which then must be closed on top of the vapor barrier crate film.
- Insulation of the attic floor is carried out in approximately the same way as the basement:
- cranial bars are screwed onto the floor beams;
- a draft floor is laid on them;
- the floor is covered with waterproofing;
- then comes the insulation material (expanded clay, mineral wool, sawdust, ecowool, expanded polystyrene, etc.);
- the insulation is covered with waterproofing from above;
- boards or plywood of the "white" floor of the attic are mounted on top of it.
- Roof slopes are also better insulated, as most of heat escapes through the ceilings and the roof. To do this, a heater is laid between the rafters, which is closed with a vapor barrier from the attic side, and then all layers are sheathed with clapboard, plywood, cement-shaving sheets or moisture-resistant drywall.
crateFrom the outside, a frame house can be given almost any look.
The facade of the building acquires reliable thermal insulation, protection from weather phenomena, and the house itself - completeness, accuracy and individuality.
How - read in a special publication of our portal.
Interior decoration of the frame house - at the request of the owners
At the end of the finishing work, around windows and doors are mounted decorative panels- slopes and platbands.
If a veranda or terrace was not planned in the project, then they can be attached after all work is completed, but it is better, of course, to build together with the walls.
Electricity can be mounted both inside the walls, even at the stage of installing the frame, and after the completion of the sheathing with decorative material. The latter method of installation has been used more and more recently, since it is safer and allows, if necessary, to carry out repair work without opening decorative finishes. However, modern technology allows you to use other options.
Electrical wiring in a wooden house - special attention!
Whatever you say, but a fire hazard wooden house always higher than stone. No "liberties" in the installation of electricians are simply unacceptable!
How to mount it correctly is described in detail in a special article of the portal.
If a decision is made to start building a frame house, you need to remember that this will require a lot of free time, although incomparably less than with other buildings. The work will certainly go more fun and faster if there is a reliable and knowledgeable assistant nearby, and preferably several. In this scenario, it is quite possible to build a house in one summer season.
The main thing is to act in accordance with the technological instructions during the construction process when performing all types of work, to perform them accurately, smoothly and consistently.
And in conclusion, to complete the overall picture - a video lecture on the main advantages and disadvantages of frame houses.
Video: frame house - "pros" and "cons"
The frame house, according to which this material is written, was built by 2 people: one without building experience, the second is a foreman in the team for the construction of frame houses under the roof, without finishing and supplying communications. We will try to write all the steps in stages, at the same time not stretching the material too much.
You have decided to build yourself a frame house, you have only a small amount of money and that's all, i.e. there is not even an area. Our advice is to have an amount equal to 400 rubles at the beginning of building a house. (at prices for 2012) and another plus for the site, depending on how much the land costs in your region. I think 100% you should have a personal car, without it the construction is very, very difficult.
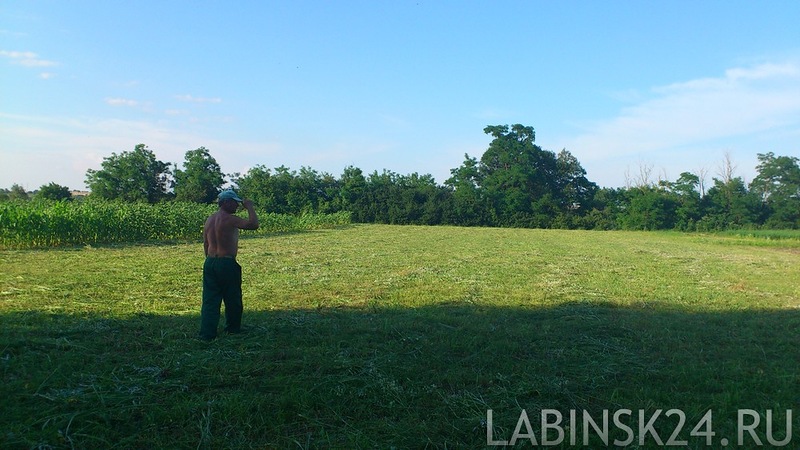
Stage 1. Choice of location.
The fact that next to the future site there should be a road, electricity, water, gas, a school, etc., everyone chooses for himself according to his needs. Our advice is not to aspire to a remote village at all, because. This:- greatly increases transport costs, and you won’t run into every construction small thing;
- strongly affects the electrical voltage, the more unpromising the village, the worse things are with electricity and gas;
- far more qualified medical and legal assistance;
- far grocery stores;
- far away, possibly rented housing during construction;
- less asphalt, and worse roads affect car repairs.
Stage 2. Site selection.
Now we can say with confidence which sites are preferable to choose.- Availability and depth drinking water in the ground if there is no pipeline and other source of water. Those. you need to take into account that you will have to make a well or dig a well, and if there is no water at all or the depth is more than 50 meters, it is expensive, and more than 100 meters is very expensive.
- The site, preferably moderately flat, is not the most important criterion, but it is more convenient and cheaper to build a foundation on such a site.
- Not flooded near a lying river, etc. You can ignore this, but it common problem near bodies of water and especially rivers. We know places where just houses in the lowlands without any rivers are flooded every 2-3 years from rain up to 50 cm with a layer of water. Not for long, but for 2-3 days, and for the house it is very bad.
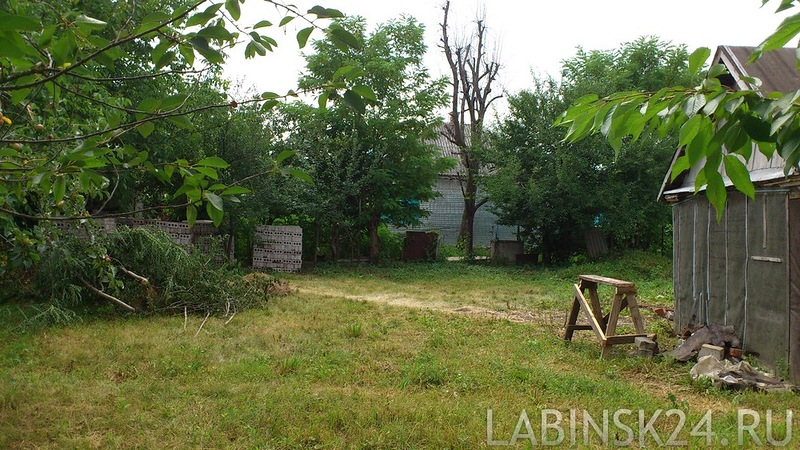
- Fewer buildings on the site. If the area with wooden house for demolition without a concrete foundation, and, for example, a brick foundation, then such a house can still be demolished, firewood and bricks can be distributed to neighbors for their pickup or you can keep the firewood yourself if you plan to do stove heating. The same applies to adobe houses. Clay can be taken to the end of the garden or fill up irregularities in the area, i.e. care must be taken to ensure that the cleanup of the site is not expensive.
- Trees and thickets are not particularly difficult, this is firewood and many neighbors from the village will dump them from you and take them away for free. Paid, it's also not very expensive.
Stage 3. House project and documentation (building permit).
To obtain a building permit and issue other documentation, it is better to hire a person, these services did not cost us much at all, a maximum of 10 thousand.We chose the project of the house ourselves and remade it for ourselves right on the computer without the involvement of professionals. Our advice, if you want affordable accommodation, then avoid the second floor, more than a gable roof, and a lot of windows. One standard window in the room, it seemed to us enough.
Our project ended up being a house with an attic, the construction of which can be continued in better times. The house was 7.5x7.5m in size and on the ground floor there were: a hall, a bedroom, a kitchen, a bathroom with a toilet and a corridor. WITH gable roof and only 4 windows on the first floor. Due to the attic, the roof turned out to be large, and this complicates the construction a little if only 2 people are building without special equipment, namely, it is difficult to assemble farms and then cover them with tiles, but perhaps we were able to do it.
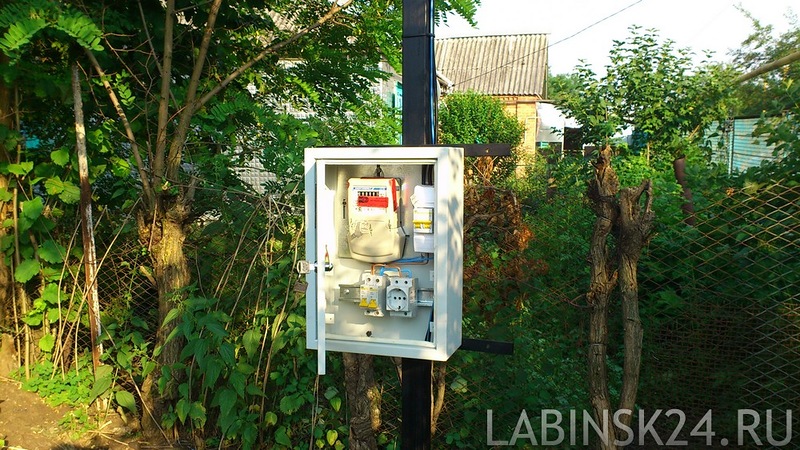
Stage 4. initial communications.
Electricity.The first thing to do, even before clearing the site, is to resolve the issue with electricity. Construction cannot proceed without it. We recommend bringing light to the area first. Those. put a pipe rack with a counter, socket and automatic machines. It's not all that expensive, and for a little extra money, the process is easily accelerated. That's exactly what we did. It’s a pity to leave a gasoline generator, it needs to be transported, refueled, it makes noise and costs the same as it would cost to bring light to the site, in our case, the light without any acquaintances was summed up within 5-7 thousand rubles, along with the payment of “thank you” to speed up the process. In terms of time, it all took about a month, i.e. you can get confused by this in early spring, when you have not yet begun construction, but the light can already be carried out.
If the light has already been brought to the site, then this is even better, you just have to invite electricians to transfer it all to the pipe rack.
Remember that if the light was connected, but cut off for some reason, be sure to connect it while the documents are drawn up for the old owners, it will be quick and not expensive. Then it will be problematic for you, as new owners, to connect the light, but it is possible for a fee.
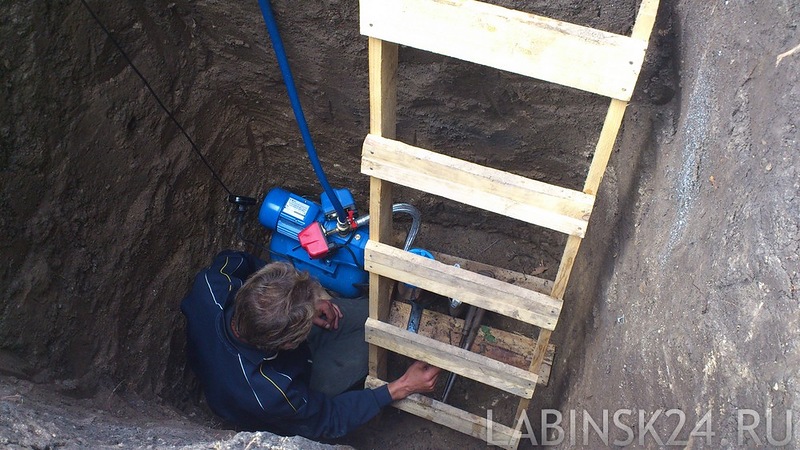
 Water.
It would be very nice to have water immediately on the site. We carried bottled water with us and made the well after the foundation had been poured. In principle, there are not so many difficulties from this, but it is much more pleasant with water. I'm glad that frame construction practically does not require water during construction. Therefore, while you do without water, you can not make a well. We wouldn't need it until the very beginning. internal works.
 Gas.
Gas.
If there is gas nearby, then you can carry it out at any stage. We spent it only at the beginning of interior work and finishing.
Remember that it is best to start conducting gas at the beginning of spring, then there is the least queue and by the end of summer everything can already be finished. And in the fall there are very long queues and you risk greatly stretching the process.
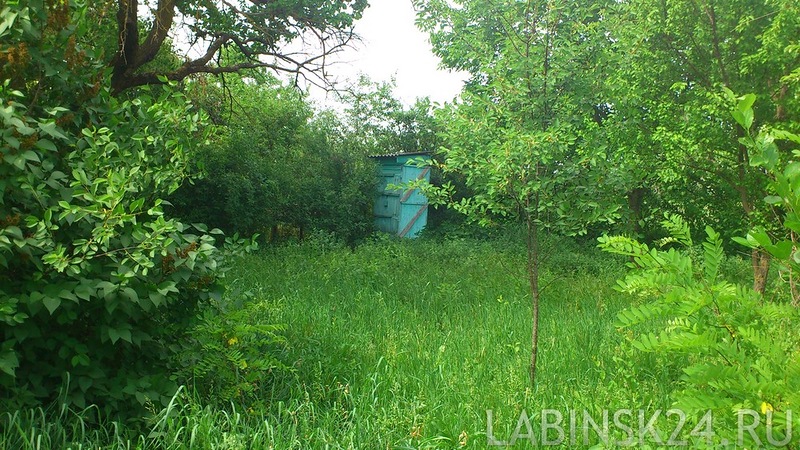
Stage 5 Tool storage and toilet.
You can carry power tools with you, as we did, but there is a construction wheelbarrow, shovels, etc. that will not fit into the car, for them you need to organize a room from boards or corrugated board with a lock. We had a barn in the yard that had to be demolished, but which served us as such a room until it was impossible to store everything in the house.And a lot of important "accessory" is a toilet. Without it, believe me, it is very difficult and I would even say it is not possible. You can also knock down a temporary toilet from the boards and dig a bigger hole for it. Not for nothing, there is such a phrase that "construction begins with a toilet."
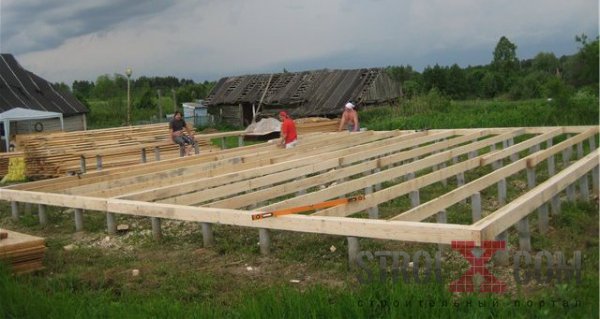
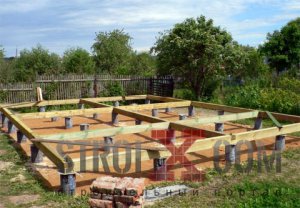
Stage 6 Foundation and pavement.
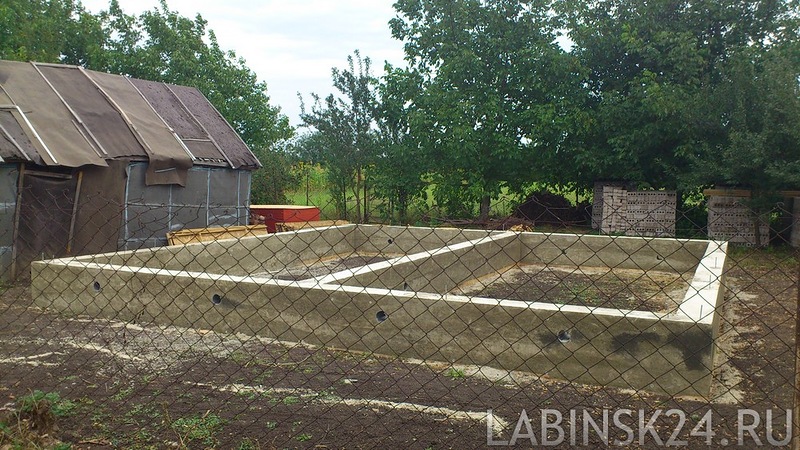
We poured the foundation low buried. You can make a pile, this technology is practiced now. For us, under the house 7.5x7.5m, the foundation with a concrete pump cost 30,000 rubles. Weeks 2 were spent on clearing the site, digging trenches and assembling formwork. The formwork was made from OSB, then the same materials were put into construction. Those. she was useless.Pipes for sewerage and water were brought out in advance under the foundation.
Our only shortcoming was that we did not immediately fill the blind area, but postponed it for later. We recommend that you take care of it right away so that nothing erodes your foundation, etc. 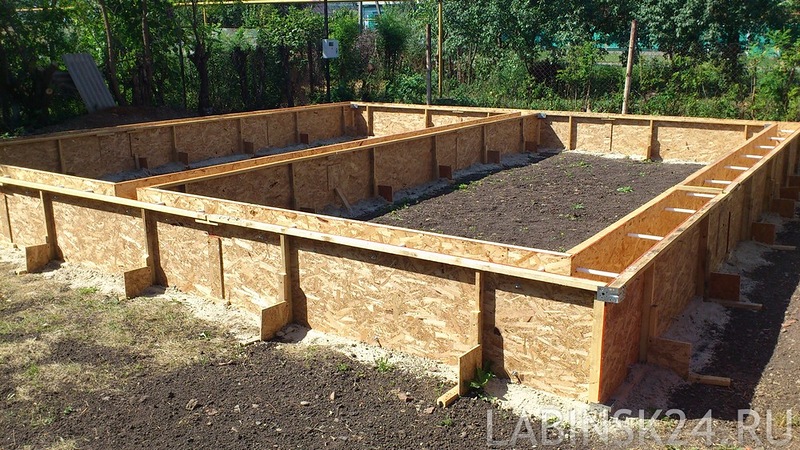
![]()
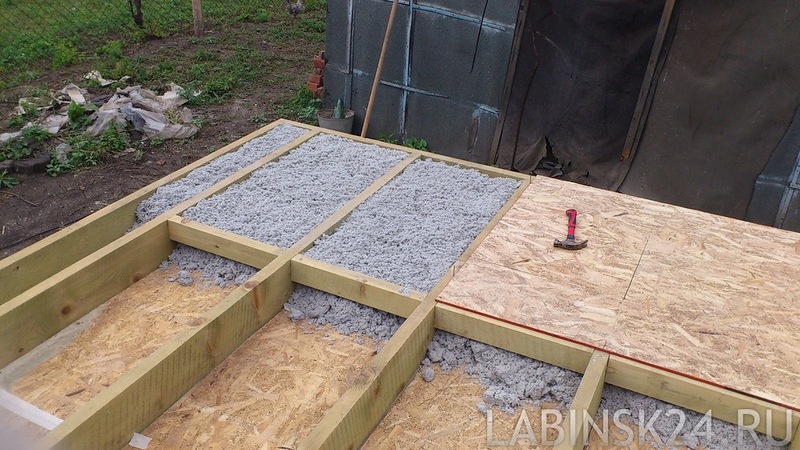
Stage 7. Floor.
Next, we made the floor of the frame house, immediately insulated it. It is better to use moisture-resistant plywood on the floor, but we laid 2 sheets of OSB, and the plywood was laid at all when the house was finished and altered to interior work.Be sure to cover the floor with a film at the end of the working day to protect the floor from rain, we did not do this and our OSB sheets lost their original strength and appearance. 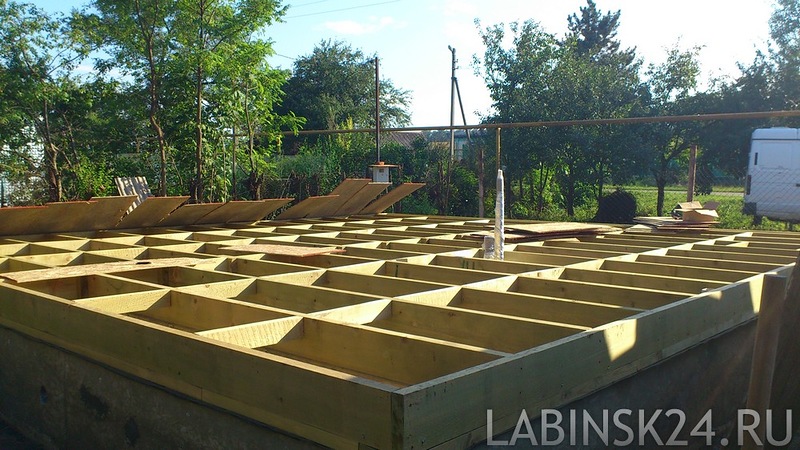


Stage 8. Walls.
The walls are rising according to technology, there is nothing special to describe here, because. the article is more about the stages, and not about the technology.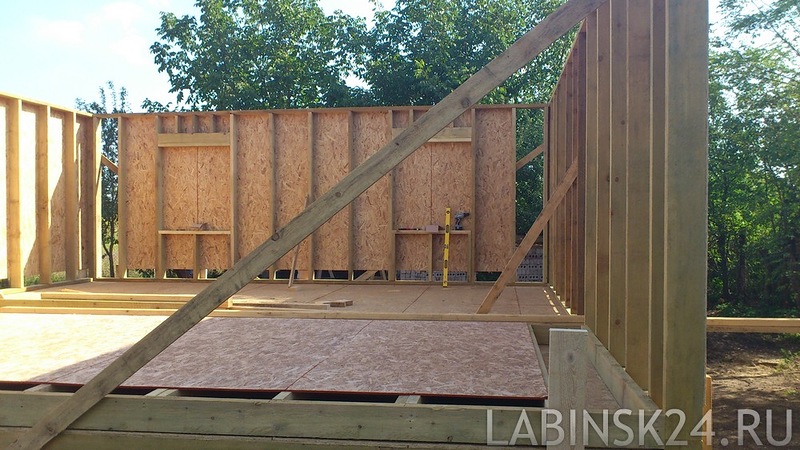

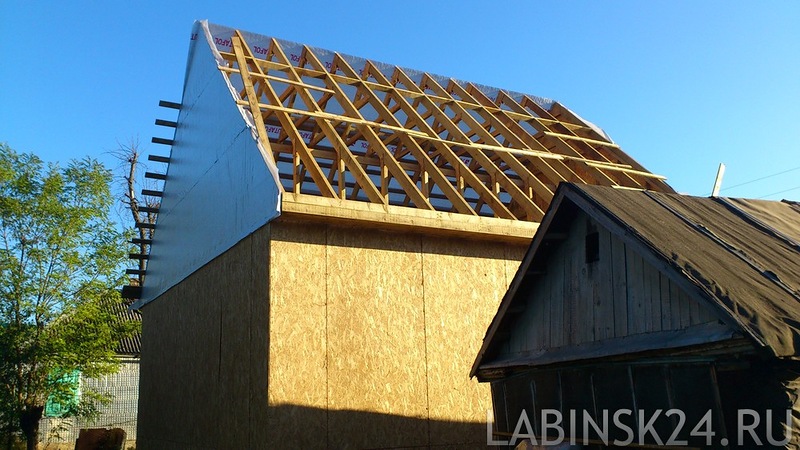
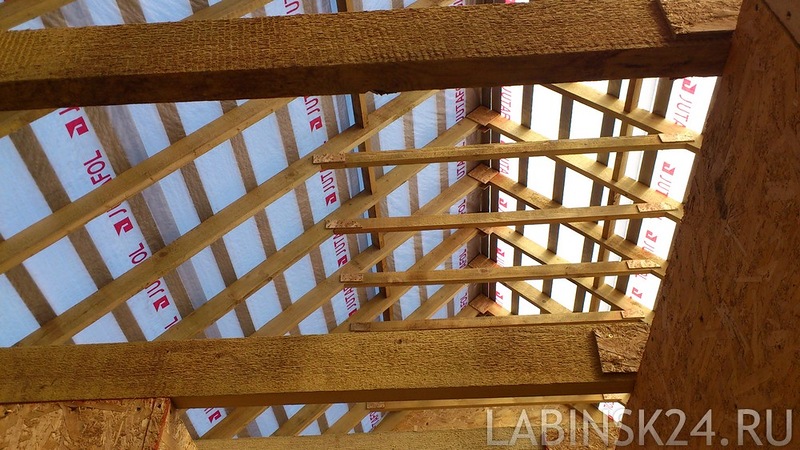
Stage 9 Farms and waterproofing under the roof.
The stage is quite difficult if the roof is planned to be large, as it was with us. Together we managed, in spite of everything, but it was difficult to assemble the trusses directly on the decks laid on the walls of the first floor, because. collecting them on the ground, and then lifting them to the top together was not realistic. But we install trusses, stretch the waterproofing and nail the crate. The house is protected from the rain.
10 stage. Roof.
We buy a metal tile, we bring and we make installation. We have an article on our site.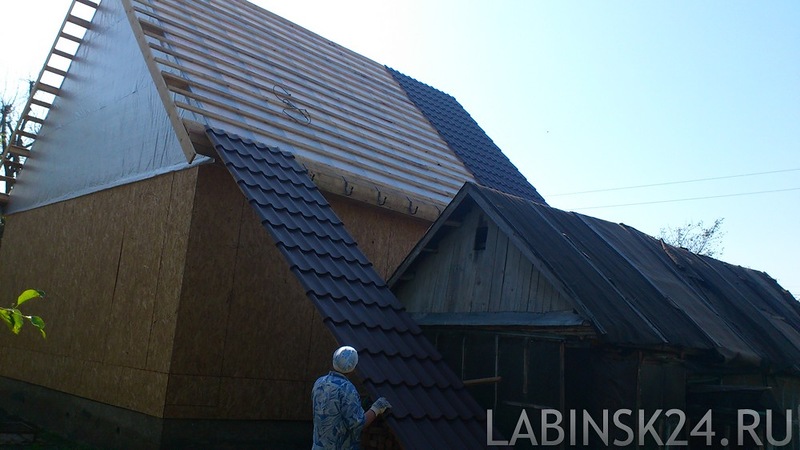
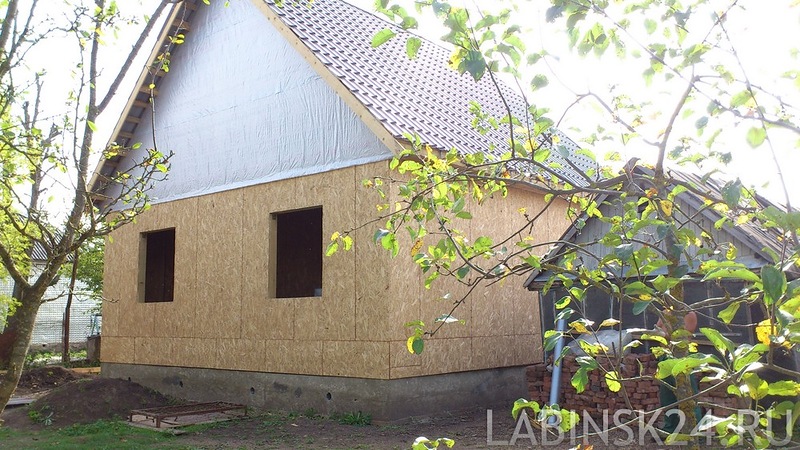

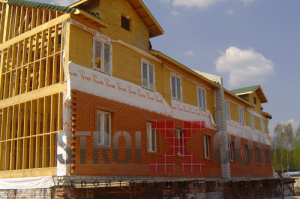
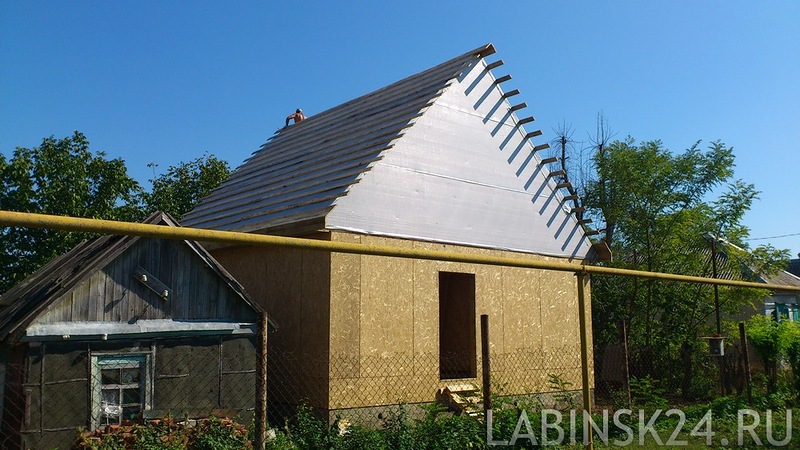
11 stage. Wrap with waterproofing under the siding.
In our case, there was not enough money for siding and it was decided to wrap the house in waterproofing, which is placed under the siding. It was waterproofing JUTAFOL so that the house is not left without protection in the winter.12 stage. Entrance door and plastic windows.
Here I think, too, it is not necessary to spread too much. Installation technologies are almost the same for everyone.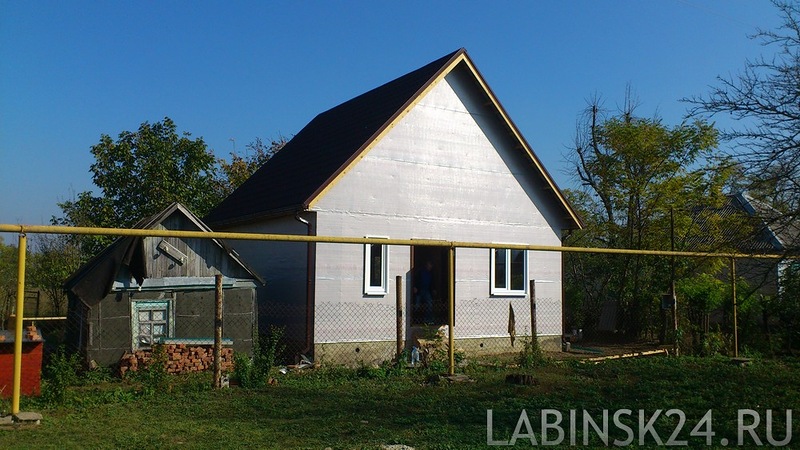
13 stage. Siding or exterior trim.
If you have enough money, it would be very good to immediately finish the house outside to protect it from rain.14 stage. House insulation with ecowool.
Next, we move on to the process of warming the house. Our website describes our cheap way to blow ecowool. This stage can already be done in a year or in autumn-spring, because. the rain will no longer be a hindrance. In this way we insulated the floor of the outer and inner walls, and the ceiling. It turned out, a kind of sealed box, which can already be heated and it will retain heat.Random stage. Purchase of materials.
Procurement of materials was carried out gradually, as needed. First, formwork boards and OSB for the whole house were bought. Further, after the foundation, boards for the whole house were purchased. And there, as we approached the stage, everything necessary for its implementation was bought. We treated all the boards with Senezh, do not miss this moment, treat the boards with a good agent, maybe even with liquid glass, it is cheaper and can be diluted with water for better absorption.

Conclusion and completion.
In principle, a frame house was built. Now you can move on to the interior design of the house. We continued construction the next year in early spring. They warmed up one room and spent the night in it, at that time they did the electrics, sheathed everything with plasterboard, laid plywood, installed water and heating, and made sewers, which you can also read about on our website. After that, it was possible to call in the house, which we did. It was easier to continue building this way. the house is already warm and there were all communications.In general, it turned out that the site was acquired in May 2012. Construction started in mid-June 2012 and the house was delivered with a roof, windows and a door in October 2012. There was no construction during the winter. In the early spring of 2013, the blowing of ecowool, the supply and installation of communications in the house, drywall and plywood were continued. And already at the end of May, we drove into the house for permanent residence and continued finishing. Those. in the house after exactly a year it is already possible to live and move out rented apartment, which we did. Of course, during the winter it was necessary to accumulate additional money, because. those same 400 thousand rubles. at the beginning of construction, they end up on siding or ecowool.
Tags: